This project was submitted by one of our readers, just like you.
Fantasy Chair Makeover

Fantasy Chair Makeover
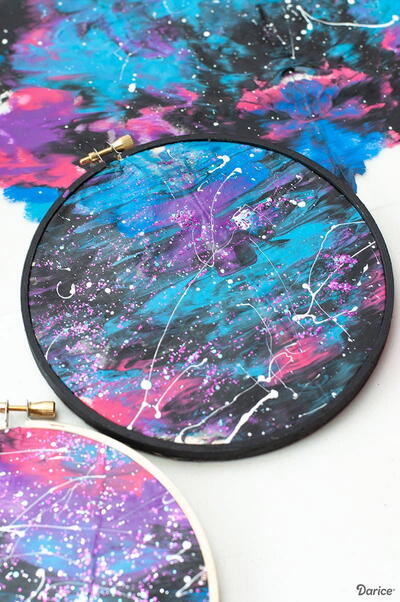
From the Designer: "Turn drab into fab with a little paint and a little imagination (ok and maybe just a little bit of elbow grease)! With this tutorial, you can turn any old, ugly, worn out or boring chair into a fabulous designer decorator piece for your home! And who knows you may have so much fun doing this project you might just turn into a do it yourself painting guru!What are you waiting for? Grab your supplies!"
Primary TechniquePainting

Project TypeMake a Project
Materials List
-
Chair
-
Sandpaper
- Modge Podge Extreme Glitter- Plaid
- Testors Intense Glitter Paint
-
Various colors of wood stain – Unicorn Spit
- An old hotel key card
-
Folk Art Home Décor Chalk Paint- Plaid
-
Folk Art Home Décor wax sealer
High Gloss Polyurethane
-
High Gloss Polyurethane
Instructions
-
First you must clean your chair then sand down any varnish or gloss coating that the chair might have had at one time.
-
Use a heavy grit sandpaper to smooth out any dents scratches or remove a layer of stain. Use a damp clean cloth to wipe up any dust.
-
Use paint or stain to make strips onto the places where you want multicolor. (I used the seat and the backing of the chair.) Take an old hotel key card and wipe the stain in one direction, preferably the same direction of the woodgrain. Have a paper towel handy to wipe off that card with any excess stain.
-
Paint the legs and the edges of the chair with chalk paint, you may have to use two or three coats.
-
You can seal it with a wax sealer on those edges and legs to maintain that chalk look but protect from spills.
-
On top of the multi colored areas are used a little bit of Modge podge glitter and some areas and Testors Intense Glitter Brilliance- the Modge Podge glitter is larger while the Testors is more fine . Allow to dry completely. Either product can be used as a sealant, I wanted to have areas with glitter and without so I used high gloss Polyurethane to cover those multi-colored areas. (Polyurethane won’t become yellow in time.)

Read NextToco Toucan