Distressed Wicker Side Chest
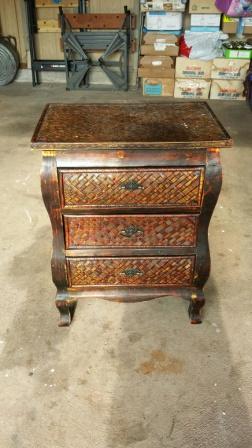
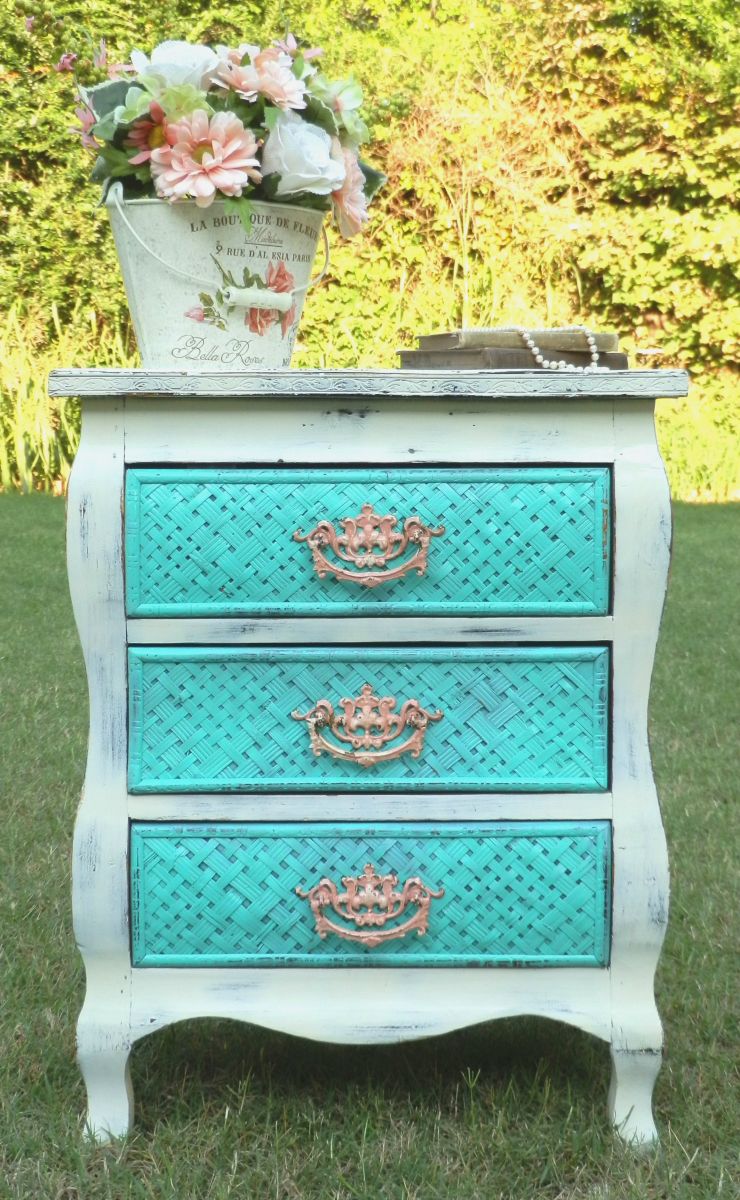
Learn how to distress paint furniture and save yourself time, money and trips to the store. This Distressed Wicker Side Chest is perfect for beginners but looks super sophisticated. Use paint and sandpaper to create a unique look. In just two or three hours, you can start and complete this DIY painted furniture project. People will want to know where you found such a cool and unique piece of furniture. Don't tell them you worked on this project at home - see if they can figure it out for themselves. No matter what, everyone will be impressed by the cool colors and unexpected design. A friend of mine was selling this little wicker chest for $7. Two of the handles were broken, and she just needed to get rid of it. I loved the shape of it, and so I brought her home hoping to do my first furniture refinishing project. It took me a long time to decide upon the colors, but I love the results! I had a very difficult time finding new drawer pulls, so I turned to Ebay. I loved the coral/ivory color with the gold distressing, so I just sealed them with the clear gloss. I had considered refinishing it and selling it, but I love it so much that I think I will remodel my guest room to match it!
Primary TechniquePainting

Materials:
- Krylon ColorMaster Ivory Satin
- Krylon ColorMaster Sea Glass Satin
- Krylon ColorMaster Non-Yellowing Clear Gloss
- Sheet of fine sandpaper
- Set of three drawer pulls/handles
- Drill and drill bit
- Screwdriver
- Newspaper
Instructions:
- Cover entire work surface with newspaper before beginning project. Using screwdriver, carefully remove handles. Separate drawers from main body. Using warm soapy water, clean entire surface of chest and drawers. Allow surface to dry.
- Using Krylon ColorMaster Ivory Satin spray paint, spray entire body of chest using even coats to cover. Set aside to dry.
- Using Krylon ColorMaster Sea Green spray paint, spray front and sides of each drawer in even coats. Set aside to dry.
- Once completely dry, use sandpaper to "distress" the body and drawer fronts by gently rubbing the surface focusing on corners, edges, and areas wherein natural distressing would occur. Use Krylon ColorMaster Non-yellowing Clear Gloss to seal the entire body and drawer fronts.
- Prepare handles (paint or seal, if desired). I used Krylon ColorMaster Non-yellowing Clear Gloss to seal the paint already on the handles. Using drill and drill bit, carefully drill holes for handles. (If original handles are used, this may be unnecessary) Replace pulls/handles.

You can find this project, as well as many more, in our new eBook, Make it Yours®: How to Spray Paint Furniture, Home Decor Projects, Holiday Crafts and More from Krylon®! Download your own free copy today!
Read NextToco Toucan
Your Recently Viewed Projects


Thanks for your comment. Don't forget to share!
faeriequeen2002 56 43277
Oct 01, 2014
Actually it looked much nicer before! With a little loving care, coat of varnish and new handles it would have been fine.
Report Inappropriate Comment
Are you sure you would like to report this comment? It will be flagged for our moderators to take action.
Thank you for taking the time to improve the content on our site.