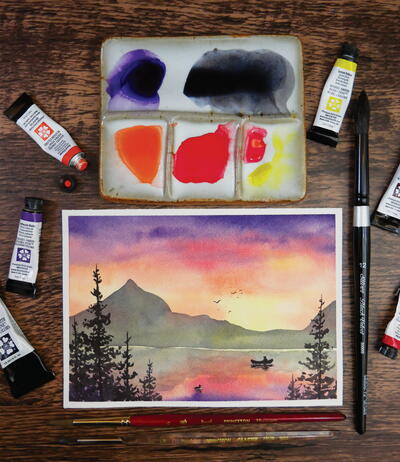
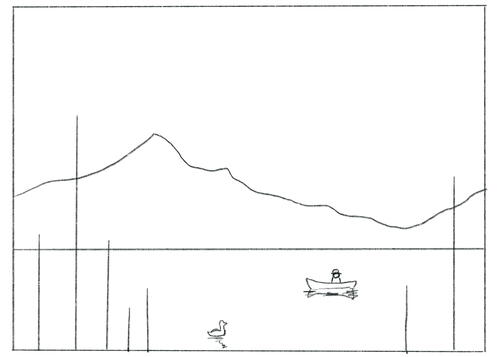
Canoe Lake Sunset

The sun has dipped below the mountains, saying goodbye for the last time that day, leaving behind bright warm tones—one last hurrah before the darkness of night takes over. A lone canoe sits out on the lake’s nearly still water, but a small loon paddles out from the lake’s edge to join the boat in the last few minutes of the sun’s brilliant light. In this painting, you will learn how to paint a lake that reflects the sky above.
Materials List
-
Paints:
- lemon yellow
- pyrrol orange
- pyrrol red
- carbazole violet
- Neutral Gray
- Brushes: sizes 12, 6 and 2 round
- Paper: 5 x 7–inch (13 x 18–cm) cold-pressed watercolor paper
- Painter’s tape (or washi tape)
- Paper towels (or a rag)
- Pencil and kneaded eraser
- Ruler
- White gel pen
INSTRUCTIONS:
-
THE SKETCH
Grab your ruler and draw a horizon line one-third of the way up the paper from the bottom. This will be the lake. Next, lightly sketch in your distant mountains, and use a ruler to sketch out where your foreground pine trees will be. I placed some pines in the left- and right-hand corners of the paper. On the right side of the lake, roughly sketch out the shape of a canoe with one man inside. You don’t need details here, just the basic shape of the canoe, which is sort of like a banana with a flat bottom. Since the lake will be flat and calm, there will be a reflection of the canoe in the water, so sketch out a few lines directly below the canoe to depict this. -
THE SUNSET SKY (LAYER 1)
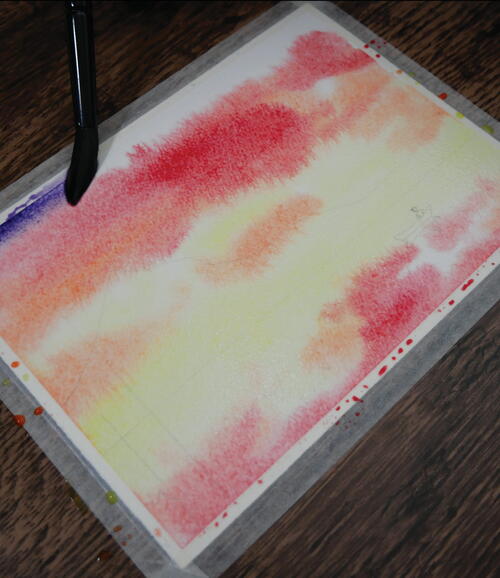
For this piece, we’ll be painting with loose strokes of color in a sort of uneven gradient. This time, however, we have the sky’s reflection on the lake, so we’ll need to replicate those colors there.
So, start out by wetting the entire sheet of paper with clean water using your size 12 round brush. Then, load up your brush with medium-value lemon yellow, and begin applying paint to the paper in long, horizontal strokes. You’ll need to paint this lemon yellow color above and below your horizon line, indicating that the color will be both in the sky and on the water. Essentially, we’re going to paint a very loose “mirror image” of whatever we paint in the sky.
Next, load up your brush with medium-value pyrrol orange, and paint above and below the lemon yellow, adding some of the orange color within the yellow section to create some wispy, soft clouds. Repeat the same process with medium-value pyrrol red, leaving a small section of white at the top of the paper for our final color. Lastly, clean off your brush, and then load it with dark-value carbazole violet. Paint in the carbazole violet at the top of the paper and then at the bottom of the paper.
Let this layer dry completely, as we’ll be painting in a second layer to build up our colors momentarily. -
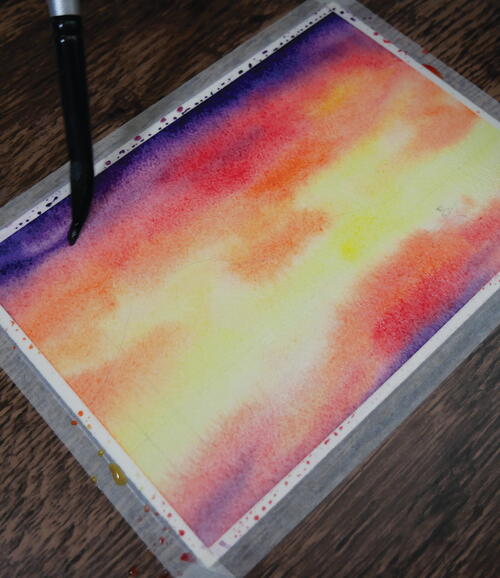
STEP 3: THE SUNSET SKY (LAYER 2)
Once your first layer is dry, go ahead and rewet the entire paper again with clean water, starting from the lemon yellow section and working outward. If you added clean water from the top to the bottom of the paper, for example, the purple pigment may travel downward and end up mixing with the lemon yellow, muddying the bright, vibrant colors we’re looking to achieve.
After you’ve rewet your paper, repeat the same process: adding in darker values of lemon yellow, pyrrol orange, pyrrol red and, finally, carbazole violet. Paint in these colors with loose strokes, letting the analogous colors naturally mix and blend on the wet page. When you’re satisfied, let your paints dry completely, reevaluate the saturation of your colors and, if necessary, repeat the same steps again to build up your painting to your desired vibrancy. -
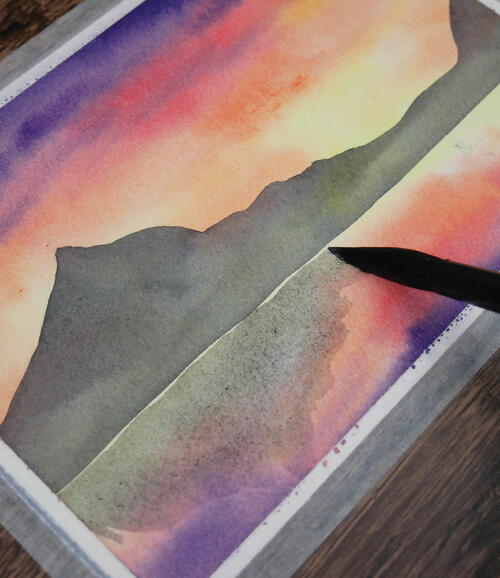
STEP 4: THE MOUNTAIN & REFLECTION
The mountain in this painting will also be a simple silhouette. Since the sun has dipped below the horizon, there is no light to shine on the details in the distance, hence why we’re painting a silhouette.
So, load up your size 12 round brush with medium value Neutral Gray, and fill in the pencil sketch of the distant mountain range. Let dry and then use a light-value Neutral Gray to paint a reflection of the mountains in the lake. This reflection doesn’t need to be perfect, but it should roughly mirror the shape and height of the mountains above it. In fact, as you can see in my painting, the tops of the mountains look rather undefined in their reflections. Giving the reflection this rough edge makes it look as though the water has a slight ripple, warping the reflection of the mountains.
Additionally, for reflections on water, leave a small line unpainted in between your mountains and their reflection. This slight separation helps the viewer of your painting identify where your mountains begin and where the reflection begins.
Let dry. -
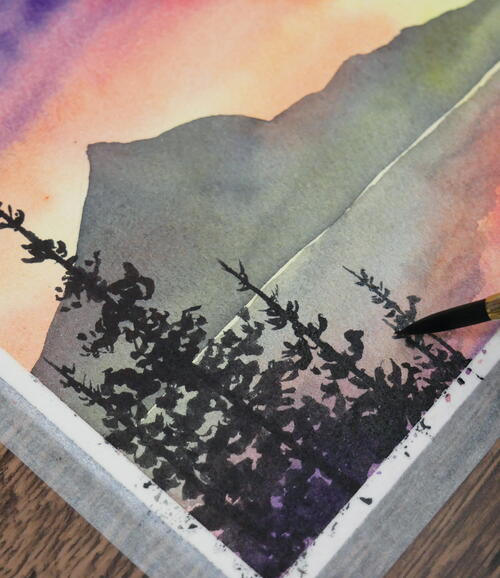
STEP 5: THE PINE TREES, CANOE, FLYING BIRDS & LOON
Time to add in foreground elements to bring magic to our painting!
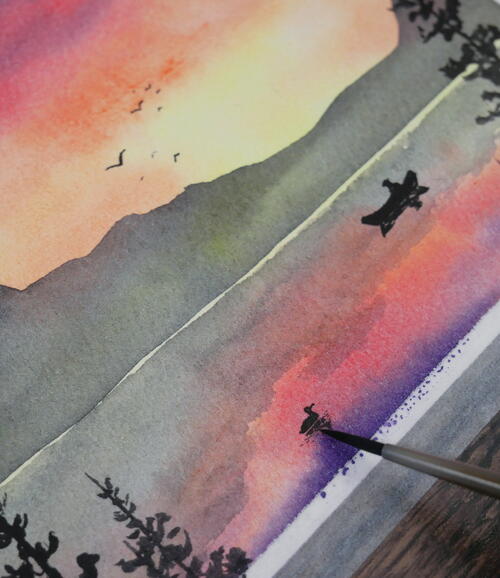
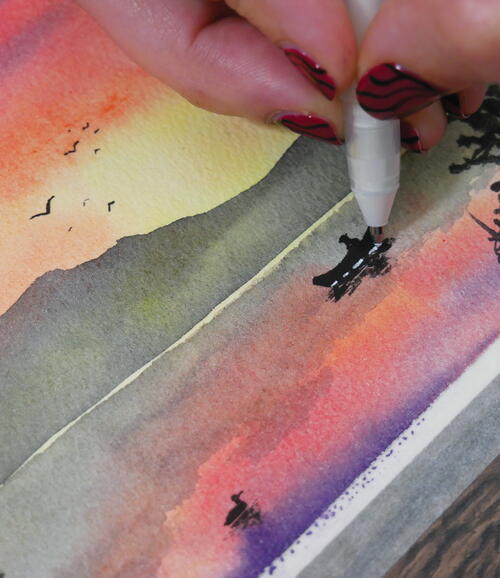
Using the blobby technique and a size 6 round brush, paint in pine trees with dark-value Neutral Gray. The pines should be of various shapes and sizes in the bottom left- and right-hand corners of your painting. Painting pines on both sides of the paper helps to frame your main subjects, the lone canoe and loon.
Switch to your size 2 round brush, and load it up with dark-value Neutral Gray. In order to paint small details like this one, make sure your brush is well loaded but not dripping with paint. If your paintbrush is loaded with too much moisture, it will be difficult to paint precise lines. Following your sketch beneath, paint in the canoe and its lone passenger, as well as a rough reflection directly beneath. In the canoe’s reflection, you don’t have to fill it in entirely with paint. Leaving some small unpainted spaces adds to the illusion of a reflection, making it look as though the water is rippling.
After your canoe, paint in a flock of birds high in the sky, above the mountain range silhouette. Vary the shapes and sizes of the birds so it looks like some are closer and some are farther away.
Lastly, let’s add in our loon. The best way to describe the shape of the loon is this: a silhouette of an apple pie, with a head and beak attached. As always, if you’re unsure of how to approach painting something, try it out on a scrap sheet first before adding it to your painting. I do this all the time, and it takes away the stress of having to “get it right” the first time. Once you’ve painted your loon, use the dry-brushing technique to add in some rippling reflections beneath the loon. I also went back and added some dry brushing to the reflection of the canoe as well.
For some final touches, pick up your white gel pen, and add a few broken lines/dots where the bottom of the canoe and the loon would touch the lake. This helps to break up the subject and reflection.
Credit:
Reprinted with permission from Stunning Watercolor Skies by Rachael Mae Moyles. Page Street Publishing Co. 2023. Photo credit: Rachael Mae Moyles.
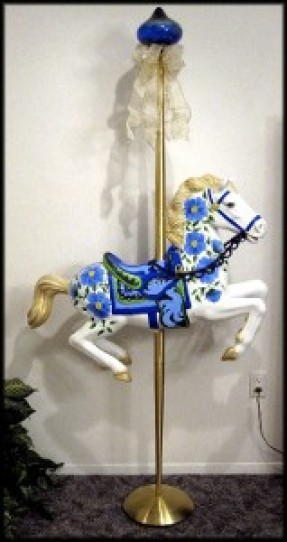
Read NextWonderfully Whimsical Carousel Horse