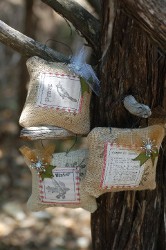
Balsam Sachet Ornaments
Looking for a completely unique Christmas ornament craft? Make Balsam Sachet Ornaments from Melony Bradley! This is a fantastic craft that isn't difficult to make.
Materials:
- Cardstock square
- Burlap
- Fusible webbing sheet
- Red ticking
- Muslin
- Stamp
- Pigment ink
- Scissors
- Sewing machine
- Used dryer sheet
- Balsam
- Polyfil stuffing
- Brad
- Wire
Instructions:
-
Use a 6" cardstock square as a template to trace and cut out two pieces of burlap for the sachet.
-
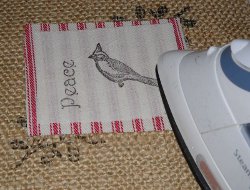
Cut a 9 x 12 fusible webbing sheet in half. I like to use Lite Steam a Seam by The Warm Co. Fuse the sheet halves to red ticking and muslin, making sure fabrics are wrinkle free. Remember to turn off your steam function on your iron when fusing. Always leave a slight border around the fabrics to make sure the fusible webbing does not stick to your ironing board.
-
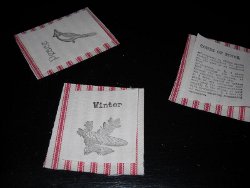
Now comes the fabric stamping part. Choose stamps you wish to use and use pigment ink to stamp on the fused muslin. You can also use a specially formulated ink for fabric. Pigment ink, heat set with the iron on a low setting works just as well.
-
Stamp the burlap with a background image of your choice that will show up well such a florals or swirls. Burlap does not show the stamped images as well as the muslin, so the images need to be bold.

-
Now cut out the stamped muslin motifs, leaving an 1/4 around the edges for stitching. Cut a fused red ticking piece, approx 1/4- 3/8 larger than the stamped motif.
-
Center the pieces on the stamped burlap square that will be the front piece of the sachet and fuse with an iron. (if your pieces seem uneven, don't fret, I find that uneven edges only add to the country charm!)
-
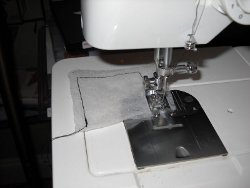
Get out your sewing machine. Straight stitch the edges of the ticking and muslin border with a dark colored thread for contrast. if you don't want contrast, use a light color to match the muslin.
-
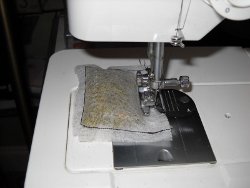
Now is a good time to create your dryer sheet sachet. You will need one used dryer sheet cut to two pieces of 3 1/2" squares. After you straight stitch the muslin and ticking edges, straight stitch three sides of the dryer sheet together.
-
Fill the sachet with a small hand full of balsam. Straight stitch the top opening closed to secure. (Note- if you are not comfortable machine stitching with the balsam inside the sachet, hand stitch. When machine stitching, make sure you do not overstuff the sachet. You don't want to end up with balsam inside your machine parts!)
-
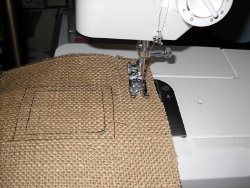
Place the two burlap squares together. Machine stitch together about 1/2 from the edges (seam allowance.) Start at the bottom left edges and stitch left, top and right side together but leave the bottom open for turning and stuffing. Steam the seams open on all four sides.
-
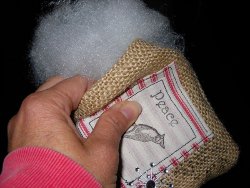
Turn the right sides out. If needed, use a blunt object to push out corners. From the bottom opening, stuff the sachet with the balsam sachet and a small amount (golf ball sized) of polyfil stuffing. If you are using a brad to embellish as I did, go ahead and insert the brad while the bottom is opening to make it easier. As an option, you can sew on a button embellishment later. Whipstich the bottom opening closed.
- Finally, insert a piece of wire for the hanger, inserting the ends into the balsam at the top and bending to make secure. Tie on a bit of tulle and you are finished!
Read NextPurple Plaid Angel Ornaments