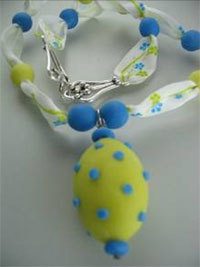
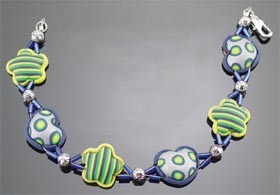
Porcelain Bead Necklace
These bumpy porcelain beads are thread onto ribbon in a complimentary color for a stylish necklace.

Materials:
- 18 inches of satin ribbon ½ inch wide
- 1 tub Soft Yellow Craft Porcelain
- 1 tub Soft Blue Craft Porcelain
- 24 gauge silver wire
- 1 small silver jump ring
- 1 bead clasp with large holes in the ends
Tools:
- Tri Bead roller
- Bead Roller Set 6
- Bead Baking Rack/Cane Slicer
- Fabric adhesive
- Fabric stiffener - Stiffen Stuff or similar (optional)
- Small drinking straw (approx 1/8 in diameter)
- White PVA glue
- Small flat sealed tile (to use as work surface)
Steps:
- Condition the porcelain clay (see How to Condition Porcelain Clay below). Using the tri bead roller, make four yellow round porcelain beads and six round blue porcelain beads. Use the small drinking straw, or a similar object, poke a hole through each bead. The drinking straw works well as it cuts a core of clay out of the bead without deforming it.
If you do not have a straw, dry the beads now and drill a large hole in each using a hand drill later on.
- Using the Set 6 focal bead roller make one large yellow porcelain bead. Make a hole through it using a piercing pin from the bead rolling kit.
Divide a small pea size piece of blue porcelain in two, roll both pieces into small balls and add one to each end of the yellow bead adhering with a small dot of PVA glue.
Take a second pea size piece of blue porcelain clay and press it flat on a tile so it is approximately 1/16 inch thick. Use your straw or other small circular hollow shape, punch a series of small circles from the blue porcelain. Adhere them to the surface of the yellow bead with a small dot of PVA glue. If you make small impressions in the yellow bead first, the blue dots are easier to adhere.
Set all beads aside to dry.
- To assemble, cut one end of the ribbon at a sharp angle so you have a triangular point. Use this point to thread the ribbon through the large holes in the yellow and blue beads and through the pieces of the clasp. Thread the ribbon in this order:
One half of clasp, blue bead, yellow bead, blue bead, yellow bead, blue bead, blue bead, yellow bead, blue bead, yellow bead, blue bead, second half of clasp.
Cut both ends of the ribbon straight across. Using fabric adhesive, adhere one end of the ribbon to itself to hold the clasp in place. Allow to dry. Check the ribbon for length and trim it, if required. Using fabric adhesive, glue the end of the ribbon.
- Push a 6 inch length of wire through the large yellow bead. Bend the wire over as it comes out the yellow bead, trim to 1/16 of an inch and then flatten the bent wire against the bottom of the bead. The wire should be secure enough inside the bead that a simple bend in the wire will hold it in place.
At the top of the bead make a small loop and trim excess wire. Open the jump ring, loop it onto the ribbon between the two blue beads and hang the focal bead from the jump ring. Close the jump ring and, if desired, apply a small amount of glue to seal it closed.
Arrange the blue and yellow beads evenly along the ribbon nestling the two middle blue beads up against the jump ring.
If desired, mask the beads with small pieces of paper and spray a small amount of Stiffen Stuff or other fabric stiffener to the ribbon so it holds its shape.
Read NextAngel Charm