This project was submitted by one of our readers, just like you.
DIY Pearl Bracelets in 2 Ways

DIY Pearl Bracelets in 2 Ways
"Simple bracelets are always my choice but it is hard to find those in shops. I thought why not make our own and came up with these ideas."
Project TypeMake a Project
Bead TypePearl
Time to CompleteUnder an hour
Bead Technique UsedStrung
Bead Project TypeBracelet

Materials List
-
For big pearl bracelet:
A big pearl bead
- Two small silver bead of your choice
- One eye pin
- Leather cord of your color choice
- Two End caps
- Small jump rings -3
- Pliers
- E 6000
- Scissors
-
For half and half Pearl & chain Bracelet:
chain of your desired choice - 3" to 5" inch - Pliers
- Scissors
- E 6000
- Any silver beads of your choice (Optional)
- Pearl beads
- Elastic cord - 0.5mm
Instructions
-
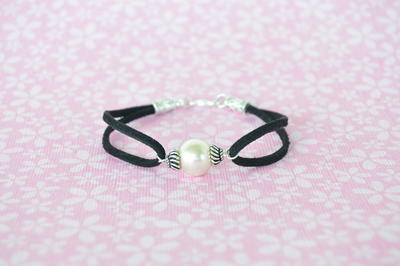
Take the eye pin and string a small silver bead, a big pearl bead and then a small silver bead. This small silver beads are totally optional. I thought a big pearl bead alone would look very plain, in order to give some character to the center of the bracelet I chose to add the silver beads on both sides.
-
Use pliers to cut the extra wire and make a loop.Make sure the loop is large enough to prevent the bead from falling out. Also make sure that the loop you make is in the same direction of the loop that is already in the eye pin.
-
Measure two leather cords of each 6" inch long. ( For 7.5" bracelet) This length may vary depending on the size of the bracelet you are making. Make sure you take into account the end cap loop, lobster clasp length and center pearl bead length before you measure and cut the leather cord. Now string a jump ring through the leather cord and bring it to the center. Repeat the same with the other cord. Use pliers to open the jump ring and attach it to the center pearl bead loop.
-
Add a drop of glue (E 6000) into the end caps and push the ends of the leather cord inside the end cap. Allow it to dry for 24 hours or as said in the package of glue. Use another jump ring and pliers to add lobster clasp to one of the end cap and you're done!
-
For Half and Half pearl & chain bracelet: Cut the chain, half of your bracelet length. I made this as 6" inch bracelet so I cut the chain as 3" inch length.
-
String pearl beads and silver beads as desired using the elastic cord. I used three pearl beads and one silver bead and repeated the same four times to get 3" inch length of strung beads.
-
Knot the strung beads on to the ends of the chain each side. You will need three knots to secure them. Cut the extra cord and add a drop of glue on the knots to secure them. Once it is dry , you're done. How simple was that?

Read NextFashion Ribbon Medals
Your Recently Viewed Projects
Thanks for your comment. Don't forget to share!
mulberrygalprinces s
Jul 28, 2016
This Pearl bracelet turned out to be the winner of the summe. It's so easy, fun, fast and cute. Not just for pearls but and pretty large bead that you want to make the focal point of the band. We used some pretty buttons too. Thank you for sharing this great idea.
mulberrygalprinces s
Jun 13, 2016
I can tell my grand daughter and I will be making bracelets this summer. She loves to look thru my bead box and come up with a bracelet for both of us. This is very easy for her to try. I also macrame so I can make up the cord part for her too. Thanks or sharing.
Report Inappropriate Comment
Are you sure you would like to report this comment? It will be flagged for our moderators to take action.
Thank you for taking the time to improve the content on our site.