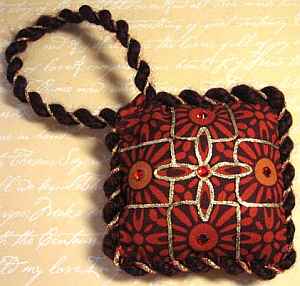
Art Nouveau Ornament
Want to give a hip and trendy hostess gift when you go to parties this season? Make something handmade - but use fun and funky fabrics and of course Kreinik metallic threads for the bling. This project uses the Kreinik Custom Corder to make the trim. You'll have so much fun with this tool, you may start making holiday jewelry too!
Materials:
- Beatnik Daisy fabric, Michael Miller (C3182_Wine)
- Kreinik Metallic: #16 Braid 027 Orange and 202HL Aztec Gold High Lustre
- Burgundy yarn (Lion brand Wool-Ease Thick & Quick)
- Kreinik Iron-On Thread 6230 Burnished Gold
- Kandi Crystals 5mm Hyacinth (available from Kreinik)
- Burgundy sewing thread
- Fiberfill or other stuffing
- Kreinik Custom Corder
- Home iron or mini iron
- Kreinik teflon press cloth
- Scissors, sewing needle, optional- sewing machine
Steps:
Turn your iron on to the highest heat setting and let it heat thoroughly.
- Cut out your fabric first. You will need two 4" squares. Place one on top of the other, with right sides facing inward. Using either your needle and thread or a sewing machine and stitch around the outside of your fabric, leaving a 1/2" seam and leaving a 1/2" to 1" gap in one corner.
- Turn your fabric inside out, through the gap you left. Use a pencil or chopstick to push out the corners. Begin embellishing your design using the Iron-on thread and crystals. (Lay the thread at a starting point, cover with the Teflon Press Cloth, and press for several seconds until the thread adheres.) Follow your fabric's pattern or make up your own design. When finished, fill your ornament with fiberfill until it's the right firmness for you. Set aside.
- Make your cord using the instructions included with the Custom Corder. To start, cut one 96" length of Burgundy yarn and one 48" length each of Orange and Aztec Gold Braid. Tie your orange and gold braids together at each end, then loop your yarn through them and tie the ends together. Follow the instructions that come with the corder to make your cord.
- When your cord is finished, insert one end into the open corner in your ornament. Using needle and thread, begin sewing the cord along the seam of the ornament, either sewing through the center of the cord or looping around it in the same direction as the twist. (Sew through the ends of your iron-on thread as you go if possible, for added security.) When you get around to the open corner again, make a loop and insert the other end of your cord in the hole. Fold the fabric over the bottom of your loop and sew across to seal the corner and hold your cord in place. Tie off your thread and sew through the seam to hide the ends.
Kreinik threads available through needlework stores or www.kreinik.com.
Read NextEggshell Mosaic DIY Picture Frame