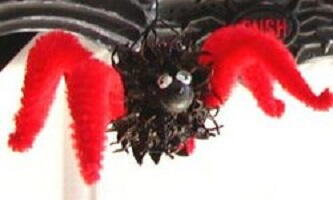
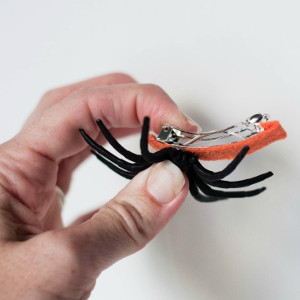
Six Legged Gum Ball Spider
Make a six legged spider for your Halloween party. This is perfect for a school craft or fun for the whole family. Scare your friends by hanging this guy from the ceiling.
From the designer: Okay, I know spiders have 8 legs. The first time I made them I didn’t, I found out after I had made about 3 or 4 dozen of them. The children I gave them to didn’t notice until someone was nice enough to point it out. So I just told them that my spiders were not the dangerous kind because they only had 6 legs. They bought it and I have been making 6 legged spiders for about 35 years. They make great Halloween favors and decorations. I made them one year for prizes at the school Halloween Carnival.

Materials:
- Small Acorns (Pent Oak acorns are the right size)
- Sweet Gum Balls (from a Sweet Gum Tree)
- Bumpy Chenille Stems (color of your choice for the legs)
- Black Paint
- Small Round Elastic
- Rolly Eyes (4 mm paste on)
- Glue that dries clear (Elmer’s works well)
- (small jewelry tools work best)
- Wire cutters
- Needle Nose Pliers (thin, sharp, straight )
- Scissors (sharp, small point)
- Egg cartons (empty)
Steps:
- Take each gum ball, cut the stem off and place it in the egg carton stem up. Remove the cap or top from the acorn. Put a dollop of glue on stem nub of the gum ball. Place the round end down of the acorn (end you took off cap) into the glue dollop. Press firmly onto the gum ball. Allow to dry at least 24 hours.
- Take the 18 inch piece of round elastic and tie it tightly around the center of the gun ball making sure the head is at the middle of the side. Stretch the elastic so it fits snug, tie in a knot and clip off end if needed. Dip each spider into the paint so that the knot is covered. When the paint is dry the knot is secure. Hang the spiders in a very warm dry, area for at least 24 hours. Be sure to put plenty of paper or a drop cloth under them to catch the paint drips. Select a place that they may stay with out moving them until they are dry. A small fan to keep the air moving is a good idea.
- If you are going to put your spiders on a plastic stick or dowel you could tie them on before dipping and place them in a container or secure the sticks in Styrofoam to dry. Just be sure they don’t fall over or touch anything before they dry.
- You may make the elastic as long as you wish, but I found that 18 inches works well. You can add on later if needed.
Legs
- Cut the bumpy chenille stem into 4 equal parts. The big fussy part is the main part of the leg. Take the needle nose pliers and make a small curl in one end of the stem. Dip the straight end into the glue and insert into one gum ball hole on the side even with the head, spacing the 3 legs evenly on each side. Shape the stem with your fingers until they curve down and form spider like legs with the small curled end as the foot. Allow glue to dry. Your spiders should stand without any trouble now. Being very careful not to disturb the legs, you should be able to put on the eyes so the eyes and legs can dry at the same time. I usually cut and curl all my chenille stems before I glue them on my spiders. You can do this while watching TV.
Eyes
- Using small amount of glue, put a dot on each side of the acorn head and press eye firmly down into the glue dot holding one finger under the acorn. Do not put pressure on the legs. Allow glue to dry.
- I like to sit them on something or hang them on a web, but I have seen spiders similar to my 6 legged ones on sticks or dowels. I would recommend that the sticks be made of plastic for safety or maybe some sort of green twig if we want to be environmentally correct.
This could make a fun project for a Girl Scout or Boy Scout troop. They could be sold to make money for the troop or to donate the money to a worthy cause. They could pick up the gum balls and the acorns on a camping trip. You could let the troop do as much of the assembly as they were old enough to do. It is also a fun project for a family.