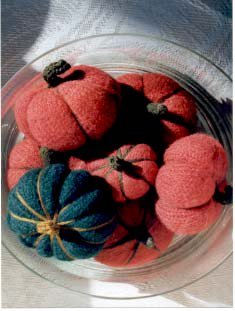
Round Felted Pumpkins
Wool yarn makes these felted pumpkins a great decoration for the Halloween and Autumn season. In a few easy steps you can have these pumpkins decorate your home from head to toe.

Materials:
For each pumpkin, you will need:
- 30yd/27m, worsted weight wool yarn (MC)
- Lengths of worsted weight yarn for “furrows” and stem
- One pair needles and one pair double-pointed needles, size 4mm (US6/CAN8)
- Net fabric or nylon stocking
- Polyester or acrylic fiberfill
Felting Tips
- Always use a natural fiber yarn obtained from an animal source, most often wool.
- Do not use a wool yarn that is labelled “superwash”.
- The most efficient felting method is a full washing machine cycle set at “Hot” or “Whites”.
- It may require two or more washing cycles to obtain the felted finish.
- Allow felted projects to dry thoroughly before adding finishing pieces.
Finished Size
The finished size is the measurement after felting and finishing of the pumpkin. These pumpkins are made by wrapping yarn around a fiberfill form. The size of the pumpkin will be determined by the yarn weight used and the size of the fiberfill ball. Approximate finished diameter, using worsted weight yarn and a 3 (4, 5)"/8 (10, 12)cm diameter ball of fiberfill: 2 (3, 4)"/5 (8, 10)cm.
Steps:
- Form fiberfill into a ball.
- With MC, wrap around the fiberfill ball, keeping yarn in place with thumb at center top and third finger at center bottom. Do not wrap too tightly nor too loosely but evenly around to cover so that no fiberfill shows through the wrapped yarn. Keep the shape rounded as you wrap so that the “pumpkin” does not become flattened. Darn in yarn end at center bottom and secure with a small knot.
- Place the pumpkin into a square of net fabric or a nylon stocking. Knot or tie securely to keep pumpkin in its rounded shape.
- Felt the pumpkin until the surface has become dense and matted.
- Remove the pumpkin from the net fabric or stocking, cutting if necessary.
- Correct the rounded shape and allow the pumpkin to dry thoroughly before completing the finishing details.
Finishing
Furrows
- With a double strand of CC, wrap the yarn tightly around the pumpkin from bottom to top four times, creating eight evenly spaced sections. Secure the yarn at center bottom of pumpkin. Darn in yarn ends.
Stem (make 1)
- With CC, leaving a length of 8"/20cm at beginning and with double-pointed needles, cast on 5 sts. Work I-Cord as follows; *Knit all sts. Do not turn work but slide stitches to the right end of needle. Rep from * until 10 rows completed. Bind off, leaving an 8"/20cm length of yarn. Darn bind off length of the yarn back through stem. Position stem at center top of pumpkin and join. Darn in yarn ends.
Check out other Halloween crafts and costumes in the How to Halloween eBook.
Read NextMake Your Own Wand DIY