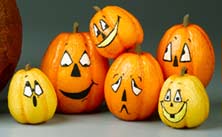
Pumpkin Pals
Brighten your tabletop with these adorable Pumpkin Pals. Whether you make them spooky or friendly, they're sure to bring smiles to the faces of everyone who sees them. Halloween craft ideas don't get more fun than this. Rather than using sharp knives to carve your pumpkin, you can decorate the gourd with acrylic paint. This is a great project for kids or adults with limited crafting abilities. Don't be afraid to personalize your pal and make him or her a little different than the picture. These pumpkins are so cute, you'll want to leave them out all season long.
Materials:
- STYROFOAM™ Brand Foam Eggs: 5"; 4", two; 3", three
- Pumpkin Pals pattern
- Ruler
- Pencil
- Fine-line black permanent marker
- Rubber bands
- Wooden skewers
- Metal teaspoon
- Small bowl
- Water basin
- Scissors
- Paper towels
- Acrylic paints: black; brown; white; yellow
- Gloss découpage medium
- Thick, white craft glue
- Low-temp glue gun and glue sticks
- Orange tissue paper, various shades
- Brown construction paper
- 1/4" diameter wooden dowels
- 3/16" diameter wooden dowels
- Serrated knife
- Candle stub or paraffin
- 1" flat; liner or small round paintbrushes
- Disposable palette
- Paper piercing tool or sewing needle
Instructions:
- Wax serrated knife with candle stub or paraffin. Cut thin slice from top and bottom of each foam egg. Roll cut foam edges against work surface to round and smooth into shape.
- Mark center top and bottom of each egg. Wrap three rubber bands around each egg, creating six equal vertical segments. Use marker to draw segment lines; remove rubber bands. Using blunt edge of wooden ruler or skewer, press 3/8"-deep grooves along lines. Rub cut edges with back of metal spoon to smooth. Insert skewer into bottom of each pumpkin for handle.
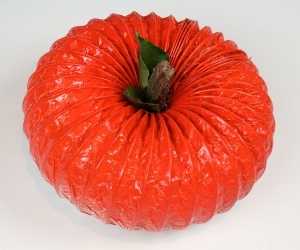
- Using patterns, cut six sections from orange tissue for each pumpkin. Cut six sepals from brown construction paper; set aside.
- Thin white glue with a few teaspoons of water in small bowl. Working on one section at a time, brush generous coat of glue/water mixture onto foam; place one tissue section on top. Carefully brush on more glue/water mixture, gently removing wrinkles and air bubbles as you go. Repeat for each pumpkin, allowing tissue pieces to overlap in grooves. Place skewers in heavy glass or jar to dry.
- When dry, follow manufacturer's instructions to seal each pumpkin with a coat of découpage medium; let dry.
- Cut several 1" lengths from dowels, cutting on an angle, for stems. Paint stems brown and place in scrap foam until dry.
- Refer to photo to transfer face patterns to pumpkins; pattern A is for 5" pumpkin, Bs are for 4" pumpkins, and Cs are for 3" pumpkins. Referring to photo, draw on features with fine line marker; add highlights with white and yellow paint.
- Use skewer to make small hole in center top of each pumpkin; glue stems into holes. Place dot of glue in hole at bottom of pumpkin, created by skewer, and gently press center of sepal into hole. Tuck points into hole as well and flatter paper back against bottom of pumpkin.