Pretty Spooky Witch Hat Centerpiece
It's never too early to start planning cool Halloween decorations for your home. Learn how to make a witch hat that will look perfect on the dinner table with this Pretty Spooky Witch Hat Centerpiece. Your Halloween banquet won't be complete without this table decoration idea. The Pretty Spooky Witch Hat Centerpiece brings the fun and festivity of Halloween alive with its bright colors and bold adornments. Create this simple shape and have fun decorating it for the spooktacular season.

Materials:
- Xyron Mega Runner
- Xyron 5" Creative Station
- Xyron Glue Stick
- Crafters Companion Die'sire Large Rose Die
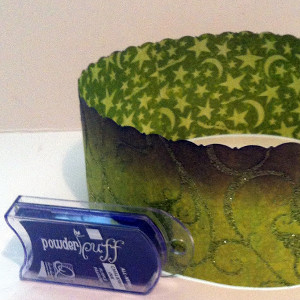
- Crafters Companion Spray and Sparkle Iridescent Glitter
- Sillhouette Studio Cobwebs and Trick or Treat Designs
- Black A1 Sheet of Card
- Fiskars Paper Edger 'Seagull' Scissors
- Bazzil Basics Grey Cardstock
- K&Company Jen Yanok Halloween Papers
- Purple, Green and Black Tuile Fabric
- Black Lace Trim
- Green and Orange Polka dot Ribbon
- Crafttime Flat Back Buttons
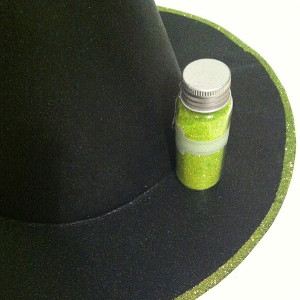
- Doodlebug Sugar Coating Glitter
Instructions:
Hat
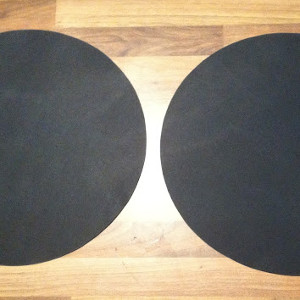
- Start by making the basic cone shape on the A1 black card. Cut a piece of card 22" by 19". Apply adhesive using the Xyron mega runner down one 19" side and roll into a cone and place to one side.
- Cut out two circles 13" in diameter and mark the centre points with a pencil
- Draw a line from top to bottom and from left to right through the centre of both
- Draw a 7" circle in the centre of both circles
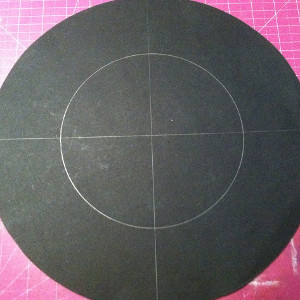
- Cut out the centre of ONE of the circles
- Take the ring and place it down over the cone. On the underside of the rind draw around with a pencil
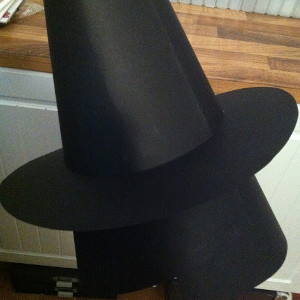
- Remove the ring and open up the cone, leave a 1" strip under the pencil line and trim away the excess. Cut slits into the 1" strip up to the pencil line. Apply more adhesive with the Xyron Glue Stick and form back into the cone shape
- Turn up the tabs
- Apply adhesive around the pencil outline on the base card
- Adhere the cone to the base
- Secure in place by covering the base with more adhesive using the Xyron Mega Runner and the place the ring back over the cone and down onto the base.
- Spray the finished hat with the Crafters Companion Spray and sparkle.
Decorating
- Pinch the top of the hat and flatten it down about four inches and curl over.
- Apply adhesive to the rim with the Xyron Glue Stick and sprinkle with the glitter
- Cut two 12" x 3" strips of paper, trim with the Fiskars Scissors
- Ink the top edges with the purple ink and then seal the ends together using the Xyron Mega Runner
- Apply adhesive around the base of the cone with the Xyron Mega Runner
- Drop on the band and press in place
- Cut two strips of the green and purple tulle 1mtr long and scrunch together and knot around the band. Secure in place.
- Make a smaller black tulle bow and tie the orange polka dot ribbon around it. Secure in place.
- Die cut the large cobweb and secure to the banding using the Xyron Mega Runner
- Die cut the smaller cobwebs and run through the Xyron 5" Creative Station
- Adhere the cobwebs to the cone of the hat
- To make the feathers I hand cut two strips of black paper and cut the feathering down the edges and shaped them.
- Secure to the tulle using the Xyron Glue Stick
- Die Cut three Die'sire strips of rose petals, assemble together using the Xyron Mega Runner
- Spray with the Spray and Sparkle
- Die Cut the 'Trick or Treat' in orange and in black. Run the orange die cut through the Xyron 5" Creative Station.
- Layer the orange on top of the black slightly to the right to create a shadow. Spray with Spray and Sparkle
- Apply some adhesive to the centre of the die cut and adhere to the hat
- Secure a green ribbon bow to the rear of the flower, place a gem in the centre and then secure to the middle of the black tulle bow.
Read NextFabric Yo Yo Pumpkin Craft