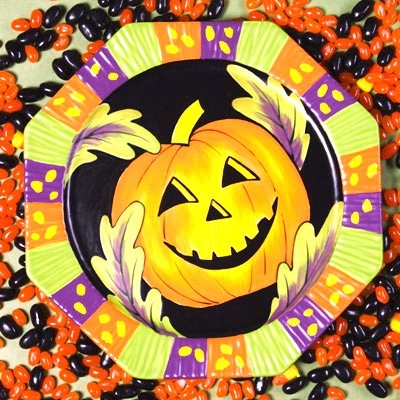
Halloween Plate
Serve your goblin cookies and ghoulish treats on this cute Halloween pumpkin plate from I Love to Create. Using satin glazes you can create this plate in nine steps. Your guests will love it!

Materials:
- Satin Glazes
- SN 366 Black
- SN 374 Neon Yellow
- SN 375 Neon Orange
- SN 379 Neon Green
- SN 380 Neon Purple
- Dinnerware Bisque Designs
- 25817 Designer Ware Charger 11" x 11" x .75"
- Signature Brushes
- SB 802 No. 1 Liner
- SB 806 No. 6 Round
- SB 807 No. 6 Fan Glaze
- Clay carbon paper
- Foil
- Pen
- Sponge
- Pattern
Steps:
- Lightly wipe ware with damp sponge to remove any dust.
- Place the clay carbon paper on top of charger and pattern on top of clay carbon paper. Use a pen to trace over design, transferring design onto charger.
- Pour puddles of each color onto a piece of foil. Using the No. 1 Liner or the No. 6 Round, apply three coats of Neon Yellow to the eye and nose area, the stem and the dots around the charger edge. Fan out the No. 6 Round and apply three coats of Neon Yellow to the face of the jack-o-lantern, pulling the strokes loose and airy on the outer edges. Refer to photo. Let dry between coats.
- Fan out the No. 6 Round and apply three coats of Neon Orange to the remaining areas of the jack-o-lantern face, blending the color into the Neon Yellow areas. Referring to photo, apply three coats to the orange sections around the charger edge. Let dry between coats.
- Using the No. 6 Round, apply three coats of Neon Green to the leaves and the corners of the charger, letting dry between coats. Fan out the No. 6 Round and add Neon Orange to the edges of stem for shading.
- Using the No. 1 Liner or the No. 6 Round as needed, apply three coats of Black to the eyes, nose, mouth and background area in the center of the charger, letting dry between coats. Add details to the leaves, eyes, nose and lines on the jack-o-lantern with the No. 1 Liner.
- Using the No. 1 Liner or the No. 6 Round as needed, apply three coats of Neon Purple to the remaining sections around the charger border, letting dry between coats. Fan out the No. 6 Round and apply loose shading to the centers of leaves.
- Using the Fan Glaze brush, apply three flowing coats of Neon Green to the back side of the charger, letting dry between coats.
- Stilt and fire to witness cone 06.