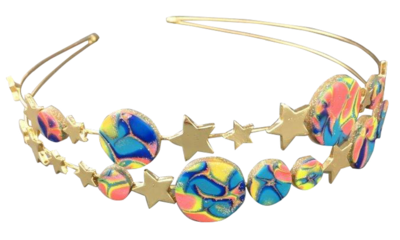
Out-of-This-World DIY Headband
This galaxy craft is one inspiring accessory.

Learn how to make a stunningly beautiful DIY headband for the outer space lover in your life! With shimmering clays and pretty techniques, you can create swirls of color more vivid than the Milky Way. Follow this easy step-by-step tutorial to learn how you can take colorful clays, layer them, and shape them into the pretty discs used to decorate this headband. This would make a fantastic gift for the young lady in your life, especially if she's learning about astronomy in school. Give them as favors at your daughter's birthday party, or simply wear it as a fun accessory with any colorful outfit.
Estimated Cost$11-$20
Time to CompleteWeekend project

Project TypeMake a Project
Materials List
- 1 block of Premo! Ultramarine – 2 oz.
- 1 block of Premo! Wasabi – 2 oz.
- 1 block of Premo! Turquoise – 2 oz.
- 1 block of Premo! Accents – Sunset Pearl – 2 oz.
- 1 block of Premo! Accents – Yellow Gold Glitter – 2 oz.
- Clay Conditioning Machine
- Sculpey® Super Slicer
- Sculpey® Acrylic Roller
- Kemper Small Circle Cutter Set
- 2-Part Clear Epoxy
- Gold Tone Wire Headband with Stars
- Vegetable Peeler – dedicated for use with Polymer Clay
- Toothpicks
- Index Cards
Getting Started
Polymer clay may stain. CLAY MAY DAMAGE UNPROTECTED FURNITURE OR FINISHED SURFACES. DO NOT USE polymer clay on unprotected surfaces. We recommend working on the Sculpey ® clay mat, wax paper, metal baking sheet, or disposable foil. Start with clean hands and work surface area. Knead clay until soft and smooth. For best results, clean your hands in between colors. Shape clay, pressing pieces together firmly. Bake on oven-proof glass or metal surface at 275°F (130°C) for 30 minutes per ¼" (6 mm) thickness. For best baking results, use an oven thermometer. DO NOT USE MICROWAVE OVEN. DO NOT EXCEED THE ABOVE TEMPERATURE OR RECOMMENDED BAKING TIME. Wash hands after use. Baking should be completed by an adult.
Instructions
Begin by preheating oven to 275°F (130 °C). Test temperature with oven thermometer for perfectly cured clay. For best results, condition all clay by running it through the Clay Conditioning Machine for several passes on the widest setting. Fold the clay in half after each pass and insert the fold side into the rollers first.
-
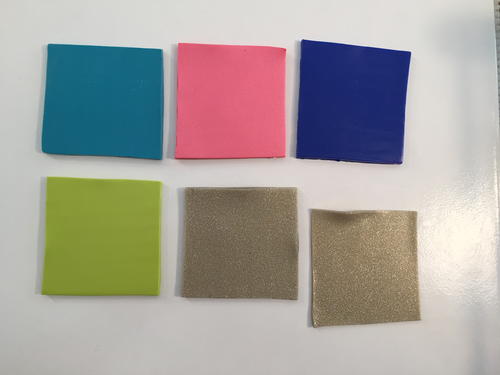
Set the Clay Conditioning Machine to the thickest setting. Condition and roll out sheets of the following colors
Ultramarine
Wasabi
Turquoise
Sunset Pearl
Yellow Gold Glitter
Cut each sheet of clay into a 2.5” square. -
Adjust the setting on the Clay Conditioning Machine to a thin setting. Roll the excess Yellow Gold Glitter into a sheet and trim to a 2.5” square. Set the excess clay to the side; this excess clay will be used later in the project.
-
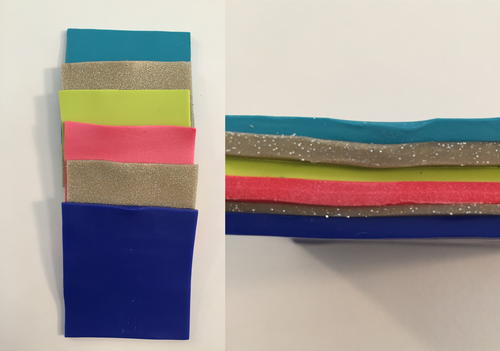
Stack the squares of clay in the following order: Turquoise, thick Yellow Gold Glitter, Wasabi, Sunset Pearl, thin Yellow Gold Glitter, and Ultramarine.
-
Adjust the Clay Conditioning Machine back to the thickest setting. Use the Acrylic Roller to compress the stack of clay so that it is a little thicker than the opening between the rollers on the Clay Conditioning Machine. Place one edge of the stack of clay against the rollers and roll through once. Adjust the Clay Conditioning Machine to one setting thinner. Place the narrow edge of your stack of clay against the rollers and roll through once.
-
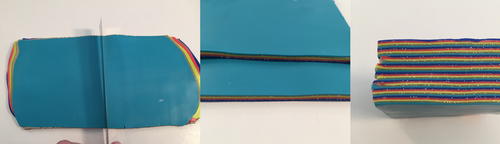
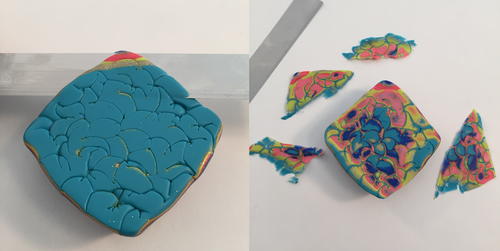
Measure the strip of clay and mark the mid-point of the overall length of clay. Use the Super Slicer Blade to cut the strip of clay in half. Stack the two halves of the strip one on top of the other; make sure that when you stack the two halves that the stripes are in the same order. Repeat this process twice more so you end up with a stack that is eight sets of stripes tall.
-
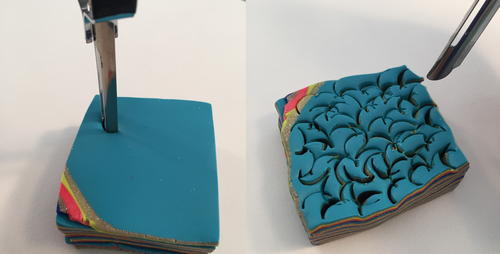
Pick up the vegetable peeler and push the tip straight down and all of the way through the stack of clay. Continue making holes in the stack until the entire stack has holes.
-
Position the stack of clay between your palms and press from either side to compress the stack. Turn the stack 90-degrees and compress from the other two sides. Repeat this process until it looks like all of the gaps made by the vegetable peeler are pressed closed. Use the Acrylic Roller to roll the top of the stack smooth.
-
Lift the stack of clay, rotate it 90-degrees and place it back onto the work surface; when looking at the stack it should now be in an on-point position (appears to be diamond shaped). Firmly press the stack of clay down onto the work surface so it does not move. Pick up the Super Slicer Blade and hold it parallel to the work surface. Use the blade to cut thin slices from the top of the stack. Continue cutting slices and setting them to the side until you have accumulated a dozen or more slices.
-
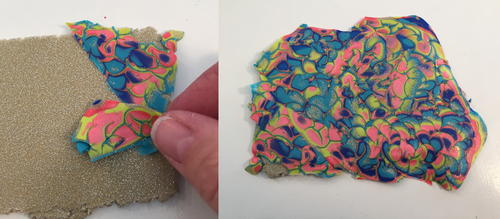
Pick up the Yellow Gold Glitter that was set to the side in Step 2 and roll out a sheet of clay on the thickest setting of the Clay Conditioning Machine. Place the sheet of clay on the work surface. Pick up a slice from the stack and place it onto the sheet of Yellow Gold Glitter clay. Using the Acrylic Roller, gently roll the slice onto the sheet of clay. Continue adding slices, making sure to roll them down each time, until you have the entire sheet of Yellow Gold Glitter covered in slices from your stack.
-
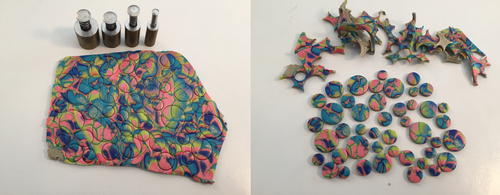
Move what is left of the stack of clay to the side for use in a future project. Lift the slice-covered sheet of Yellow Gold Glitter clay off the work surface and roll through the Clay Conditioning Machine once. Note: Rolling the sheet through the Clay Conditioning Machine will smooth down the surface of the sheet of clay and return it to an even thickness. Smooth the patterned sheet of clay down onto the work surface and use the Kemper cutters to cut out several circles of different sizes. Try to fit as many circles into the sheet of clay as you can so you have many pieces to choose from. Once you have all of the circles cut out peel away the excess clay.
-
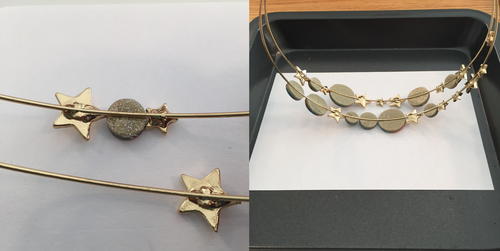
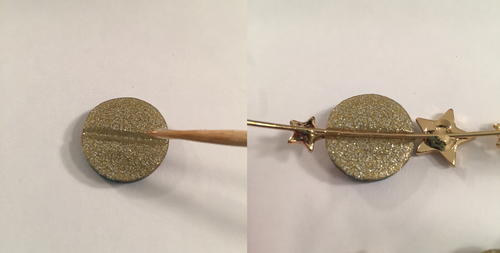
Place an index card down on the work surface. Pick up a couple of the cut circles of clay and place them pattern side down onto the index card. Pick up the headband and pick a spot between two stars. Hold the headband over the different size circles until you find a size that looks either good or, in the case of stars that are close together, will fit in the gap. Once you know which circle you would like to use position the headband over the chosen circle and line the wire of the headband up over the center of the circle. Slowly press the wire of the headband down into the clay. Continue slowly pressing down until the wire is buried just below the surface of the clay; leave the clay on the headband. Continue the process of adding circles of clay onto the headband until you have added as many clay pieces as you like. Once you are finished adding clay, place an index card onto the baking dish and place the headband face down onto the index card. Bake the clay/headband assembly for 20 minutes and let cool completely.
-
After the headband and clay have cooled carefully remove the pieces of clay one at a time and lay them down in the order they were attached, or as an alternative take a couple of photos. The purpose of taking photos or lining up of the pieces is so you can reattach them in the same places.
-
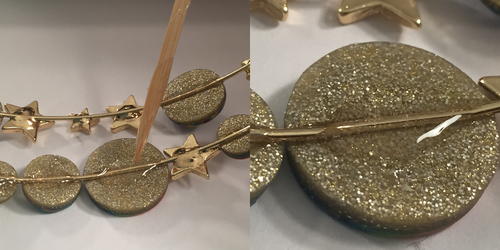
Place an index card on the work surface. Use a toothpick to mix a small amount of the 2-part clear epoxy. Spread a little bit of the epoxy into the indented line on the back of one of the clay circles; remember less is more when using adhesives, too much adhesive will cause the pieces to move and will take a bit longer to set. Press the headband into the groove and hold for a few seconds. Continue this process until all of the clay circles have been attached to the headband. Set the assembly to the side and let the epoxy set per the amount of time recommended by the manufacturer.
-
Mix another small amount of epoxy on a new index card and spread a coat of the epoxy over the wire of the headband and onto a clay circle; the wire should be encased in the epoxy. Continue this process until all of the circles of clay have a second batch of epoxy added. Set the assembly to the side and let the epoxy completely cure per the amount of time recommended by the manufacturer.

What kind of project do you wish you could make out of clay?
Your Recently Viewed Projects
Thanks for your comment. Don't forget to share!
Crafter 17499
Mar 08, 2018
Would love to know where to get the headband itself. Have twin granddaughters and this would be a fun summer project.
Editor Dana
Mar 12, 2018
Hi there! I found a similar headband at Claire's website: https://www.claires.com/us/kids-gold-stars-headband-133850.html?pid=133850 I hope that helps!
Mistress of All Ev il
Mar 02, 2018
I really wish my sister was still in her headband phase because this headband would have been PERFECT for her. To answer your question, I'd like to sculpt a mini replica of the one and only Maleficent out of clay. I think it would be the perfect addition to my desk decor.
mrquinn 7643016
Feb 23, 2018
I haven't worked with clay since high school. It would be interesting to start again after 40 years
kimlennie 9336847
Feb 23, 2018
I have never done anything with clay but would like to start. It looks like it could be so much fun. This headband is so cute.
karawaldner 306086 2
Feb 19, 2018
what a beautiful project, I would love to make clay jewelry,
Report Inappropriate Comment
Are you sure you would like to report this comment? It will be flagged for our moderators to take action.
Thank you for taking the time to improve the content on our site.