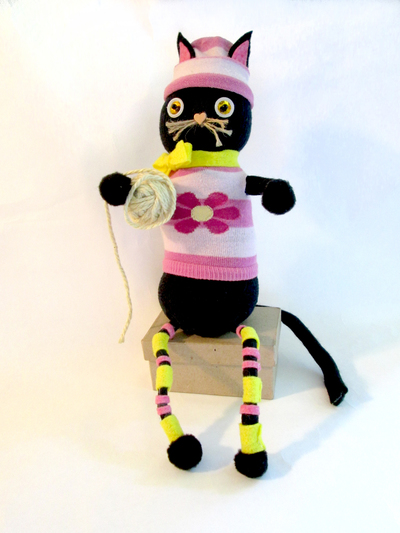
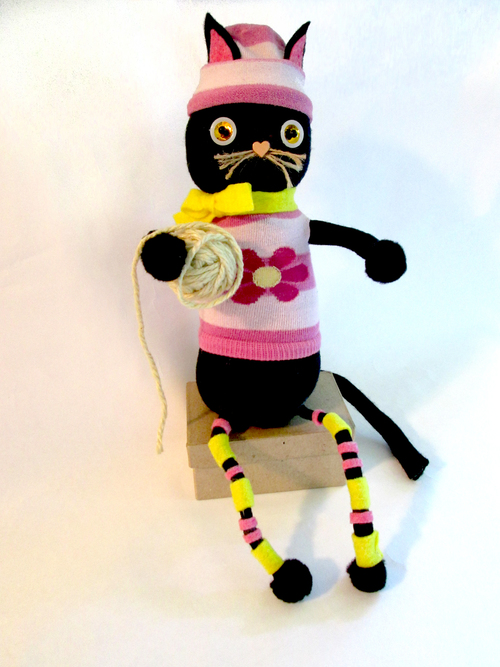
No Sew Sock Kitty
This is one of the cutest no sew sock animals.

Make an awesome sock project without sewing! The No Sew Sock Kitty is an easy sock animal pattern to make. The step-by-step tutorial will teach you how to turn a few socks into an adorable plushie. This cute project can be done in an evening, and by using inexpensive materials like socks to make the project, you'll create something truly adorable for minimal cost. Customize your sock kitty by choosing a unique "shirt" for him or her, and make them for several little kids in your life. This is a wonderful gift idea for the holidays.
Estimated CostUnder $10
Time to CompleteIn an evening
MaterialsBeads, Fabric, Felt
Primary TechniqueNo Sew Project

Project TypeMake a Project
Materials List
- 1 knit sock with ribbed cuff (black or in color of your choice)
- 1 decorative knit sock in color and pattern of your choice
- Felt (black, pink, yellow or colors of your choice)
- 18 gauge Fun Wire (Toner Plastics) in any color
- 2 flat backed black beads (4 mm)
- 2 yellow faceted gems (10 mm or size of your choice)
- Heart shaped brad or bead
- 2 knitting stitch markers in a size that fits around your faceted gems
- 4 black pompoms (1” diameter) or pompoms in colors of your choice
- Hemp or jute cord
- Kitchen and garden cotton twine (name a kind)
- 1/2 to 3/4 cup uncooked rice
- Polyester fiberfill (12 oz bag)
- Gem-Tac® Permanent Adhesive, Fabri-Tac® Permanent Adhesive (Beacon Adhesives)
- Fabric scissors
- Ruler
- Non-stick craft mat
Instructions
-
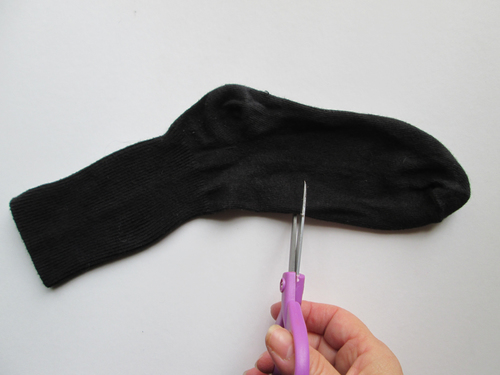
Cutting across the cuff right above the heel, cut the black sock in two sections. Discard heel section or save for another project.
-
Turn remaining cuff section inside out. Hand gather around the cut edge. Wrap securely with an 8” length of cotton string and tie closed. Turn right side out. Fill with rice until the tied cuff section stands securely and doesn’t topple over. Stuff fiberfill into the remaining space, leaving about 1/2” inch on top. Hand gather top edge and secure with another length of cotton string. Trim excess string, if needed.
Note: Adjust the amount of rice based on the size sock being used. -
Squeeze to form a neck and shape a head about 3” below top edge. Loosely wrap a 10” length of cotton cord around the neck and tie closed; trim string as needed.
-
Cut wire into lengths as follows:
3” (Cut 2 for arms)
4 1/2” (Cut 2 for legs)
7” (Cut 1 for tail)
Cut black felt into lengths as follows:
2 1/2” x 3 1/2” (Cut 2 for arms)
2” x 5” (Cut 2 for legs)
3” x 7 1/2” (Cut 1 for tail) -
Begin with one arm. Apply a line of Gem-Tac along along one piece of wire; set for one minute. Attach wire to one long edge of the felt, holding securely against the felt until it grabs. Wrap felt around wire by applying Fabri-Tac to felt and pinching until it grabs, as you wrap. Repeat these steps for the other arm, both legs and the tail. Dry completely.
Note: Straighten all wire pieces before applying glue and attaching to felt. Apply adhesive and wrap in stages. It is important to make sure the adhesive grabs and begins to set up as you wrap. -
Cut four 3” lengths of cord. Tie in center of all to secure; glue whiskers onto head with Gem-Tac. Glue heart brad or bead over whiskers. Glue small black bead onto faceted gems; glue onto head. Glue knitting stitch markers over gems. Attach arms, legs and tail onto body, pressing and holding one piece at a time until secure. Wrap and glue 1/2” x 2” strips of yellow and 1/4’ x 2” pink felt around legs, as shown. Glue pompoms onto arms and legs; dry. When everything is completely dry, shape the arms and legs as desired.
-
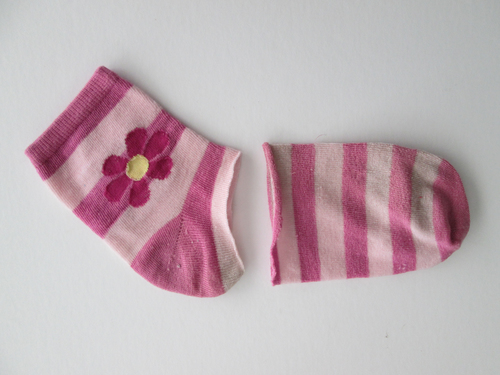
Cut the decorative sock into two sections, as outlined in Step 1. Cut off heel so the cuff section is squared off. Measure the distance from the cat’s neck to where the arms are attached. Mark that on the cuff section and cut a 1/2” slit along both sides. Carefully slip the cuff section over the cat’s head and slip the arms through the slits.
-
Cut a 3/4” x 15” strip of yellow felt. Wrap around neck, positioning over top edge of sweater and tie to secure. Roll up the cut edge of the decorative sock toe section. Place over head. Cut two pink (3/4” x 1”) and two black felt triangles (1” x 1 1/2”). Glue layers together with Fabri-Tac; glue onto front of hat, just above rolled edge.

Creative Options
-
Use a striped sock for the body to create a tabby cat. Or paint stripes or other features on your sock with fabric paint.
-
Create a banner or sign for your cat to hold. Or add a bouquet of felt, fabric or paper flowers.
-
Create several smaller kitties from child or baby socks to place in the larger cat’s arms.
More Crafty Ideas For You
If you're a fan of the adorable No Sew Sock Kitty project, we have some great recommendations for you to try next! For those who enjoy working with socks and creating cute animal crafts, we suggest trying out the No Sew Sock Bunny. This project is perfect for beginners and makes a great gift for Easter or any bunny lover in your life.
If you're looking to up your sock crafting game, why not give the No Sew Sock Owl a try? This project is a bit more challenging than the Sock Kitty, but the end result is absolutely charming. It's a fun way to add a whimsical touch to your home decor or gift to a bird enthusiast.
For those who want to try something a bit different, we recommend the No Sew Sock Monster project. This quirky and colorful craft is a great way to let your creativity shine. It's a fun project to do with kids or to give as a unique gift for Halloween or a monster-themed party.
No matter which project you choose, we hope you have a blast crafting something new and exciting. Happy crafting!