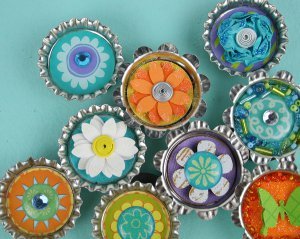
A Garden of Bottle Caps
Turn your refrigerator door into a bountiful garden with this Garden of Bottle Caps. Made with a variety of cute embellishments, this recycled craft is a great way to use up all those bottle caps collecting dust in your craft stash. You could even forgo the flowers and use little images of friends and family to create a fun magnetic family tree that's unlike anything you've seen before!

Materials:
- Circle Lever Punch (Medium)
- Flower Lever Punch (Medium)
- Poppy Lever Punch (Medium)
- Fingertip Tweezers
- Bottle caps
- Heavy Duty Magnets
- Patterned Paper (Bella Blvd)
- Epoxy Stickers (KI Memories)
- Jewel Stickers (Little Yellow Bicycle)
- Coil Brads (Karen Foster Design)
- Diamond Glaze
- Ultra Fine Glitter (Art-C)
- Beads (Art-C)Push Pin/Needle
Instructions:
-
In the scrapbook embellishment section of your local craft supply store you can find bottle caps in nearly every solid color you’d ever want – patterned ones even! But, on the off-chance that you can only find the plain silver caps and you want colorful ones, or if you’d rather recycle caps you’ve collected from your beverage of choice, keep in mind that you can turn those caps into whatever color you want by simply giving them a coat of spray paint.
-
While these bottle caps may appear to be a bit more in the mixed media arena, don’t let that scare you off from trying something new. I’d like to show you how easy they are to duplicate.
-
First, you’ll need to gather your supplies and narrow your focus down to a coordinating color scheme. I’ve chosen to focus on turquoise, lime green, and orange (with a few hints of purple and yellow).
-
For each bottle cap you are altering, punch one circle from cardstock, patterned paper or glittered cardstock using your Medium Circle Lever Punch. This is a 1” circle. This size has worked for nearly all varieties of bottle caps I’ve tried.
-
Adhere one circle inside each bottle cap using a strong, fast drying adhesive. My adhesive of choice for this type of project is Diamond Glaze. Glossy Accents by Ranger is a good alternative if you can’t find Diamond Glaze.
-
Once you have a circle adhered to each bottle cap you can work on putting your punches to use to create a masterpiece inside each cap.
- Here are three ways to use some of your Medium Lever Punches:
-
Punch four flowers from coordinating cardstock, using the Poppy Medium Lever Punch. Using your fingers, crumble each flower to give it a bit of dimension and to make the paper more pliable. Use a push pin or needle to poke a small hole through the middle of all four flowers. Thread all four flowers onto the prongs of a medium-sized brad. Open the prongs to secure. Gently scrunch up the top flower close to the center brad. Continue to manipulate each of the four levels until you have something that represents a dimensional blossom.

-
Adhere the flower to the center of the circle using a small drop of Diamond Glaze. Allow to dry. Once it is completely dry, apply small amounts of Diamond Glaze to the outside edges of the blossom. Sprinkle a coordinating color of ultra fine glitter on the flower. Allow time to dry, and then turn bottle cap upside down over a trash can to allow any excess glitter to fall back off.

-
Punch three flowers from white cardstock, using the Flower Medium Lever Punch. Use a push pin or needle to poke a small hole through the middle of all three flowers. Thread all three flowers onto the prongs of a medium-sized brad. Open the prongs to secure. Gently manipulate the three flowers so the petals are spaced out giving a fuller appearance to the flower. Adhere the flower to the center of the circle using a small drop of Diamond Glaze. Allow to dry.

-
Once it is completely dry, apply small amounts of Diamond Glaze to the tips of the petals. Sprinkle white sanding glitter on the flower. Allow time to dry, and then turn bottle cap upside down over a trash can to allow any excess glitter to fall back off.

-
Punch two butterflies using the Jenni’s Butterfly Jenni Bowlin Lever Punch. Adhere one butterfly flat inside the bottle cap on top of the patterned paper. Bend wings upward on the second butterfly, and then apply a very small drop of Diamond Glaze to the body of the second butterfly taking care not to get glue on the wings. Place directly on top of the body of the first butterfly and allow to time to dry. Once dry, you can manipulate the wings to give them more dimension.


-
Then, apply a thin thread of Diamond Glaze all the way around the inside of the bottle cap. Sprinkle small beads into the cap. Allow to dry, and then turn bottle cap upside down over a trash can to allow any excess beading to fall back off.

-
Most of all, have fun experimenting with adding a variety of layered punched shapes to your bottle caps. If you need to place a single bead or decide you don’t like the look of something and need help getting excess beads removed before the Diamond Glaze dries, you might find the Fingertip Tweezers quite helpful in completing the task.
- Once you have all of your bottle caps embellished, you can use a thin coat of Diamond Glaze on the backside of your bottle cap to apply your magnets. Be sure to keep bottle caps at a good distance from each other when drying to keep them from pulling toward one another and pulling the magnet loose from the bottle cap before it’s had time to dry.
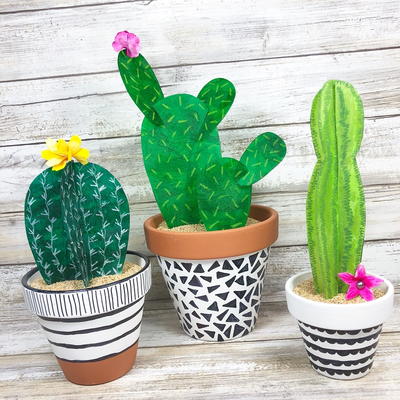
Read NextModern Recycled Faux Cactus


![Pill Bottle Crafts: Reuse Pill Bottles [15 Ideas]](http://irepo.primecp.com/2017/06/334076/PILL-BOTTLE-CRAFTS-Header_Category-CategoryPageDefault_ID-2274135.jpg?v=2274135)