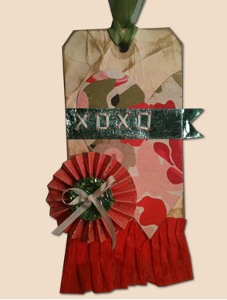
Spread the Love Gift Tag
Nothing says you care quite like a thoughtful gift, but if you simply slap on a gift tag, the value of the present goes way down. Make a Spread the Love Gift Tag and show someone how much you care. A cute gift tag can really make a huge difference when it comes to giving.

Materials:
- Layer Plus Tool
- Ultra Clear Adhesive Sheet – 8” x 10
- Premium Extreme 1/8”
- Premium Extreme 1/2”
- Premium Extreme 1”
- Sparkles in Silver or Gold
- Shiny Transfer Foil Sheets in Holiday or Spring Blossom
- Clear Foam Adhesive Pads
- Manilla Shipping Tag 3 ¼” X 6 ¼”
- Crate Paper Fourteen Collection in Sparks & Darling
- Clearsnap Fluid Chalk Ink in Chestnut Roan
- Crepe Paper Streamer in Pink;
- Ribbon in White
- Tulle Ribbon in Red
- Embroidery Floss in White and Needle
- Scissors
- Piercing Tool
- Sizzix Sizzlits Decorative Strip Die – Mini Paper Rosettes (2 Sizes)
- Sizzix Bigz Die 1” Circles
- Big Shot Machine
-
Bone Folder.
Instructions:
-
Crumple tag, straighten and ink all over with Chestnut Roan.
-
Line up 1” wide Premium Extreme with bottom edge of tag, trim and peel liner paper. Fold over cut edge of crepe paper and pleat. Trim and fold over edge to finish.
-
Cut a 4” x 4” square out of the Ultra Clear Adhesive Sheet, cover with Darling Paper. Trace heart and cut out with scissors or put through your die-cutting machine using a heart-shaped die. Peel back the liner and attach to tag. Trim excess overhang on the one side.
-
Measure and cut a 3 ¾” length of ½” wide Premium Extreme. Cut a notched tail at one end of the strip of tape. This will be the overhang. Attach the strip flush to the left edge of the tag using Layer Plus Tool for straight placement, leaving a ½” overhang.
-
Immediately apply Shiny Transfer Foil, grey side down/color up, with your finger or a bone folder, to the back of the notched overhang, where the adhesive is exposed. Then, remove the paper liner from the tape on the front of the tag and cover the whole strip with the same Shiny Transfer Foil you just used.
-
Die cut Rosette from Sparks Paper, fold and attach ends with 1/8” wide strip of Premium Extreme to create tube. Cut 2” long strip of 1” wide Premium Extreme and place sticky side up on work surface. Gather top of rosette in fingers, while pushing in at top and out at bottom. Once flat, attach to Premium Extreme, flip over and burnish with bone folder for a complete bond.
-
Die cut 1” Circle from Ultra Clear Adhesive Sheet, and attach it to the center of the front of the rosette. Peel off the liner, pick up the rosette and push the adhesive circle into a little plate filled with Sparkles glitter or micro-beads or threading beads, or a combination of any of these. Press firmly for a good bond. Shake off excess.
-
Tie bow with ¼” ribbon and attach to center of circle with a Clear Foam Adhesive Pad.
-
Peel liner from the back of the rosette and attach to tag using Layer Plus Tool for exact placement.
-
Line up Layer Plus Tool along top edge of foil strip and pierce 8 holes with piercing tool. Repeat along bottom edge. Thread white floss on needle and stitch XOXO using pierced holes. Secure each end to back of tag with 1/8” strip of Premium Extreme – do not peel liner.
- Tie a 12” length of tulle ribbon through hole at top of tag.
Read NextBlessing Bags DIY