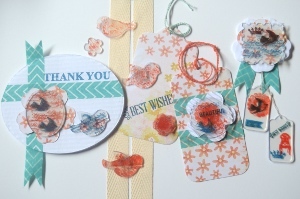
Shrinky Dink Tags
These adorable Shrinky Dink Tags are great for labeling your packages. Made from shrink plastic and the Fuse System from Fiskars, these cute plastic tags are durable and fun...and they can be used in several unique ways. Not only can you use them to label gifts, but you can mark luggage, hand them out as favors, or even use them as place markers for a dinner party or wedding shower.

You can find this project, as well as many others, in our free downloadable eBook, Fuse Creativity System Project Guide: Fun Party Themes, Ideas for Handmade Cards, and More Paper Crafts from Fiskars!

Materials:
- Fuse Creativity System® Starter Set
- Medium Design Set 100780 – Circle
- Medium Design Set 100850 - Bird
- Medium Design Set 101880 - Tag
- Medium Design Set 100820 - Oval
- Stamp Block Set
- Teresa Collins Doily Banner Simple Stick™ Stamps (4" x 8")
- Teresa Collins Sentiments Simple Stick™ Stamps (4” x 8”)
- Teresa Collins Thank You Simple Stick™ Stamps (3" x 6")
- Teresa Collins Paris Simple Stick™ Stamps (4" x 8")
- 1/4" Circle Hand Punch
- Adhesive - foam dots, Glue Dots®
- Baker’s twine
- Cardstock
- Ink pads
- Shrink art film
Instructions:
- Start by pre-heating your oven to 300 – 350 degrees (or whatever temperature is suggested in the instructions on your shrink plastic package).
- Select a few of your favorite steel-rule Fuse dies to cut shapes for your tags and toppers. Some of the less-detailed photo-etched Fuse dies will work too, but most will just emboss the shrink plastic and not cut all way through, so it’s best to stick with your steel-rule dies for this project.

- Sandwich a piece of shrink plastic between each die and cutting plate, and run it through the Fuse machine to punch out the shapes. Insert something soft, like a Q-Tip or a pencil eraser into the hole on the backside of the die to pop the plastic out of the die.
- When baking your shrink plastic, there are always a few that don’t turn out perfectly, so cut out a few more pieces than you think you might use.
- Use your Simple Stick stamps with quick drying inks, designed for stamping on smooth surfaces, to stamp layers of images, text, and patterns on your cut shapes. Stamp the lighter colors first and darker colors last. Press stamps gently – too much pressure can cause the stamps to slide and smear.

- Line a cookie sheet with parchment paper and place your shapes ink-side up on the paper. Carefully read the baking instructions on the shrink plastic packaging, and bake your stamped plastic according to these instructions.

- Once they’re done baking, let them cool before handling. The finished pieces will be about 1/8th of their original size.

- With your Fuse machine and dies, cut a few basic shapes from card stock to use as a base for your tags and toppers.

- Use extra-strong glue dots to attach your shrink art to the paper tags. Trim your tags with washi tape and embellishments, and add a few more stamps. Punch a hole in the tags and tie on some baker’s twine.

- You can also attach the toppers to the package using adhesive foam dots.

- The possibilities are endless with this project – you can personalize these tags and toppers to make them for any gift-giving occasion. The recipient will be thrilled to receive a package trimmed with a charming, miniature piece of art! It’s a great project for children too – just make sure the adults are in charge of the oven!

Love shrink plastic crafts? Find more gorgeous ideas for what to make with shrink plastic in DIY Shrinky Dinks: A Shrink Plastic Craft Guide.
Read Next76 Easy Craft Projects for Adults