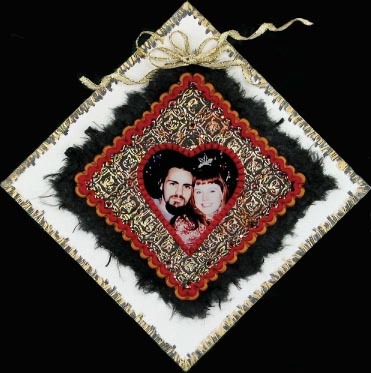
Leaf in Relief Greeting Card
Use polymer clay and metal leafing to surprise that special someone with a greeting card they can cherish for years to come.
By Lisa Pavelka for AMACO
Materials:
- FIMO® Soft Polymer Clay — Black, Metallic Gold, Metallic Red
- Easy Metal leafing — Abalon
- JHB Signature Series Stamp: Tumbling Leaves, Set 1
- Swarovski flatback crystals in Siam # 208 and Topaz # 203, size ss5
- 11" x 51/2" white cardstock (scored in half and folded)
- Black Mulberry Paper
- Krylon Gold Leaf Pen
- Black Sharpie Marker
- Poster Tack
- 1/4" wide wired gold ribbon
- 4" x 4" piece of light cardboard or magnetic backing
- Paper Glue (Beacon Zip Dry recommended)
- AMACO® Pasta Machine
- AMACO® PolyRoller
- AMACO® PolyBlade
- Fine tip tweezers
- Thin knitting needle
- 2" heart, circle or square shaped cookie cutter
Steps:
- Condition each of the clays for a minute, by hand or by running through the pasta machine.
- Roll out a sheet of black clay on the 3rd largest setting of the clay machine (or roll out to 1/16" thick using the roller). Place a sheet of the Abalon leafing over the clay sheet and burnish (rub) with finger to bond these together.
- Place the leafed clay face down over the rubber stamp. Run the PolyRoller firmly over the stamp to emboss the design into the clay (one pass only in either direction). Do not roll repeatedly back and forth!
- Trim the embossed, leafed sheet to 4" x 4." With the clay facing diagonally, cut out the center with the cookie cutter and remove scrap clay.
- Roll out 17" snakes (1/8" in diameter) using the Red and Gold FIMO®. Wrap these around the outer edge of the leafed clay frame and trim any excess clay. Secure and decorate by impressing vertical marks along the edges, every 1/8th inch.
- Use the tweezers to press flatback crystals into the corners surrounding the leaf impressions, alternating the colors. Press them at least halfway down into the clay. This will cause the clay to rise up and over the crystal edges and form a natural bezel.
- Make a hole in the top corner using the knitting needle and bake at 265ºF for 30 minutes.
- While the clay frame is baking, place the white, folded cardstock over a piece of scrap paper. Mark short vertical strokes along all four edges using the black marker. Repeat this over the top of the black markings with the gold leafing pen.
- Cut a 5" x 5" piece of mulberry paper. Dampen 1/2" of each edge with a fingertip or cotton swab dipped in water. Carefully tear away the wet edges to create a feathered effect. Attach the mulberry paper over the center of the white card using paper glue.
- When cool, tape a photo onto the back of the frame. Glue cardboard or magnetic backing over the photo. Tie ribbon thought the hang hole and attach to card using removable poster tack.
Tip: if mailing, use a padded envelope and mark “Hand Cancel.”
Read NextDIY Paint Pen Coffee Mugs