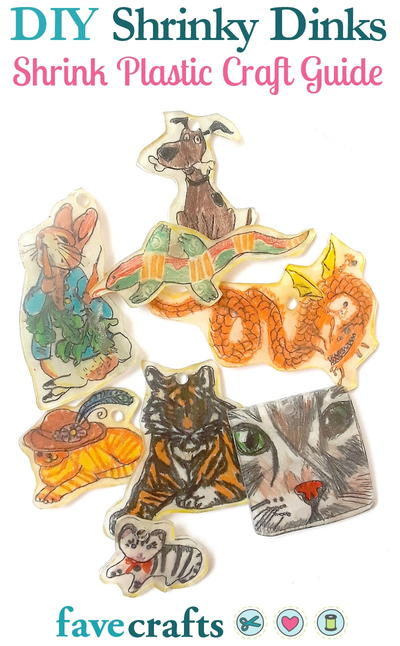
Art, Just Smaller
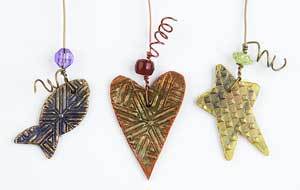
It's a big deal without being big. Shrink plastic is a great resource for any project, from jewelry to art. With this craft from Jacquard Products, you can create coolness from shrink plastic and a few other supplies.

Materials:
- PolyShrink™ plastic/Lucky Squirrel
- Pearl Ex Stamp Pads
- Scissors
- Hole punches
- Sandpaper 200-400 grit
- Stamps
- Heat embossing gun or oven
Instructions:
- Sand a sheet of the PolyShrink™ plastic evenly with the fine grade sandpaper. Sand the side you will be working on. The pigments, inks or drawing materials will become embedded into the surface when the plastic shrinks.
- Stamp with a rubber or foam stamp onto the sanded surface of the PolyShrink™ using one or more of the Jacquard Pearl Ex Stamp Pad colors. Colors will intensify when the plastic shrinks. Be sure not to overload with color or it may flake off after shrinking.
- Cut out the shape that you want to use. Remember that your shape will be about 45% of its original size.
- Punch holes in the plastic if you are making it into jewelry or buttons. Hole punches come in many different shapes so you may want to experiment with it. The holes will maintain their shape even when they shrink.
- If using a heat embossing tool, lay the piece on a flat surface that won’t be damaged by the heat embossing tool. A thick piece of wood is good. Heat the piece by aiming the tool at the plastic. The plastic will begin to move and curl when you heat it. If you feel it is shrinking too fast, hold the tool a little further away. When the piece is completely shrunk, lay flat and allow to cool. If you want a piece that has a curve to it, you can lay it over a bottle or jar. If using an oven, put the piece of plastic on a Teflon sheet in a regular or toaster oven no hotter than 300° to 350° for approximately 3 minutes.
- If you want an embossed look to the piece, continue to heat the piece with the heat embossing tool. When the piece becomes very soft, stop heating and quickly press a rubber or wooden stamp into the plastic. After a few seconds, remove the stamp and let the piece cool completely. You will have to gently pry the piece off of the surface that it is on.
- After the piece is cooled, you can add more painting to the edges or highlights to an embossed area. You also may want to sand the edges to make them smooth. Try rolling or dabbing the edges of a piece onto a stamp pad for quick and easy colored edges.
- Add a ribbon or jewelry findings to your finished piece. Or use it in a collage, scrapbooking or journal!