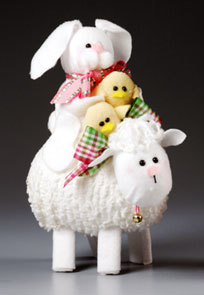
Easter Parade
These baby animals are marching into town just in time for spring. These adorable collection of furry friends makes a great Easter decoration, and a perfect addition to a baby's room year round.

Materials:
- STYROFOAM™Brand Foam:
- Ball, 2"
- Eggs: one 2"; two 3"; one 6"
- Fabrics: white chenille, 11" x 12"; yellow fleece, 4" x 8"; white fleece, 6" x 16"
- Felt: white, 9" x 12" sheets, two; yellow scrap; pink scrap
- Pom poms: 2" white, two; 1" pink, one
- White yarn, 2 yds.
- Ribbons: 1-1/2"- and 2"-wide patterned, 1/2 yd. each; pink satin, 1/4" x 1/3 yd.
- Embroidery floss: black, 1/2 yd.; white scrap
- Black eye beads, four each: 5mm; 6mm
- Gold jingle bell, 1"
- Wooden craft sticks, two
- Pink powdered blush
- Serrated knife
- Candle stub or paraffin
- Pencil
- Ruler
- Compass or circle template, 5"
- Scissors
- Embroidery needle, 3"
- Low-temp glue gun and glue sticks
- Thick, white craft glue
For pattern, click here. (pdf)
Steps:
General
1.Wax serrated knife with candle stub or paraffin.
2. Cut patterns from fleece and felt as indicated.
3. Once all characters are completed, glue bunny's bottom to lamb, leaving space for chicks. Glue chicks into bunny's arms as shown.
Bunny
1. Cut thin slice from narrow end of one 3" foam egg for body. Cut thin slice from one side of foam ball for head.
2. Cut two 5" circles from white fleece. Center foam head, rounded side down, on one fleece circle. Pull fleece edges up to flat side of head and glue to secure; this side is bottom of head.
3. Refer to photo and use scissors tip to poke two small holes for eyes into head; glue 6mm beads into holes. Glue white pom poms to head below eyes for muzzle. Glue pink pom pom nose in place. Use fingertip to blush cheeks.
4. Pleat ears along pattern lines and glue to head as shown.
5. Use second fleece circle to cover foam body in same way as head. Glue head to body; hold firmly until glue dries. Tie 1-1/2"-wide ribbon into bow around neck; trim ends.
6. Refer to Diagram 2 to glue arms and legs to sides of body.
Lamb
1. Cut remaining 3" foam egg in half for head; reserve one half for a future project. Cut thin slice from one long side of large egg for body.
2. Cut four 2" x 6" pieces from white felt for legs. Use scissors to gently round corners on chenille fabric rectangle for body.
3. Place foam head, flat side down, onto white felt. Use pencil to trace around head, 1-1/2" beyond foam edge; cut out. Center head, rounded side down, on felt. Pull felt edges up to flat side of head and glue to secure; this side is bottom of head.
4. Refer to photo and use scissors tip to poke two small holes for eyes into head; glue 6mm beads into holes.
5. Thread needle with three strands floss; knot ends. Insert needle through bottom of head, coming out at center front below eyes. Make small vertical straight stitch and take needle back through head; knot and clip threads. Glue nose to face.
6. Fold yarn in half repeatedly until it measures 4" in length; tie center of bundle with white floss. Glue bundle to top of head.
7. Pinch ear ends together and glue to either side of head, just under yarn. Use fingertip to blush cheeks.
8. Center body, rounded side down, on wrong side of chenille fabric. Pull fabric edges up to flat side of body and glue to secure; trim excess. This side is bottom of body.
9. For legs, cut craft sticks in half. Wrap and glue white felt strips cut in Step 2 around each leg. Refer to Diagram 1 to make slits in bottom of body; glue legs into slits.
10. Glue head to wide end of body; hold firmly until glue dries. Slip bell onto pink ribbon and tie around neck. Tie 2"-wide ribbon into bow; trim ends and glue to back of head.
Chicks
1. Cut small, 2" foam egg in half for bodies.
2. Use pencil to trace half-eggs onto yellow fleece, drawing 1-1/2" beyond foam edges; cut out. Center one half-egg, rounded side down, in center of each fleece piece. Pull fleece edges up to flat side of body and glue to secure; this side is back of body.
3. Refer to photo and use scissors tip to poke two small holes for eyes into each head; glue 5mm beads into holes. Glue beaks to faces under eyes. Glue wings to sides of bodies.
®™ Trademark of The Dow Chemical Company ("Dow") or an affiliated company of Dow. For more project ideas, please see styrofoamstyle.com.
Read NextGarden Bunny Easter Box
Your Recently Viewed Projects
Thanks for your comment. Don't forget to share!
Marilyn B
Mar 08, 2017
Love the Easter parade critters! Thanks for such great and complete instructions! For a softer look, you could add a little fiberfill to the lamb's legs to flesh them out a bit, or some cotton wool would do the trick too. The faces on these darling creatures is so sweet and will bring a smile to any child's face. This parade would be a darling Easter brunch centerpiece for a lovely table setting! Super!
Report Inappropriate Comment
Are you sure you would like to report this comment? It will be flagged for our moderators to take action.
Thank you for taking the time to improve the content on our site.