Easter Bunny Decor
This Easter holiday you should create a cute little bunny decor for your house. Using eggs, pom poms and felt Debra Quartermain shows us how to make this adorable little bunny.

Materials:
- STYROFOAM* Brand Products:
- 9" x 4" cone
- Balls: 1-1/2", one; 1", two
- Eggs: 2-1/2" x 1-7/8" and 1-15/16" x 1-1/2", one each
- Felt: mango tango or orange, 15" x 15"; apple green, two 9" x 12" sheets; white plush, 8" x 21"
- Green chenille stem, one
- 1" ombre sheer ribbon, 1/2 yd.
- Pom poms: 3/4" white, two; 1/4" pink, one
- Black embroidery floss
- Serrated knife
- Old candle
- Pencil
- Ruler
- Scissors
- Compass
- Straight pins
- Embroidery needle
- Low-temp glue gun and glue sticks
Pattern
Steps:
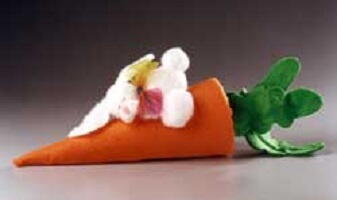
- Wax serrated knife blade with old candle. Cut one 1" ball in half for front paws. Cut smaller egg in half lengthwise for back feet. Cut a thin lengthwise slice from larger egg to flatten one side of body. Press 1-1/2" ball (head) and remaining 1" ball (tail) on a flat surface to slightly flatten one side.
- Using patterns, cut out felt pieces as indicated. From white plush felt, use a compass to cut following circles: one 4" for head, one 3" for tail, and two 2" for front paws.
- Center foam pieces for front paws, back feet, head, body, and tail flat side up on wrong side of corresponding plush felt piece. Wrap felt around foam onto flat side and pin at top, bottom, and center of each side. Adjust excess felt between pins, smoothing folds; glue felt in place. Remove pins. Trim excess felt as necessary.
- Cover foam cone with felt, overlapping long edges; glue. Fold over excess felt at wide end of cone and glue to foam. Glue opposite end in a point.
- Cut chenille stem in three equal lengths. Pair and glue felt leaves, sandwiching a chenille stem in between where indicated on pattern. Gather together and glue ends to center top of carrot. Bend and shape leaves as desired.
- Glue white pom poms side by side to front of bunny's head for cheeks; glue pink pom pom at center top for nose.
- Use two strands of black embroidery floss to work horizontal straight stitches for bunny's eyes. Insert needle through back of head to front and take a tiny stitch above one cheek. Return needle to back of head. Repeat to stitch second eye above opposite cheek. Knot ends of floss together and trim.
- With your fingers, gather base of each ear and glue to top of head. Position ears approximately 3/4" apart with ends extending outward.
- Using photo as a guide, glue bunny to carrot in the following order: body, head, front paws, back feet, and tail.
- Tie ribbon in a small bow and glue to bunny's neck.
®™ Trademark of The Dow Chemical Company ("Dow") or an affiliated company of Dow. For more project ideas, please see styrofoamstyle.com.
Read NextEaster Bunny Milk Jug Basket