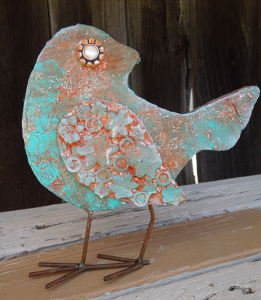
Textured Foil Bird
Aluminum foil isn't just meant for leftovers. You can also use this inexpensive supply to create your own Textured Foil Bird. By employing a simple vintage technique, you can design your own version of the project and give it a faux patina finish.

Materials:
- Aleene’s Fast Grab Tacky Glue
- Kitchen foil
- Wood bird with wire feet (Michaels)
- Pencil with eraser
- Scissors
- Paper plate
- Buttons (flower and round for wing, fancy for eye) – Blumenthal Lansing
- Acrylic paint – rust, aqua, white
- Cosmetic sponge wedges
Instructions:
-
Sketch a wing shape onto center (flat area) of paper plate. Cut along pattern line and adjust as needed to fit to bird.
-
Glue buttons onto wing shape. Set aside.
-
Cut piece of foil approximately 1-1/2 times larger than bird body.
- Carefully crinkle foil to give it lots of texture. Place foil on work surface and flatten with hands, adding more texture as you flatten.
-
Apply Aleene’s Fast Grab Tacky Glue with fingers to front of bird.
-
Press crinkled foil into glue. Cut away excess leaving approximately 1″ extra. Cut foil in 1/2″ intervals around entire bird. This will help the foil to wrap around the edges.
-
Apply glue with fingers along outside edge of bird. Gently wrap foil around sides, press into glue and cut away excess.
-
Repeat process to apply another piece of crinkled foil to back of bird wrapping excess around sides and gluing in place. If any side areas remain uncovered, glue small pieces of foil in place over exposed areas. Set aside.
-
Apply glue over buttons on wings. Crinkle piece of foil and press into glue. NOTE: it is easier when gluing over buttons if you bunch up the foil slightly when you are gluing in place. This gives extra foil to press down into the crevices of the buttons.
-
Use eraser end of pencil to press foil down into the crevices of the buttons. Use side of pencil to rub foil to help it conform to the shape/texture of the buttons. Continue to work the foil into the buttons until their designs can be clearly seen embossed in the foil.
-
Cut away excess foil leaving approximately 3/8″ to cut and glue around to back of wing. Set aside.
-
Use side of pencil to rub foil on front and back of bird. This will add more texture.
-
Use sponge to apply light coat of rust paint to front of bird. Let dry. Use sponge to apply light coat of aqua paint randomly over rust paint to give you the look of patina. Repeat on sides and back of bird. Set aside to dry.
-
Repeat painting technique on wing adding small highlights of white paint over the aqua. Let dry.
- Glue wing and button eye onto bird. Let dry.