How to Make Macrame Plant Hangers Video
Learn how to make macrame plant hangers with an easy step-by-step video tutorial!

Learn how to make macrame plant hangers for beginners with this simple step-by-step video tutorial!
This how to make macrame plant hangers video teaches you the basics of this wonderful throwback craft. This classic 1970s craft is making a comeback! You can use clothesline or another thick cord to make your plant hanger, and clothesline is great because this material allows you to hang your plant hanger outside without worrying about the elements.
In this macrame plant hanger tutorial, you'll learn the square knot and the half square knot, and you'll work up this project in no time! Macrame videos are easy to follow and will make you an expert in various elements of the craft. If you're a beginner to macrame projects, videos are the next best way to learn short of someone teaching you in person.
Get on trend and learn how to make a decoration that will add life to your space!
Looking for more simple tutorials? Get free projects sent directly to your inbox.
Subscribe to FaveCrafts
Estimated CostUnder $10
Time to CompleteUnder an hour

Project TypeMake a Project
Materials List
- Clothesline
- A potted plant to hang in the plant hanger!
Instructions
-
Cut 6 cords that are each 140 inches long. Fold them in half.
-
Take three groups of two cords each and, from the middle of the 140 inch length, create a braid a few inches long.
-
Repeat on the other side of the braid.
-
With the braid sticking up the top, knot in place with an overhead knot. This will be where the plant hanger hangs on the hook.
-
Straighten the cords out by running your hand through them and removing any twists. Divide the cords into three groups with three cords on each side and six cords in the middle.
-
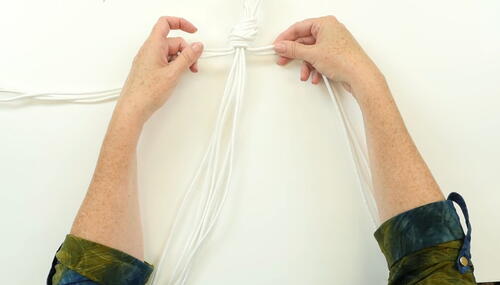
On the right, hold the three cords as if they were one. Bring them under the center cords and over the left-hand cords. Then bring the left cords and through the loop you created on the right-hand side. Pull tight to create the first half of your square knot.
-
For the second half of the square knot, take the right cords and bring them under the center cords and over the left cords. Then bring the left cords under the center cord and through the loop you created on the right-hand side. Pull tight to finish the square knot.
-
Now, divide the work into three groups of four. To do this, take one cord from the center and move it to your right-hand cords. Then take another cord from the center and move it to your left hand cords.
-
You will be working each group separately for this step. Starting with the center cords, create the first half of a square knot. Instead of completing the knot, repeat this half square knot 10 times to create a twist.
-
Repeat this step on the right-hand group of cords and the left hand group of cords.
-
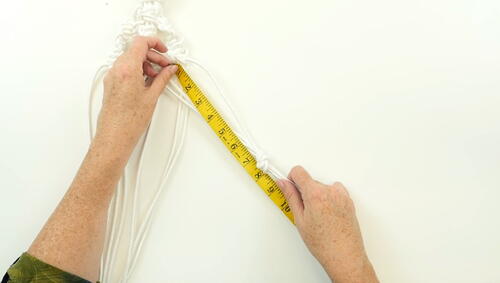
Next, take two cords from the right-hand group and two cords from the center group. Measure down approximately 8 inches and tie those four cords into an overhand knot.
-
In the same way, take two cords from the left-hand group and the remaining two cords from the center group. Measure down approximately 8 inches and tie those cords into an overhand knot to match.
-
Now take the last four cords, measure down approximately 8 inches and tie another overhand knot to match.
-
Straighten the cords and repeat the process, creating three more overhand knots about 4 inches down from the previous knots.
-
Measure down another four inches and tie all the cords into one knot. This is where your plant will sit.
-
To finish your macrame plant holder, you can cut the excess cords to your desired length. They can all be cut to the same length or to different lengths depending on the look you want to achieve. Once your cords are cut, tie one knot at the bottom of each cord to prevent fraying.


Read NextSuper Simple Etched Mason Jar