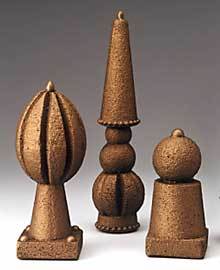
Bronze Finial Trio
Use leftover pieces of STYROFOAM to create these intriguing accents. The look is rich, warm, and contemporary, and the faux-finish technique is easy to do.

Materials:
Small Finial
- STYROFOAM Brand Foam:
- Sheet, 3" x 3" x 1"
- Cone, 6" x 3"
- Ball, 2-1/2"
- Wooden bead, 5/8"
Medium Finial
- STYROFOAM Brand Foam:
- Sheet, 3" x 3" x 1"
- Cone, 6" x 3"
- Egg, 4-1/2"
- Wooden beads: round, 1/2", four; oval, 3/4", one
Tall Finial
- STYROFOAM Brand Foam:
- Cones, one each size: 12" x 4", 6" x 3" (use medium finial cone)
- Balls, one each size: 3", 2", 1-1/2"
- Wooden beads: teardrop, 3/4"; string, 1/4" x 1/2 yd.
General Materials:
- Water-based acrylic primer
- Bronze faux finish
- Fine-line black permanent marker
- Ruler
- Utility knife with several new blades or serrated knife
- Old candle
- Disposable palette
- Water basin
- Paper towels
- Stiff-bristled paintbrush
- Disposable sponge brush
- Low-temp glue gun and glue sticks
(Note: Model shown used faux finishes from Modern Options)
Steps:
Small Finial
- Use utility knife or serrated knife to trim 1/4" from bottom of 3" foam square base; cut corners from base. Wax knife blade with old candle first for easier cutting.
- Draw a line around bottom of cone, 2-1/2" from base; cut on line.
- Using photo as guide, glue 2-1/2" cone section to base; glue ball to cone. Glue and push bead into top of ball. Let dry.
- Use stiff brush to apply one coat primer to finial. Let dry. Use disposable brush to apply two to three generous coats bronze finish. Follow manufacturer's instructions for drying time. Note: Paint all finials at once after assembly, if desired.
Medium Finial
- Use utility knife or serrated knife to trim 1/4" from bottom of 3" foam square base. Wax knife blade with old candle first for easier cutting.
- Draw lines around cone, 1" from top and 3-1/2" from top. Cut cone on lines; set aside 2-1/2" section. Note: Save rest of 6" cone for tall finial base.
- Holding egg narrow-end up, measure and mark egg into eight equal vertical segments. Cut a v-shaped notch along each line, 3/8" wide and 3/8" deep. Cut small slice from base of egg to make bottom flat.
- Using photo as guide, glue cone section to base; glue egg to cone. Glue and push oval bead into top of egg, and round beads into base corners.
- Use stiff brush to apply one coat primer to finial. Let dry. Use disposable brush to apply two to three generous coats bronze finish. Follow manufacturer's instructions for drying time. Note: Paint all finials at once after assembly, if desired.
Tall Finial
- Use utility knife or serrated knife to cut a 1"-thick slice from top of remaining medium-finial cone for base. Wax knife blade with old candle first for easier cutting.
- Measure and mark 3" ball into eight equal vertical segments. Cut a v-shaped notch along each line, 3/8" wide and 3/8" deep. Cut small slice from top and bottom of each foam ball.
- Draw line around 12" cone, 5-1/2" from tip; cut on line.
- Using photo as guide, glue balls to base; glue cone tip to balls. Glue and push teardrop bead into top of cone; glue bead string around bottom of cone and base.
- Use stiff brush to apply one coat primer to finial. Let dry. Use disposable brush to apply two to three generous coats bronze finish. Follow manufacturer's instructions for drying time.
®™ Trademark of The Dow Chemical Company ("Dow") or an affiliated company of Dow. For more project ideas, please see styrofoamstyle.com.