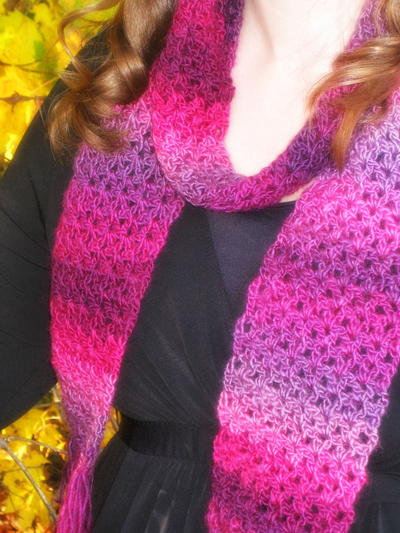
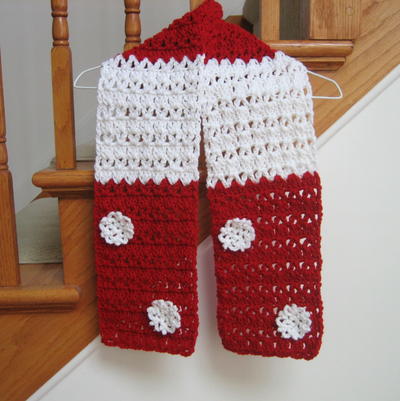
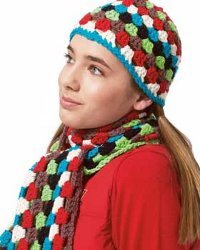
Beginner Crochet Hat and Scarf Set
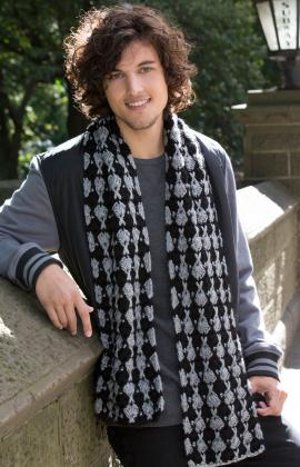
This free crochet hat and scarf set from Bernat Yarns is great for the beginner crocheter. This granny square technique is great for anyone to use and the Softee chunky yarn will keep you nice and warm. This pattern is great for men and women alike, and both patterns work up quickly and easily. This crochet set also makes a great gift for a friend or family member. For those who are new to crochet or who are looking for an easy pattern to get you through the winter, this is the pattern for you!

Materials:
- Ball of Bernat® Softee Chunky yarn in True Taupe (A)
- Ball of Bernat® Softee Chunky yarn in Berry Red (B)
- Ball of Bernat® Softee Chunky yarn in Natural (C)
- Ball of Bernat® Softee Chunky yarn in Hot Blue (D)
- Ball of Bernat® Softee Chunky yarn in Dark Blue (E)
- Ball of Bernat® Softee Chunky yarn in Hot Lime (F)
- 5.5 mm (U.S. I or 9) and 6 mm (U.S. J or 10) crochet hooks or size needed to obtain gauge
Gauge:
- Hat: 12½ dc and 6½ rows = 4 ins [10 cm] with smaller hook.
- Scarf: 12 dc and 6 rows = 4 ins [10 cm] with larger hook.
Instructions:
Hat: To fit Teen (Adult).
Scarf: Approx 8 ins [20.5 cm] wide x 75 ins [190.5 cm] long.
Stripe Pattern
- With A, work 1 row.
- With B, work 1 row.
- With C, work 1 row.
- With D, work 1 row.
- With E, work 1 row.
- With F, work 1 row.
- These 6 rows form Stripe Pat.
Hat
The instructions are written for smaller size. If changes are necessary for larger size the instructions will be written thus ( ). When only one number is given, it applies to both sizes. For ease in working, circle all numbers pertaining to your size.
-
With smaller (larger) hook and B, ch 6. Join with sl st in first ch to form a ring.
-
1st rnd: Ch 5 (counts as dc and ch 2). (3 dc in ring. Ch 2) 4 times. 2 dc in ring. Join with sl st in 3rd ch of ch 5.
-
2nd rnd: Sl st in next ch-2 sp. Ch 3 (counts as dc). (1 dc. Ch 2. 2 dc) in same ch-2 sp. [Ch 1. (2 dc. Ch 2. 2 dc) in next ch-2 sp] 4 times. Ch 1. Join with sl st in top of ch 3.
-
3rd rnd: Sl st in next dc and ch-2 sp. Ch 3 (counts as dc). (1 dc. Ch 1. 2 dc) in same ch-2 sp. [Ch 1. Miss next 2 dc. 3 dc in next ch-1 sp. Ch 1. Miss next 2 dc. (2 dc. Ch 1. 2 dc) in next ch-2 sp] 4 times. Ch 1. Miss next 2 dc. 3 dc in next ch-1 sp. Ch 1. Miss next 2 dc. Join with sl st in top of ch 3. Fasten off.
-
4th rnd: Join F with sl st in any ch-1 sp. Ch 3 (counts as dc). 2 dc in same ch-1 sp. (Ch 1. Miss next 2 dc. 3 dc in next ch-1 sp. Ch 1. Miss next 3 dc. 3 dc in next ch-1 sp. Ch 1. Miss next 2 dc. 3 dc in next ch-1 sp) 4 times. Ch 1. Miss next 2 dc. 3 dc in next ch-1 sp. Ch 1. Miss next 3 dc. 3 dc in next ch-1 sp. Ch 1. Join with sl st in top of ch 3. Fasten off. 15 3-dc groups.
-
5th rnd: Join A with sl st in any ch-1 sp. Ch 3 (counts as dc). 2 dc in same ch-1 sp. *Ch 1. 3 dc in next ch-1 sp. Rep from * around. Join with sl st in top of ch 3. Fasten off.
-
1st row of Stripe Pat is complete.
-
Keeping cont of Stripe Pat, rep last rnd 9 times more.
- Edging: Join D with sl st in any ch-1 sp. Ch 1. 1 sc in same sp as last sl st. 1 sc in each of next 3 dc. 1 sc in next ch-1 sp. Rep from * to last 3 dc. 1 sc in each of last 3 dc. Join with sl st in first sc. Fasten off.
Scarf
Notes: Join new color at end of each row.
To change color, work to last 2 loops on hook. Draw a loop of new color through last 2 loops on hook to complete st and proceed in new color.
-
With A, ch 203. Place marker on every 50th ch for easier counting.
-
1st row: (WS). With A, 1 dc in 8th ch from hook (counts as dc, ch 2 and 1 dc). 1 dc in each of next 2 ch. *Miss next 2 ch. 1 dc in each of next 3 ch. Rep from * to last 3 ch. Miss next 2 ch. 1 dc in last ch. Join B. Turn. 39 3-dc groups.
-
2nd row: With B, ch 3 (counts as dc). 2 dc in first ch-2 sp. *Ch 2. 3 dc in next ch-2 sp. Rep from * to last 3-dc group. Ch 2. 2 dc in turning ch. 1 dc in 3rd ch of turning ch. Join C. Turn.
-
3rd row: With C, ch 5 (counts as dc and ch 2). *3 dc in next ch-2 sp. Ch 2. Rep from * to last 3-dc group. Miss next 2 dc. 1 dc in top of turning ch. Join D. Turn.
-
First 3 rows of Stripe Pat are complete.
- Keeping cont of Stripe Pat, rep last 2 rows until Stripe Pat had been completed twice. Fasten off.
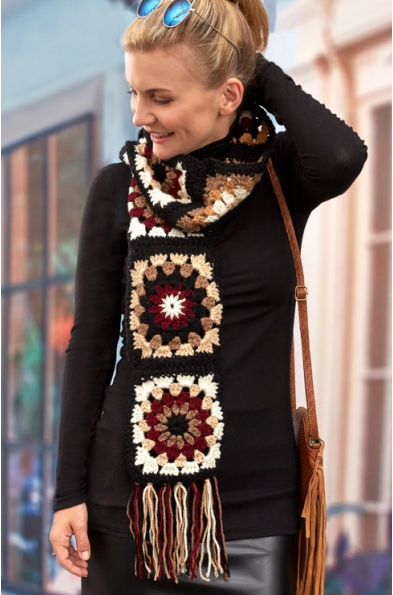
Motif (Make 4)
-
With B, ch 5. Join with sl st in first ch to form a ring.
-
1st rnd: Ch 5. (3 dc in ring. Ch 2) 3 times. 2 dc in ring. Join with sl st to 3rd ch of ch 5.
-
2nd rnd: Sl st in next ch-2 sp. Ch 3 (counts as dc). (2 dc. Ch 2. 3 dc) in same ch-2 sp. [Ch 1. Miss next 3 dc. (3 dc. Ch 2. 3 dc) in next ch-2 sp] 3 times. Ch 1. Join with sl st to top of ch 3.
-
3rd rnd: Sl st in each of next2 dc and ch-2 sp. Ch 3 (counts as dc). (2 dc. Ch 2. 3 dc) in same ch-2 sp. [Ch 1. Miss next 3 dc. 3 dc in next ch-1 sp. Ch 1. (3 dc. Ch 2. 3 dc) in next ch-2 sp] 3 times. Ch 1. Join with sl st to top of ch 3. Fasten off.
- FINISHING: Sew 2 Motifs tog. Sew Motifs to each end of Scarf.
Your Recently Viewed Projects
Thanks for your comment. Don't forget to share!
Inukshuk84
Mar 10, 2016
This is a great beginner project. I know from experience how discouraging it can get when learning a new skill and it's just not working out for you. Once you learn the basics, it's like a whole new world opens up and you realize that you can make just about anything. All it takes is patience and determination. This hat and scarf set are great for gift giving, as you can use any colour you want, in any combination!
Melissa Ryan
Dec 10, 2012
This pattern is so quick and easy! Great for beginners and those interested in learning how to make a crocheted hat and/or scarf
luckysea13
Jul 26, 2012
I think this pattern is cute & will look good on my grand daughter. Will make this for her 11 B-Day present.
treks1
Jan 25, 2011
Hi, Im new to some of the wording used and Im confused by the ending of the scarf. "FINISHING: Sew 2 Motifs tog. Sew Motifs to each end of Scarf." What is the motif and what does it look like on the ends of the scarf since its not shown? I see how its made but I just dont understand what it is. Sorry I feel a bit dense. lol
bzyliz 6976443
Nov 30, 2012
Just briefly reading the pattern; here is my understanding of it. After the scarf is completed, you end it and secure your yarn. Then you make 4 separate motifs. Sew( either needle & thread OR slip stitch two together.) Then sew two or slip stitch two on each end. I always slip stitch; just personal prefance. Does this help? bzyliz@aol.com
SoniaLenora2002 35 82612
Nov 23, 2010
This is it. This is what I've been looking for, for a long time. A pattern like this that tells how to crochet a hat just like this.
yamyamtuyo 8705816
Nov 03, 2010
i want learn to make hot and blanket with the dvd cd learn if you free a yarn you send me-my 1716-keeaumoku st#305 honolulu-hawaii 96822
lynntae7 0087989
Feb 12, 2012
Hi Yamyamtuyo! When I first began to crochet I bought a very inexpensive dvd kit from the Mary Maxim online catalog. I promise you, it is awesome! It shows "how to's", stitches, etc., and the best thing is that you can learn at your own pace and pause when you need to. Try it...
bryke
Jan 26, 2010
IN the hat directions for row 1 it say to ch 4 in the beginning, but the last direction is to slip stitch in the 3rd chain of the ch 5. There is no ch5. Please explain. thank you bryke bunky749@yahoo.com
Report Inappropriate Comment
Are you sure you would like to report this comment? It will be flagged for our moderators to take action.
Thank you for taking the time to improve the content on our site.