This project was submitted by one of our readers, just like you.
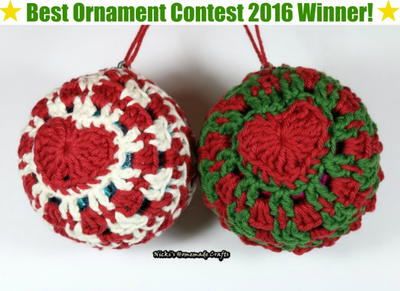
Christmas Bauble with Hearts
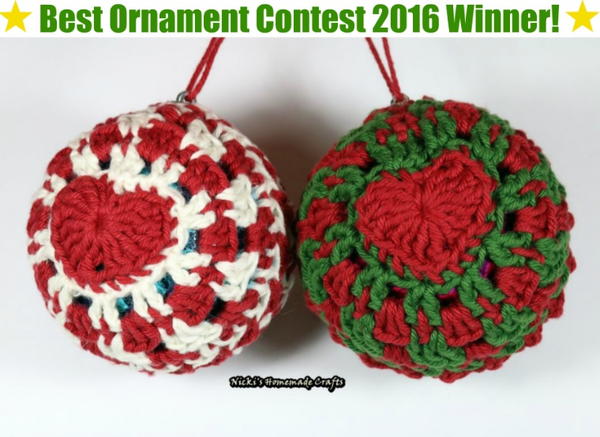
"The Christmas bauble is made by creating two identical halves first, starting with making the heart on each half. One finished making the halves they are crocheted together using a zigzag stitch, a variation of the braided stitch. The yarn that was used is Knitpicks dishie yarn and a 3.5mm hook and an ornament with 3inches in diameter is needed. I designed the pattern myself and published it for free on my website www.nickishomemadecrafts.com The post also includes photos and a video tutorial that help you recreate this beautiful ornament."
This project won the Best Ornament Contest 2016! Check out the top ten winners here, and be sure to check out all of the amazing ornament tutorial entries.
Estimated CostUnder $10
Time to CompleteIn an evening
MaterialsYarn
Primary TechniqueCrochet

HolidayChristmas
Project TypeMake a Project
Materials List
- worsted weighted yarn, such as Knit picks dishie, in red, green, white
- 3.5mm hook
- scissors
- needle for weaving in the ends
- my pattern on my website: www.nickishomemadecrafts.com
- 3 inch ornament ball
Instructions
Bauble Halves (make 2):
-
Starting with red yarn (making the heart)
Row 1: Ch4, you will now place all the following stitches in the same stitch which is the 4th chain from the hook: 3tr, 3dc, ch1, 1tr, ch1, 3dc, 3tr, ch3, sl st into the center of the heart -
Change yarn to green, drop red behind (you will pick it back up in row 4)
-
Row 2: Ch1, in BLO sc in each stitch all around, sl st into 1st sc
-
Row 3: Ch2, 2dc in the same stitch, ch1, sk st, *2dc, ch1, sk st, repeat from * all around, sl st to first dc
-
Change yarn to red, drop green behind (you will pick it back up in row 5)
-
Row 4: Ch1, *1hdc into space between the 2dc from the previous round, 2hdc into chain space from previous round, repeat from * all around, sl st to first hdc
-
Change yarn to green, drop red behind (you will pick it back up in row 6)
-
Row 5: Ch2, 1dc into the same st, *place 2dc into the space between 1hdc and 3hdc from the previous round, ch1, place 1dc into the space between 3hdc and 1hdc from the previous round, repeat from * all around, sl st to first dc
-
Change yarn to red, drop green behind (you will pick it back up in row 7)
-
Row 6: Ch1, 1hdc into the space before the ch1 you just made (video is very helpful on this part), ch1, *3hdc in space between 2dc and 1dc from previous round, ch1, repeat from * all around, place 2hdc into the last space where the first hdc was placed, sl st to first hdc
-
Change yarn to green (fasten off red)
-
Row 7: Ch1, sc into the same st, *2hdc into the next space, 1sc into next 2st, repeat all around, ending with 1sc (not 2sc as you already place 1sc in the beginning), sl st to first sc
-
Fasten off and weave in the ends.
Crocheting the two halves together using a zigzag stitch:
-
Attach the red yarn
-
Ch1, *sc to second half of the bauble, ch2 (let go of the chain), sk st, pull the hook thru the next stitch of the first half bauble, pull the loop you juts let go thru, ch1, sk st on the second half of the bauble, sc, repeat from * all the way around, placing the plastic ornament between the two halves after a couple of stitches, fasten off and weave in the end.
NotesI hope you like the ornament just as much as I do.
Your Recently Viewed Projects
mulberrygalprinces s
Aug 20, 2018
This is so easy and so cute it's almost a crime. Plus you get to use up some of your yarn stash. I have family far away so something like this is perfect to make and send. It's light weight for shipping costs and it's non breakable. Thank you for sharing it
Cheryl Y
Nov 28, 2016
I love this Christmas Bauble with Hearts pattern. After reading the written pattern and seeing the video, it looks and sounds so easy to make. I think this pattern would be a good way to cover up the old painted balls I have from many years ago that no one wants to put on the tree. I like the way she explains how to do the zig zag stitch, and it looks like a great way to put the two halves together. I see that the written pattern is right on this page, but to see the video, click on the link "Clink here for the Christmas Craft", and the video is after the written pattern. Thank you so much for sharing this free crochet craft!
Report Inappropriate Comment
Are you sure you would like to report this comment? It will be flagged for our moderators to take action.
Thank you for taking the time to improve the content on our site.


