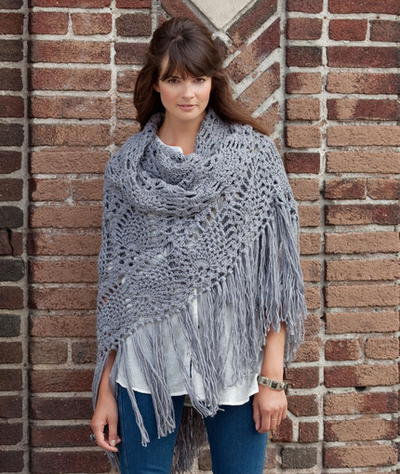
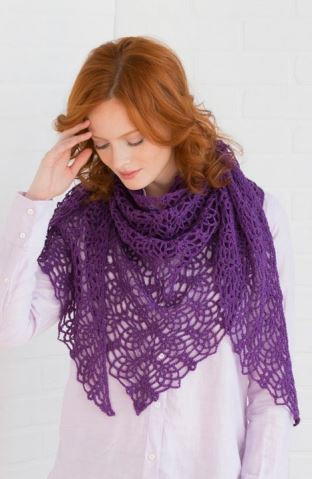
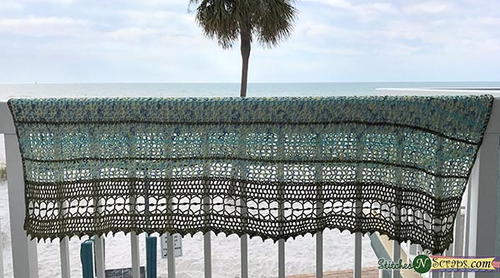
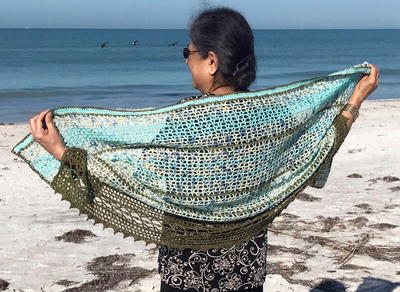
Sargassum Free Crochet Shawl Pattern
This gorgeous crochet shawl is perfect for a beach visit.

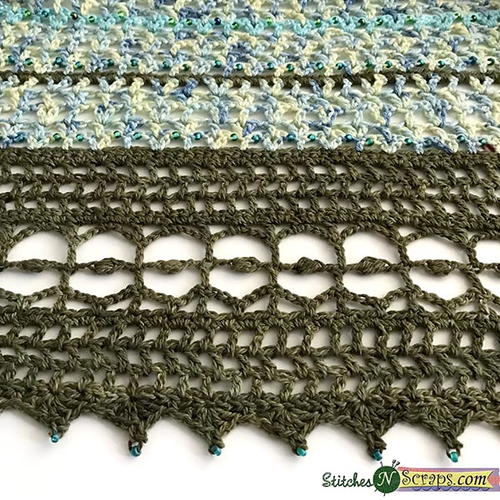
Free crochet shawl patterns make the perfect layer for a day at the beach, and the colors and texture of this stunning Sargassum shawl capture the beach visits of a brisk spring day. Shades of ocean blue, sandy brown, and the rich green of seaweed make this beautiful shawl a nostalgic accessory.
This is a great pattern for a crocheter with some experience as it features mostly easy stitches, though the border is more complex. If you've had some practice with crochet and are looking to take your skills up a notch, this gorgeous pattern is a fantastic option.
NotesNotes:
- ·2 of the yarns I used were Schachenmayr Catania Color in #053 “Fresh Color” (B) and Catania #397 Turquoise (C). The green yarn (A) was Toluca Coronado, which is now discontinued. Catania #395 Olive could be a good substitution.
·If you want to adjust the width, the pattern repeat is a multiple of 6 + 3.

Crochet HookG/6 or 4 mm hook
Yarn Weight(2) Fine (23-26 stitches to 4 inches)
Crochet Gauge17 dc x 7 rows = 4 inches (after blocking). Exact gauge is not critical.
Finished SizeAbout 27 x 60 inches after blocking.
Materials List
- Sport weight cotton yarn: 400-425 yds Color A (shown in olive green), 525-550 yds Color B (shown in multi), and 300-320 yds Color C (shown in turquoise)
- Size G (4 mm) hook or size needed to match gauge.
- Yarn or tapestry needle
- Optional: 637 beads, size 6/0 (slightly larger is ok too, just make sure they have a big enough hole to fit on your yarn). I used this “Summer Greens” assortment from Bead Biz.
Instructions
Special Stitches:
-
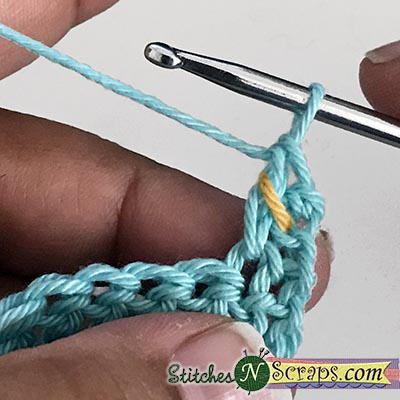
Linked Double Crochet (ldc):
For first stitch: Insert hook into 2nd ch from hook and draw up a loop, insert hook into next st and draw up a loop, (yo and draw through 2 loops on hook twice).
For remaining stitches: Insert hook into center bar of previous stitch (see picture below) and draw up a loop, insert hook into next st and draw up a loop, (yo and draw through 2 loops on hook twice).
Watch the video tutorial: Linked Double Crochet -
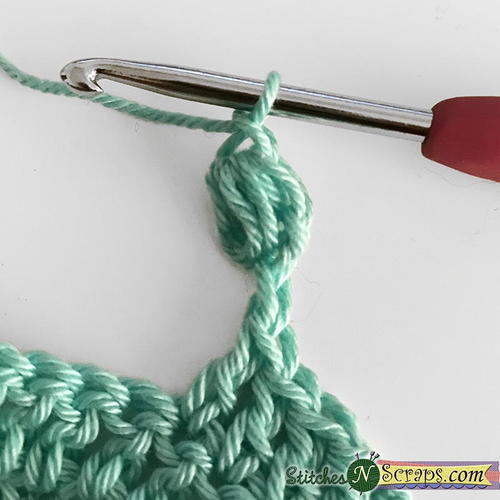
Puff Stitch (puff):
(Yo, insert hook into specified ch and draw up a loop) 3 times, yo and draw through all 7 loops on hook, ch 1 to close. -
V Stitch (V):
(Dc, ch 1, dc) in indicated stitch or space. In the stitch counts, Vs are counted as one complete stitch – the dc stitches and spaces that make up the Vs are not counted as separate stitches. When working into a V, work only into the space in the center and ignore the dc stitches. -
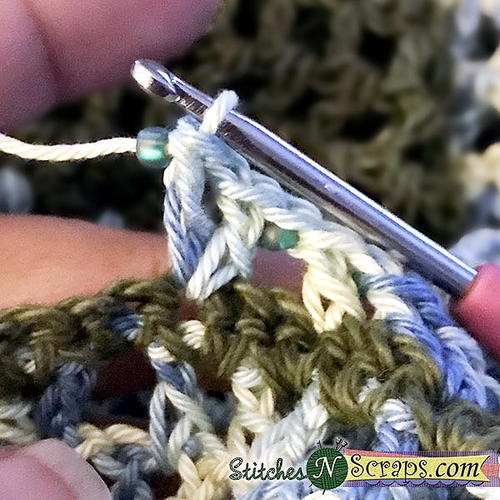
Set Bead (sb):
Slide a bead up next to the last stitch you made, so that it gets wrapped up into the next stitch or chain. This is optional. If you’re not using beads, ignore this wherever you see it.
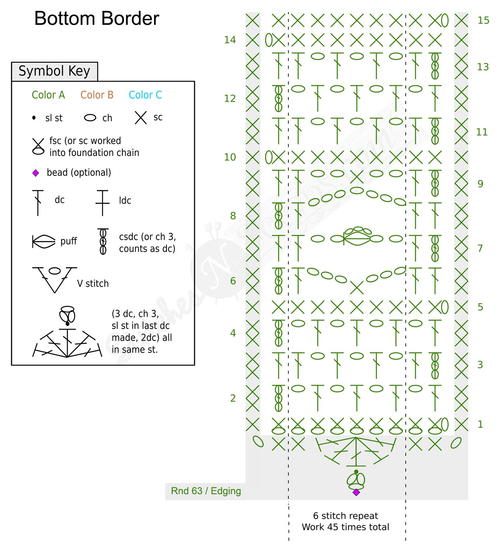
Bottom Border:
Note: Starting with foundation stitches is recommended. If you are going to use chains instead, I suggest making a few extra chains just to be safe, and then later undo the ones you don’t use.
-
Row 1 (RS): With A, work 273 fsc.
OR Alternate Row 1: With A, ch 274, sc in 2nd ch from hook and in each ch across. (273 sc)
Note: The chainless starting dc stitch (csdc) counts as a dc for all the stitch counts. It helps add structure to the edge. If you don’t like it, you can substitute “ch 3 (counts as dc), turn” instead of “turn, csdc” everywhere it appears. -
Row 2: Turn, csdc, ch 1, sk next st, (dc in next st, ch 1, sk next st) across to last st, dc in last st. (137 sts, 136 sps)
-
Row 3: Turn, csdc, (dc in next sp, ch 1, sk next st) across to last sp, dc in last sp, dc in last st. (138 sts, 135 sps)
-
Row 4: Repeat row 2.
-
Row 5: Ch 1, turn, sc in each st and sp across. (273 sc)
-
Row 6: Turn, csdc, (dc in next st, ch 3, sk next 2 sts, sc in next st, ch 3, sk next 2 sts) 45 times, dc in last 2 sts. (48 dc, 45 sc, 90 sps)
Note: On rows 7 & 8, skip all the spaces and sc stitches from the previous row – you’ll only be working into the dc stitches. -
Row 7: Turn, csdc, (dc in next dc, ch 4, puff in 3rd ch from hook, ch 1) 45 times, dc in last 2 sts. (48 dc, 45 puffs, 90 sps)
-
Row 8: Turn, csdc, (dc in next dc, ch 7) 45 times, dc in last 2 sts. (48 dc, 45 sps)
-
Row 9: Turn, csdc, (dc in next dc, ch 2, sc in next sp, ch 2) 45 times, dc in last 2 sts. (48 dc, 45 sc, 90 sps)
-
Row 10: Ch 1, turn, sc in each st and 2 sc in each sp across. (273 sc)
-
Rows 11-14: Repeat rows 2-5.
-
Optional: String 91 beads on to skein of B.
-
Row 15: Ch 1, turn, sc each st across, change to B, fasten off A.
Main Section 1:
Note: In the stitch counts, Vs are counted as one complete stitch – the dc stitches and spaces that make up the Vs are not counted as separate stitches.
-
Row 16 (WS): With B, turn, csdc, sb, ch 1, sk next st, (dc in next st, sb, ch 1, sk next 2 sts, V in next st, sb, ch 1, sk next 2 sts) 45 times, dc in last st. (45 Vs, 47 dc, 91 sps with beads)
-
Row 17: Turn, csdc, dc in next sp, (ch 1, dc in next V, ch 1, V in next dc) 45 times, dc in last dc. (45 Vs, 48 dc, 90 sps)
-
Row 18: Turn, csdc, (ch 1, dc in next V, ch 1, V in next dc) 45 times, ch 1, sk next dc, dc in last dc. (45 Vs, 47 dc, 91 sps)
-
Row 19-20: Repeat rows 17-18, changing to A at the end of row 18, fasten off B.
-
Optional: String 91 beads on to skein of B.
-
Row 21: With A, ch 1, turn, sc in first st, sc in first sp, (2 sc in next V, 2 sc in next sp, sk next dc, 2 sc in next sp) across to last st, sc in last st, changing to B, fasten off A. (273 sc)
Main Section 2:
-
Row 22-24: With B, Repeat rows 16-18.
-
Optional: String 91 beads on to skein of C.
-
Row 25: Repeat row 17, changing to C at the end of the row, fasten off B.
-
Row 26: With C, repeat row 16, changing to B at the end of the row, fasten off C.
-
Rows 27-31: With B, repeat rows 17-21 (including color changes and the option of stringing beads).
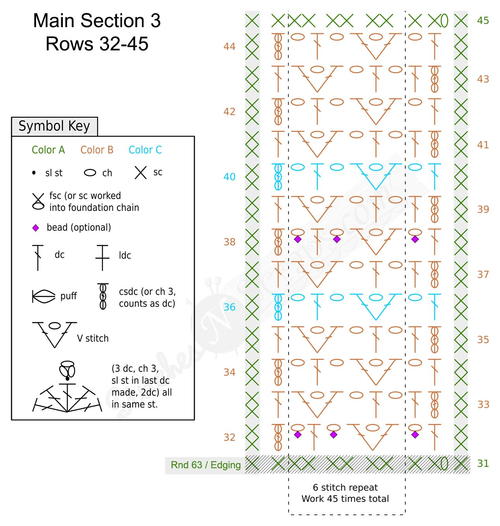
Main Section 3:
-
Rows 32-34: With B, Repeat rows 16-18.
-
Row 35: Repeat row 17, changing to C at the end of the row, fasten off B.Repeat row 17, changing to C at the end of the row, fasten off B.
-
Optional: String 91 beads on to skein of B.
-
Row 36: With C, repeat row 18, changing to B at the end of the row, fasten off C.
-
Row 37: With B, repeat row 17.
-
Row 38: Repeat row 16.
-
Row 39: Repeat row 17, changing to C at the end of the row, fasten off B.
-
Row 40: With C, repeat row 18, changing to B at the end of the row, fasten off C.
-
Row 41-45: With B, repeat rows 17-21 (including color changes and the option of stringing beads).
Main Section 4:
-
Rows 46-48: With B, Repeat rows 16-18.
-
Optional: String 91 beads on to skein of C.
-
Row 49: Repeat row 17, changing to C at the end of the row, fasten off B.
-
Row 50: With C repeat row 18.
-
Row 51: Repeat row 17.
-
Row 52-44: Repeat row 16-18, changing to B at the end of row 18, fasten off C.
-
Rows 55-59: Repeat rows 17-21, including color changes, but do not string any beads.
Top Border:
-
Row 60: With B, ch 1, turn, sc in each st across, changing to C at the end of the row, fasten off B.
-
Row 61: With C, turn, csdc, ldc in each st across, changing to B at the end of the row, fasten off C.
-
Optional: String 45 beads on to skein of A.
-
Row 62: With B, ch 1, turn, sc in each st across, changing to A at the end of the row, fasten off B.
Edging:
Rnd 63:
-
With A, ch 1, turn, sc in each st across, do not fasten off.
-
With right side facing, rotate work to work into sides of rows. Sc in each sc row, and 2 sc in each dc row across to bottom corner. (114 sts)
-
Working into bottom of row 1: Ch 1, sc in same corner st, *sc in next st, sk next 2 sts, (3 dc, ch 1, sb, ch 2, sl st in top of last dc made, 2 dc) in next st, sk next 2 sts, repeat from * 44 more times, sc in last 2 sts. (45 fans)
-
Working into sides of rows: Sc in each sc row and 2 sc in each dc row across to top corner.
-
Fasten off and join with invisible join method OR join with sl st and then fasten off.
-
Weave in all ends. Wash and block.
Charts:
Note: This is the same pattern as the written instructions do one or the other, not both. The chart is broken up into several pieces for ease of use – each section shows one row of overlap. The shaded edging / rnd 63 is done last and goes around the whole outside.
Click images to view larger versions.


Find more of Pia's patterns at stitchesnscraps.com.
Special Abbreviations
- fsc
- foundation single crochet (optional)
- csdc
- chainless starting double crochet (optional)
- ldc
- linked double crochet
- puff
- puff stitch
- V
- V stitch
- sb
- Set bead
For what occasion would you make this shawl?
Read NextAsymmetry Jacket

Thanks for your comment. Don't forget to share!
Cheryl Y
Mar 06, 2018
The name got me on this one. After reading the written pattern and looking at the charts, I so want to try this one. I think it would be a nice shawl to wear on the beach when it's windy. I'm not sure how to do the Linked Double Crochet stitch though. I read and reread the directions and it isn't making sense to me? I'm hoping to find a video on how to do this stitch. Other than that I understand the pattern. After I learn how to do the Linked Double Crochet I'll be trying this one. Thank you so much for sharing this free crochet shawl pattern.
Editor Dana
Mar 12, 2018
Hi Cheryl! Here's a tutorial on Pia's blog for how to do the ldc stitch, along with a video! http://stitchesnscraps.com/tutorial-linked-double-crochet-ldc/ I hope that helps!
Report Inappropriate Comment
Are you sure you would like to report this comment? It will be flagged for our moderators to take action.
Thank you for taking the time to improve the content on our site.