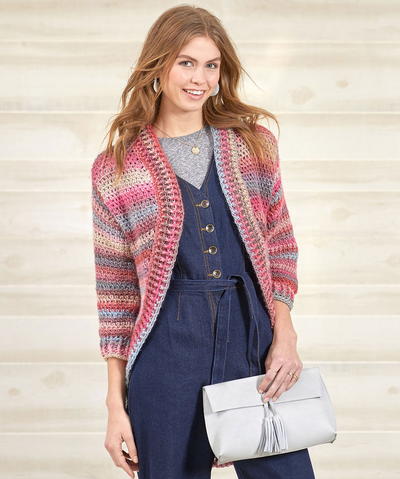
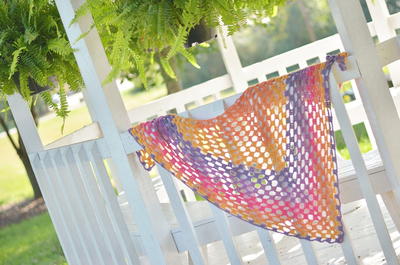
Granny Squares Crochet Jacket
This free crochet pattern uses bright yarn to make a beautiful, summery granny squares crochet jacket. This jacket will keep you warm while also keeping you "cool!"

Materials:
- Sizes H/8 (5 mm) crochet hook or size needed to obtain gauge.
- Yarn needle
- Caron International's Simply Soft Brites
- 100% acrylic, worsted weight yarn (6 oz): 3 skeins of Black (9727) (MC), 1 skein each of Grape (9610) (A), Watermelon (9604) (B), Limelight (9607) (C), Mango (9605) (D) and Lemonade (9606) (E).
GAUGE:
One motif = 4.5”/11cm square.
TAKE TIME TO CHECK YOUR GAUGE.
FINISHED MEASUREMENTS:
Bust (buttoned): 37.5”
Length at center back: 21”
Instructions:
Full Motif
-
With 1st color, ch 4; join with sl st to first ch to form ring.
-
Rnd 1: Ch 3 (counts as dc), 15 dc in ring; join with sl st to top of ch 3 – 16 dc. Break 1st color.
-
Rnd 2: Join 2nd color with sl st to any dc, ch 4 (counts as dc and ch 1), *dc in next dc, ch 1; rep from * 14 times more; join with sl
-
st to 3rd ch of ch 4.
-
Rnd 3: Sl st in next ch-1 sp, ch 3 (counts as dc), dc in same sp, *ch 1, 2 dc in next ch-1 sp; rep from * 14 times more, ch 1; join with sl st to top of ch 3. Break 2nd color.
-
Rnd 4: Join MC with sl st to any ch-1 sp, ch 1, sc in same sp, sc in each dc and ch-1 sp around; join with sl st to first sc.
- Rnd 5: Ch 2 (counts as hdc), miss next 2 sc, *(3 tr, ch 3, 3 tr) in next sc for corner, miss next 2 sc, hdc in each of next 2 sc, sc in each of next 3 sc**, hdc in each of next 2 sc; rep from * twice more, then from * to ** once, hdc in next sc; join with sl st to top of ch 2. Fasten off.
Half Motif
-
With 1st color, ch 4; join with sl st to first ch to form ring.
-
Row 1: Ch 3 (counts as dc), 8 dc in ring– 9 dc. Break 1st color.
-
Row 2: Join 2nd color with sl st to top of ch 3, ch 4 (counts as dc and ch 1), *dc in next dc, ch 1; rep from * 6 times more, dc in last dc. Fasten off.
-
Row 3: Join 2nd color with sl st in 3rd ch of ch 4, ch 3 (counts as dc), *2 dc in next ch-1 sp, ch 1; rep from * 6 times more, 2 dc in last ch-1 sp, dc in last dc. Break 2nd color.
-
Row 4: Join MC with sl st to top of ch 3, ch 1, sc in same sp, sc in each dc and ch-1 sp to end of row. Fasten off.
-
Row 5: Join MC with sl st to first sc, ch 4 (counts as tr), 3 tr in same sp, *miss next 2 sc, hdc in each of next 2 sc, sc in each of next 3 sc, hdc in each of next 2 sc, miss next 2 sc*, (3 tr, ch 3, 3 tr) in next sc for corner, rep from * to * once, 4 tr in last sc. Fasten off.
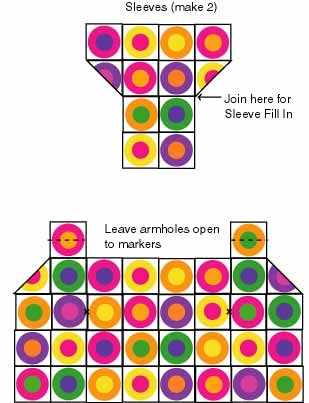
- Using photo as a guide, make Full and Half Motifs in colors indicated (center circle is 1st color, outer circle is 2nd color).
Joining Motifs: With right sides tog, place 1 motif on top of another. Join MC with sl st in corner ch-3 sps of both motifs, ch 1, sc in same sp, sc through both thicknesses across motifs to opposite corner, sc in corner. Fasten off.
Sleeve Fill In (Right Edge of Sleeve):
-
Row 1: With RS facing, join MC with sl st in corner ch-3 sp indicated on diagram, ch 3, sl st in next tr of Full Motif, (ch 1, dc) 3 times in same sp as first sl st, sl st in base of row 5 of Half Motif. Turn.
-
Row 2: Ch 3, sl st in side of row 2 of Half Motif, dc in first dc, (dc in next ch-1 sp, ch 1) 3 times, 2 dc in last dc, miss next 2 tr of Full Motif, sl st in next hdc. Turn.
-
Row 3: Ch 3, miss next hdc, sl st in next hdc, ch 1, dc in first dc, (dc in next ch-1 sp, ch 1) 5 times, (dc, ch 1, dc) in last dc, sl st in side of row 1 of Half Motif. Turn.
-
Row 4: Ch 3, sl st in center ring of Half Motif, ch 1, dc in first dc, (dc in next ch-1 sp, ch 1) 7 times, (dc, ch 1, dc) in last dc, miss next 2 sc of Full Motif, sl st in next sc. Turn.
-
Row 5: Ch 3, miss next hdc, sl st in next hdc, ch 1, dc in first dc, (dc in next ch-1 sp, ch 1) 9 times, (dc, ch 1, dc) in last dc, sl st in side of row 1 of Half Motif. Turn.
-
Row 6: Ch 3, sl st in side of row 3 of Half Motif, ch 1, dc in first dc, (dc in next ch-1 sp, ch 1) 11 times, (dc, ch 1, dc) in last dc, miss next 2 tr of Full Motif, sl st in next tr. Turn.
- Row 7: Ch 3, miss next hdc, sl st in next corner sp of 2 Full Motifs, dc in first dc, (dc in next ch-1 sp, ch 1) 13 times, dc in last dc, sl st in side of row 5 of Half Motif. Fasten off.
Sleeve Fill In (Left Edge of Sleeve): Work as for Right Edge of Sleeve joining MC with sl st in corner ch-3 sp indicated on diagram with WS facing.
Sleeve Edging:
-
Row 1: With RS facing, join MC with sl st in bottom corner of Sleeve, ch 1, sc in same sp, work 15 sc across bottom edge of Motif, 1 sc in joining sp between Motifs, work 15 sc across bottom edge of Motif. Fasten off.
-
Row 2: (RS). Join MC with sl st in first sc of Row 1. Ch 1. 1 sc in each sc across. Do not turn.
-
Row 3: Working from left to right, instead of from right to left as usual, work 1 reverse sc in each sc across. Fasten off.
- Lower Edging: Row 1: With RS facing, join MC with sl st in bottom corner of Left Front, ch 1, sc in same sp, *work 15 sc across bottom edge of Motif, 1 sc in joining sp between Motifs, rep from * 6 times more, work 15 sc across bottom edge of last Motif. Fasten off.
Rows 2 and 3: Work as for Sleeve Edging.
Neck Edging:
-
Row 1: With RS facing, join MC with sl st in bottom corner of Right Front, ch 1, sc in same sp, 2 sc up side of lower edging, *work 15 sc across side edge of motif, 1 sc in joining sp between motifs*, rep from * to * twice more, work 19 sc along side of half motif, 1 sc in joining sp between motifs, 15 sc down side of top motif, 1 sc in joining sp between motifs, rep from * to * 4 times, work 15 sc up side of top motif, 1 sc in joining sp between motifs, 19 sc along side of half motif, 1 sc in joining sp between motifs, rep from * to * twice, work 15 sc down side of motif and 3 sc along side of lower edging. Fasten off.
-
Row 2: (RS). Join MC with sl st in first sc of Row 1. Ch 1, 1 sc in each of first 2 sc, *ch 2. miss next 2 sc, 1 sc in each of next 6 sc; rep from * 6 times more, sc in each sc across, working sc3tog at corners of back neck. Do not turn. 7 buttonholes.
- Row 3: Working from left to right, instead of from right to left as usual, work 1 reverse sc in each sc and 2 reverse sc in each ch-2 sp across. Fasten off.
Join Sleeves to body. Join sleeve seams. Sew on buttons.
Read NextSimply Savvy Crochet Ruana Pattern
Your Recently Viewed Projects


Thanks for your comment. Don't forget to share!
Zeemer
May 16, 2016
So beautiful. The possibilities for the granny squares are indeed endless. Look at this sweater, it's so elegant. Thanks for having the pattern on the same page. I will definitely make this sweater as a gift or for sale.
Member 9775729
Jan 02, 2016
This is what I did to fix the issue with not understanding the Sleeve Fill In Row - sl st into corner ch sp indicated on diagram ch counts as dc ch dc in same ch sp ch dc times in same ch sp sl st in base of Row of Half Motif ch sl st in side of Row of Half Motif Turn Row - ch dc in first dc dc in next ch sp ch times dc in last dc starting ch miss next tr of Full Motif sl st in next tr sk next hdc sl st in next hdc Turn Row - ch dc in first dc dc in next ch sp ch times dc ch dc in last dc sl st in side of Row of Half Motif sl st in center ring of Half Motif Turn Row - ch dc in first dc dc in…Read More next ch sp ch times dc ch dc in last dc miss next sc of Full Motif sl st in next sc miss next hdc sl st in next hdc Turn Row - ch dc on first dc dc in next ch sp ch times dc ch dc in last dc sl st in side of Row of Half Motif ch sl st in side of Row of Half Motif Turn Row - ch dc in first dc dc in next ch sp ch times de ch dc in last dc miss next tr of Full Motif sl st in next tr sl st in corner sp of Full Motifs Turn Row - ch dc in first dc dc in next ch sp ch times dc in last dc sl st in side of Row of Half Motif Fasten off
kristybobs
Aug 21, 2015
Hi. I've made the main body of the jacket but can't figure out the pattern for the neckline. Please can someone simplify this for me?
kjwilson
Jan 13, 2014
Sorry about the bizzare post - evidently I didn't "copy" the right thing before I pasted into the comments. I have just started making the squares and have a few questions about the main body diagram. What do the "x"s mean on the second squares in from each end on the first row of FULL mofit squares? Do they mean make both full and 1/2 motifs - full for the back piece and 1/2 for the front neckline? Also, what do the dotted lines on the 2 topmost squares mean? I think this is going to be an adventure......
kjwilson
Jan 13, 2014
Makes: 8 servings, 1 cups each Active Time: 45 minutes Total Time: 4 to 8 hours (not including soaking chickpeas overnight)
n2odat 4971373
Dec 04, 2013
I have the larger part made but can not figure out how thebr /sleeves will fit in? Can you email me how that works?br /Thank you.br /Beverly Murraybr /
Della16
Dec 01, 2013
I would like to see the front, back, and sleeves laid out so I can have an idea how it is supposed to go together. I would love to make it, but I have to see the parts before I can make a new project.
sprewmom
Aug 19, 2013
I have attempted the sleeve fill 3 times now - I have absolutely no idea what they're trying to accomplish and/or how to do it - has anyone mastered this? any help would be appreciated - I have a deadline that's fast approaching!! nancyn@live.com
Jenny Wren
Jun 10, 2013
Help wanted in assembling squares. I do not understand how the sleeves fit in!
tkosoccermom 38306 31
Feb 09, 2013
I have made this pattern bigger by adding two rows or Treble crochet to each side of each piece (front and back) The final waist measures 41". I also added one square column to each sleeve, to fit the adjustment on the body of the sweater. I would have added a full square to each side but didn't need that much. It was a little bit of trial and error but the end product looks very nice, and I have gotten many compliments! Hope this helps
lilbitsbiz 0948321
Jan 23, 2015
Can you please explain, in detail, how you did the sleeve fill in? TIA
tkosoccermom 38306 31
Feb 09, 2013
I have made this sweater for myself, and now making it as a gift. I cannot for the life of me figure out the proper way to do the sleeve fill-in. Please help!! e-mail me if necessary tkosoccermom@hotmail.com. Thank You
eeyore71257 299237 4
Oct 17, 2012
I love this jacket but I am having trouble getting the sleeves in. Did anyone else have trouble or am I the only one. PLEASE let me know. Thanks Suggestions are welcome
janwuelfing 340770 5
Jun 25, 2012
just started to do this one see how i go looks good though jan w
anninsa
Jun 21, 2012
What about making it with thicker yarn and bigger hook to get a bigger size? It will require some calculations but that could work.
moonbeamangel3 735 1751
May 27, 2012
Im another lady who would like this pattern in a plus size, seems they never answer our comments, very angry
lindalawton360 452 7195
Mar 08, 2012
I too would love a plus size pattern for this beautiful sweater. A 2x size.
vwilkerson211 8869 180
Mar 07, 2012
I would also like to have this pattern in plus size. If any one has one please email it to me at vwilkerson211@yahoo.com. Thanks
charlinedosenbach 9874360
Jun 21, 2012
Take your measurements and make an outline on graph paper and make a sample square to determine your gauge. Following the diagrame at the bottom of the pattern, increase or decrease the square's placement to fit your measurements. I hope this helps.
pate0613
Jul 24, 2011
Did anybody get the pattern for larger sizes?? If so I'd really like to get it also. I love this sweater and would love to make it!!! If someone has it for a larger size would you please email it to me at pate0613@gmail.com? Thank you!
Marzapan
Dec 07, 2010
I don't like granny squares normally, too ugly , but this is the first pattern using them that I actually like!
grammaberr
Dec 01, 2010
Do they ever answer the requests on here? I also would like to have the pattern for the larger sizes of this sweater? And if there is a pattern for this, can somone direct me to it? THANK YOU, KATHY
HuskerBeth
Dec 01, 2010
I too would love to have instructions to enlarge this jacket. I would like one for sizes, XL, XX, XXX.
Linda Brown
Dec 01, 2010
Can you give me the information on making this pattern fit 50 - 52" busted person please, I am not this small either? Any ideas on making this change in this pattern? Please email me: llinda.brown@att.net. Thank you for your help. ljb
Member 14523
Aug 24, 2010
Caron Yarn sent us the diagram, which you can now seen at the bottom of the pattern. Apologies for the omission!
Crafter 1461747
Jul 31, 2010
The diagram is missing. How can I get a copy of the diagram? Is is possible to have it emailed to me. I have them motifs all done and would like to put them together. Thank you.
Member 18933
Jul 19, 2010
I too am looking for the diagram. I have made all my granny squares and it would be nice to see a diagram so I know what I am doing, very frustrating.
corgigirl
Jul 18, 2010
Why only one size? I like the jacket but I certainly can't wear one that small!
Report Inappropriate Comment
Are you sure you would like to report this comment? It will be flagged for our moderators to take action.
Thank you for taking the time to improve the content on our site.