Kitty Crochet Baby Lovey Blanket
A crochet baby blanket with animal head is easier than you think.
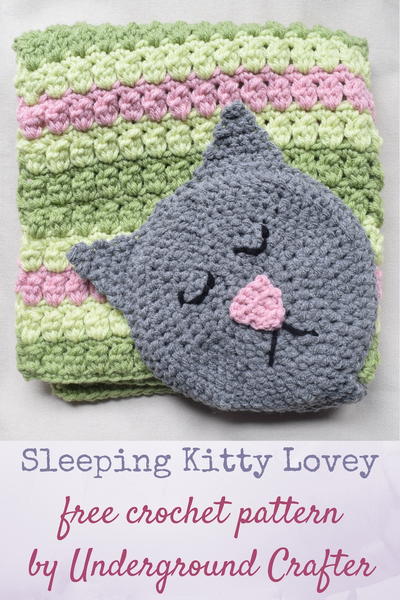
This crochet baby lovey blanket is a darling twist on a traditional lovey! Rather than having an amigurumi element with stuffing (making it a stuffed animal + blanket combination), this blanket folds up flat so it's more travel friendly! The kitty's face is worked flat and can be like a makeshift pillow. The kitty looks so peaceful sleeping! This lovey is great for the experienced beginner to crochet because you first work up a square blanket, then learn how to crochet the kitty's face. The stitches and colors featured in this pattern are so gorgeous! Bring a one-of-a-kind handmade gift to an upcoming baby shower when you make this project.
Crochet Gauge12 sts x 8 rows = 4” (10 cm) in blanket pattern. Exact gauge is not critical for this project.
Finished SizeLovey: 17” (43 cm) wide x 18.5” (47 cm) long blanket; 17” (43 cm) wide x 26” (66 cm) long with cat head attached.
Materials List
- Loops & Threads Impeccable yarn (100% acrylic, 4.5 oz/128 g/268 yd/245 m) – 1 skein ea in 01222 Fern (CA)
- 01221 Soft Fern (CB)
- 01425 Soft Rose (CC)
- 01044 True Grey (CD)
- approximately 155 yd (142 m) ea in CA and CB
Pattern Instructions
Abbreviations Used in this Pattern
- CA – Color A
- CB – Color B
- CC – Color C
- CD – Color D
- ch – chain
- cl – cluster – (Yo, insert hook in same st, yo and draw up a loop, yo and draw through 2 loops) 3 times, yo and draw through all 4 loops on hook.
- dc – double crochet
- ea – each
- hdc – half double crochet
- rep – repeat
- sc – single crochet
- sk – skip
- sl st – slip stitch
- sp – space
- st(s) – stitch(es)
- *Repeat instructions after asterisk as indicated.
Blanket
-
With CA, ch 58 (or any multiple of 2 sts, + 4).
-
Row 1: Turn, sk 1 ch, sc in next ch and ea ch across. (57 sts)
-
Row 2: Turn, ch 3 (counts as dc, here and throughout), cl in next, *ch 1, sk 1 st, cl in next st; rep from * across to last st, dc in last st.
-
Row 3: Ch 1, sc in first 2 sts, *sc in ch-1 sp, sc in next st; rep from * across to last st, sc in last st, changing to CB with last yarn over of final sc.
-
Row 4: Rep Row 2.
-
Row 5: Rep Row 3, changing to CC with last yarn over of final sc.
-
Row 6: Rep Row 2.
-
Row 7: Rep Row 3, changing to CB with last yarn over of final sc.
-
Row 8: Rep Row 2.
-
Row 9: Rep Row 3, changing to CA with last yarn over of final sc.
-
Row 10: Rep Row 2.
-
Row 11: Rep Row 3, do not change color.
-
Rows 12-41: Rep Rows 2-11, 3 times. Fasten off. Continue on to Cat Face.
Cat Face (Make 2)
-
With CD, start with magic adjustable ring.
-
Round 1: Ch 2 (counts as hdc, here and throughout), 7 hdc in ring, pull yarn tightly to close ring, join with sl st to top of ch 2. (8 sts)
-
Round 2: Ch 2, hdc in same st, *2 hdc in next st; rep from * around, join with sl st to top of ch 2. (16 sts)
-
Round 3: Ch 2, hdc in same st and next st, *2 hdc in next st, hdc in next st; rep from * around, join with sl st to top of ch 2. (24 sts)
-
Round 4: Ch 2, hdc in same st and next 2 sts, *2 hdc in next st, hdc in next 2 sts; rep from * around, join with sl st to top of ch 2. (32 sts)
-
Round 5: Ch 2, hdc in same st and next 3 sts, *2 hdc in next st, hdc in next 3 sts; rep from * around, join with sl st to top of ch 2. (40 sts)
-
Round 6: Ch 2, hdc in same st and next 4 sts, *2 hdc in next st, hdc in next 4 sts; rep from * around, join with sl st to top of ch 2. (48 sts)
-
Round 7: Ch 2, hdc in same st and next 5 sts, *2 hdc in next st, hdc in next 5 sts; rep from * around, join with sl st to top of ch 2. (56 sts)
-
Round 8: Ch 2, hdc in same st and next 6 sts, *2 hdc in next st, hdc in next 6 sts; rep from * around, join with sl st to top of ch 2. (64 sts)
-
Fasten off first Cat Face.
-
Do not fasten off second Cat Face. Set aside second Cat Face with yarn attached for seaming. Continue on to Nose.
Nose
-
With CC, ch 2.
-
Row 1: Turn, sk 1 ch, sc in next ch. (1 st)
-
Row 2: Turn, ch 1, 2 sc in next st. (2 sts)
-
Row 3: Turn, ch 1, sc in first st and ea st across to last st, 2 sc in last st. (Increases 1 st)
-
Rep Row 3 until Nose reaches desired size. Fasten off with long yarn tail (approximately 8”/ 20.5 cm) for seaming. Continue on to Face Embellishment.
Face Embellishment
-
Embellish first (fastened off) Cat Face piece.
-
Thread yarn needle with yarn tail from Nose. Sew Nose to center of front side of Cat Face.
-
Thread yarn needle with black yarn. Use the backstitch to create eyelids and mouth on front side of Cat Face.
-
With yarn needle, weave in ends on wrong (back) side of Cat Face.
-
Continue on to Assembly.
Assembly
-
Hold both Cat Face pieces together with wrong (back) sides facing each other. With your crochet hook and holding the unembellished Cat Face piece towards you, choose the top center st on the embellished Cat Face piece.
-
Starting at top center st, join pieces together with sc seam. At end of Round, join with sl st to first sc to join.
-
Do not fasten off. Continue on to First Ear.
First Ear
-
Row 1: Turn so embellished side of Cat Face is facing you, ch 1, sk current st, sl st in ea of next 3 sts, sc in next 7 sts. (7 sts)
-
Row 2: Turn, ch 1, sk first st, sc in next 6 sts. (6 sts)
-
Row 3: Turn, ch 1, sk first st, sc in next 5 sts. (5 sts)
-
Row 4: Turn, ch 1, sk first st, sc in next 4 sts. (4 sts)
-
Row 5: Turn, ch 1, sk first st, sc in next 3 sts. (3 sts)
-
Row 6: Turn, ch 1, sk first st, sc in next 2 sts. (2 sts)
-
Row 7: Turn, ch 1, sk first st, sc in next st. (1 st)
-
Fasten off. Continue on to Second Ear.
Second Ear
-
With unembellished side of Cat Face facing you, join CD with sl st to fourth st to left of top center st (if right-handed) or to right of center st (if left-handed).
-
Row 1: Ch 1, sc in same st and next 6 sts. (7 sts)
-
Rep Rows 2-7 as for First Ear.
-
Fasten off. Continue on to Neck.
Neck
-
With embellished side of Cat Face facing you, join CD with sl st to fourth st to right of bottom center st (if right-handed) or to left of center st (if left-handed).
-
Row 1: Ch 1, sc in same st and next 6 sts. (7 sts)
-
Row 2: Turn, ch 1, 2 sc in first st, sc in ea st across to last st, 2 sc in last st. (Increases 2 sts)
-
Rows 3-5: Rep Row 2, 3 times. (15 sts)
-
Do not fasten off.
-
To join Neck to Blanket, sk 21 sts along short top edge of Blanket. Starting in next st, join Neck with sl st join to edge of blanket.
Finishing
-
With yarn needle, weave in ends.
Find more of Marie's patterns at undergroundcrafter.com.
What gifts have you made for baby showers in the past?
Read NextArch Columns Crochet Afghan Pattern
Your Recently Viewed Projects
Thanks for your comment. Don't forget to share!
elocin1104 2800379
May 28, 2018
I love this kitty lovey blanket! The pattern is so easy to follow, and I love the colors! I have not seen any kitty loveys before, and I must say this one is too cute! I would also consider changing the colors of the blanket to better accommodate the colors for a babys room. This would be a great baby shower gift.
Report Inappropriate Comment
Are you sure you would like to report this comment? It will be flagged for our moderators to take action.
Thank you for taking the time to improve the content on our site.