This project was submitted by one of our readers, just like you.
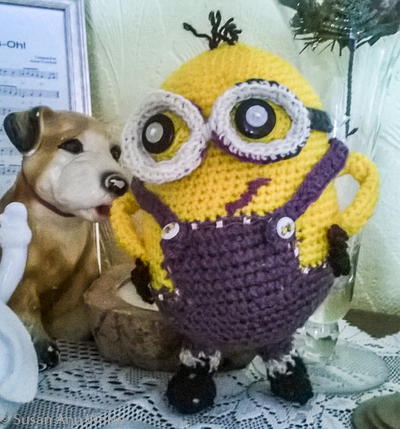
Minion-Inspired Crochet Pattern

Minion-Inspired Crochet Pattern
In the Designer's Words: "I created this chappie “flying by the seat of my pants”. I am new to crochet, and patterns I found did not attract – one took 47 pages! I used to make-up my own knitting designs so I referred to a few patterns to get an idea how to create shapes with crochet – then had a shot my own way:- I used a 4.5mm hook and double-knitting yarn. My model ended up 11inches tall including his hair. You need to use yellow for the Minion’s head/ upper body and arms, but the colours for the rest is up to you. An easy method of creating a wee chap to give pleasure to child and adult alike. One In A Minion."
If you are looking for a cute free crochet pattern to give your fave kiddo, look no further than the full how to crochet tutorial below. Essential for beginners with an absolutely adorable final produce, this Minion-Inspired Crochet Pattern make the perfect homemade Christmas gift for kids. With some yellow yarn and just a few hours of your time, this amigurumi-style crochet cutie is sure to impress your friends.

Crochet Hook4.5 mm hook
Yarn Weight(3) Light/DK (21-24 stitches to 4 inches)
Finished Size11 inches
Materials List
- Small ball Yellow DK yarn for head/body/arms
- Small ball DK yarn of own choice for dungarees (purple)
- Tiny ball DK yarn of own choice for goggles frame and strap(dark green)
- Tiny DK yarn of own choice for (white or light grey)
- Tiny ball DK yarn of own choice for boots/ hair (black)
- Tiny ball White DK yarn for socks (2rows of 6 stitches)and goggles lens (28 stitches, 16 rows)
- Large button and small button for each eye
- sewing needles: 1 to take cotton thread, 1 to take DK yarn
- Soft Toy Filling
- scissors
Minion Crochet Pattern
HEAD/BODY
Chain 6 – Amigurumi
row 1. SC in each chain
row 2. SC inc in each stitch
row 3. SC 1, inc 1 - repeat to end
row 4 SC 2, inc 1 - repeat to end row 5: SC 3 inc 1 - repeat to end
row 6: SC 4 inc 1 - repeat to end row 7: SC 4 inc 1 - repeat to end
continue in this fashion until “SC11 inc 1 - repeat to end” is complete .
Then work straight for as many rows as you think the upper body needs to be – up to the point where you would like the bib of the dungarees to start. I did about 16 rows. Connect the dungaree colour (purple for mine) and establish the place for the bib. I made the bib 12 stitches wide and 6 rows deep. Continue the rest of those bib depth rows in yellow with purple just for those bib stitches.
NB: You need to “carry” the yarn not being used at the back of the work/inside of the head so that it is ready to be used at the correct end of the work on the next row and not 12 sts away.
Using one long piece of yarn pull ‘hair’ yarn through top in loops then cut loops to form strands. I made three long loops to form six hairs. (I chose this point to do it but anytime before stuffing is fine.)–It is held firm inside.
After the bib is finished, fasten off yellow and continue in dungarees colour. Start to decrease for the bottom of the body in reverse order to the increases. I. E.: 1st decrease row: SC 11 dec 1 repeat to end.
2nd decrease row: SC 10 dec 1 repeat to end and so on.
Meanwhile stuff the body at some point near the end, but don’t leave it too late otherwise the access hole will be too small to do it easily.
LEG and BOOT
In dungaree colour Chain 6 – Amigurumirow 1. SC in each chain .
Work straight in SC for as long as you want his leg to be prior to shaping his foot. I did seven rows. I also decided to give him socks so had two white rows after five purple.
Change to boot colour (black for mine) and do two rows SC.
Using Double Crochet INC twice in the next two stitches. That’s 3 doubles in each stitch. Then 2 doubles in the next stitch. This makes the instep shape.
SC in each stitch on the next row for the lower foot. Stuff the leg & foot and close up by SC both sides of the foot together to make a wee ridged sole.
Stitch legs to body whenever you choose. – I did it as soon as the legs were made. I pushed a pipe-cleaner inside the legs to strengthen them, but that’s entirely optional.
Make two (unless yours is a Long John Silver-type Minion.)
ARMS and HANDS/GLOVES
Arms could be made Arigurumi-style with a chain of 6 or so joined in a ring then about 16 rows, but I did it linear .
In yellow: chain 16 or however long you want his arm to be.
Work 6 rows SC .
Turn arm inside out. This was a bit of a faff but not difficult. rounded end for the hand/glove – open end for sewing to body.
For hand: In black for gloves or yellow for hands, for each finger chain 3, turn back and SC in each stitch. At the start of the previous finger chain 3 again . Create 3 fingers (or however many you want yours to have). I did one hand separately and stitched it to the arm, and the other I crocheted directly onto the arm. I think the latter was better. In both cases the three fingers were formed the same way and were attached to the closed end of arm – Sew over hand/arm join to make wrist look neater and give some shape to hand.
Sew on the arms at the position which looks right for your chappie. I liked the ‘hands on hips’ look. I also stitched them to the body at the wrists so that it made the hands stick out a bit
GOGGLES AND EYES
I made the eyes from a big black button with a small white one on top.
In the colour for the frame of your goggle (dark green for mine) - Chain the size for your goggle then join up as ring. I chained about 28.
Work six rows in SC. Change to colour for the lens (white/light grey) – work six rows SC. Fasten off lens colour and change to frame colour for another four rows SC.
Fold over so that the lens colour is on the inside and covers the edge of the goggle. Stitch in place tightly so that the goggle becomes slightly narrower at the bottom.
For the eye within the goggle: In yellow Magic Circle 6 – Amigurumi
row 1. SC in each chain. For the other rows– increase as for beginning of body, to a size to fit inside of your goggle. I think I got to “SC6 inc in next – repeat to end”
Sew on button-eye in middle of yellow circle then stitch circle to inside of goggle. NB: The extra circle attached to the goggle makes the eyes more prominent. I sewed them straight onto the main face/body at first but they didn’t look right too far back in the goggles .
STRAPS FOR DUNAGREES AND GOGGLES.
Chain the required length in the respective colour. I chained about 48 for each dungaree strap and 45 for the goggle strap. Work back along the chain Double Crocheting in each stitch or work two rows SC. Fasten off.
The dungaree straps were stitched on to the dungaree body with a cross-over design at the back and a button at the front but that’s up to you.
The two goggle pieces were joined by a few sewing stitches to make a wee connecting bridge, then the strap was sewn to the outside of each goggle.
NB; if your Minion only has one eye/goggle, your strap will need to be accordingly longer. Also, I kept my completed goggles loose so that their position could be adjusted easily, but they could be stitched in place if you like.
FINISHING
Sew on the arms at the position which looks right for your chappie. I liked the hands on hips look. I also stitched them to the body at the wrists so that the hands stuck out a bit.
Decorate the dungarees if wanted, and fit the eyes/goggles.
Finish the Minion by embroidering a smile in whatever colour you have available for lips. I used maroon but black would probably be fine.
Who is your favorite animated character?

Read NextKoi Mermaid