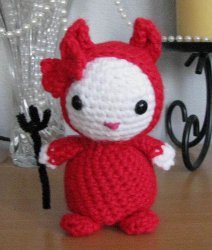
Devil Wears Red Amigurumi Pattern
Crochet this adorable amigurumi devil pattern for Halloween. You can leave it out as a cute decoration and make many to fill Halloween buckets with.

Materials:
- Lion Brand Pound of Love - White Red Heart Soft - Red Size US-G/4mm Crochet Hook
- Pink Embroidery Floss Polyester Fiberfill 2 - 9mm Safety Eyes
- Black Pipe Cleaner Blunt darning needle
- Doll measures 4-1/2” tall.
Abbreviations:
SC = Single Crochet Ch = Chain Rnd(s) = Round(s) Beg = Beginning Sts = Stitches 2tog = Crochet 2 stitches together (decrease) * = Repeat stitches from * to end of *
2nd = Second
Note:
- This pattern is worked in continuous rounds; do not join and do not turn unless specified.
- Use stitch marker to indicate beginning of rounds.
- Yarns listed is what I used – size may vary with other yarns.
- Gown is crocheted directly on the body.
Instructions:
Head: Ch 2 Rnd 1: Work 5 sc in 2nd ch from hook = 5 sc Rnd 2: Work 2 sc in each sc = 10 sc Rnd 3: *Sc in first sc, 2 sc in next sc*, repeat from * around = 15 sc Rnd 4: *Sc in next 2 sc, 2 sc in next sc*, repeat from * around = 20 sc Rnd 5: *Sc in next 3 sc, 2 sc in next sc*, repeat from * around = 25 sc Rnd 6: *Sc in next 4 sc, 2 sc in next sc*, repeat from * around = 30 sc Rnds 7-12: Sc in each sc around
Rnd 13: *Sc in next 4 sc, sc 2tog*, repeat from * around = 25 sc Rnd 14: *Sc in next 3 sc, sc 2tog*, repeat from * around = 20 sc Rnd 15: *Sc in next 2 sc, sc 2tog*, repeat from * around = 15 sc Fasten off; you do not need to leave a long tail for sewing – head will be inserted into hood. Position and insert safety eyes. Stuff head firmly. Do not sew opening closed.
Hood:
Ch 2 Rnd 1: Work 5 sc in 2nd ch from hook = 5 sc Rnd 2: Work 2 sc in each sc = 10 sc Rnd 3: *Sc in first sc, 2 sc in next sc*, repeat from * around = 15 sc Rnd 4: *Sc in next 2 sc, 2 sc in next sc*, repeat from * around = 20 sc Rnd 5: *Sc in next 3 sc, 2 sc in next sc*, repeat from * around = 25 sc Rnd 6: *Sc in next 4 sc, 2 sc in next sc*, repeat from * around = 30 sc Rnds 7-14: Sc in each sc around
Fasten off, leaving a very long tail for sewing. You will use this piece of yarn to sew the hood on the head and also to sew the head on to the body.
Horns:
Ch 2 Rnd 1: Work 5 sc in 2nd ch from hook = 5 sc Rnd 2: Work 2 sc in each sc = 10 sc Rnd 3-4: Sc in each sc around
Fasten off, leaving a tail long enough for sewing. Insert end of crochet hook into horns to bring the tip to a point. Be careful not to poke a hole.
Insert the head into hood. Position horns on each side, cupping slightly. Sew onto head. To shape the horns, pinch the horns to curve inward slightly,
Bow:
Row 1: Ch 6
Row 2: Sc in 2nd ch from hook, ch 1, turn. Rows 3-6: Sc across, ch 1, turn. Fasten off, leave long tail for sewing.
To Form Bow: 1. Weave in short piece of yarn (where ch was started) to center; 2. Weave in long tail to center; 3. Pinch center and wrap long piece of yarn around center 5 times; 4. Thread through needle and secure by running under the wrapped part, bringing it out; secure firmly. Attach the bow to side of head.
Body: With Red Yarn, Ch 2 Rnd 1: Work 5 sc in 2nd ch from hook = 5 sc Rnd 2: Work 2 sc in each sc = 10 sc Rnd 3: *Sc in first sc, 2 sc in 2nd sc*, repeat from * around = 15 sc Rnd 4: *Sc in next 2 sc, 2 sc in next sc*, repeat from * around = 20 sc Rnd 5: *Sc in next 3 sc, 2 sc in next sc*, repeat from * around = 25 sc Rnds 6-10: Sc in each sc around
Rnd 11: *Sc in next 3 sc, sc 2tog*, repeat from * around = 20 sc Rnd 12: *Sc in next 2 sc, sc 2tog*, repeat from * around = 15 sc Rnd 13: *Sc in next sc, sc 2tog*, repeat from * around = 10 sc Fasten off, leaving a tail long enough for sewing. Stuff body firmly. Sew opening closed (this will be the bottom). Flatten bottom so kitty can stand.
Arms: (Make 2) Using White Yarn, Ch 2 Rnd 1: Work 5 sc in 2nd ch from hook = 5 sc
Rnd 2: Sc in each sc around
Join Red Yarn
Rnds 3-6: Sc in each sc around Fasten off, leaving a tail long enough for sewing. Do not stuff arms.
Legs: (make 2) Using Red Yarn, Ch 2 Rnd 1: Work 5 sc in second ch from hook = 5 sc
Rnds 2-4: Sc in each sc around Fasten off, leaving a tail long enough for sewing.
For her little fork, use black pipe cleaner. Cut 2-1/2” piece and 1” piece. Wrap the 1” piece around top – curve and shape into top of fork. To Assemble: 1. Attach head to body. 2. Attach arms, just below head. 3. Attach legs. 4. Attach bow. 5. With black yarn, tie a knot in center of fork and sew into tip of hand, secure and trim yarn. 6. Using pink embroidery floss, sew nose.
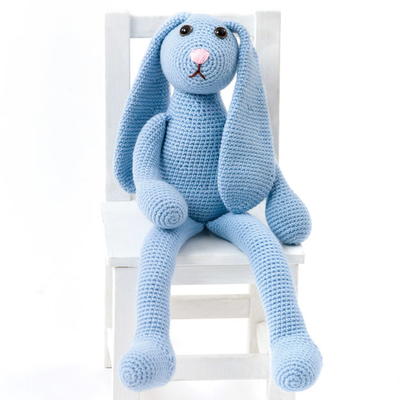
Read NextBlue Crochet Bunny Pattern
Your Recently Viewed Projects
Thanks for your comment. Don't forget to share!
joyfern04 9007959
Mar 19, 2012
I love this pattern but I have one question. Where is in the instructions for the gown? I put the whole thing together before I realized the gown is missing.
thimblefairy
Mar 10, 2011
I have tried to make this 3 times now and EVERY time the head ends up being HUGE and th body looks tiny! WHY?! Can someone please tell me why? I use the same size yarn and hook for the body and the head, but yet it always ends up two different sizes! I even tried adding an extra row after Rnd 5 so that it would read: *Sc in next 4 sc, 2 sc in next sc*, repeat from * around = 30 sc And that still didn't help! PLEASE if someone could help me out I would appreciate it so much!!
Report Inappropriate Comment
Are you sure you would like to report this comment? It will be flagged for our moderators to take action.
Thank you for taking the time to improve the content on our site.