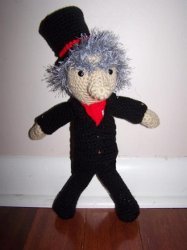
Crochet Scrooge
No "Bah-humbug's" here! Now you can crochet a scrooge this holiday season. Amigurumi is the hottest craze, so this would make for a great holiday gift. Using worsted weight yarn and polyester fiberfill you can crochet this cute little guy in no time. This is one easy crochet pattern that you just can't help but love!
Find this and other fun amigurumi patterns at "19 Free Amigurumi Crochet Patterns"!

Materials:
- 4 oz black worsted weight yarn
- 2 oz tan worsted weight yarn
- Small amounts white and red worsted weight yarn
- White fun fur, approx 1 oz
- Size G (4.0 mm) crochet hook
- Polyester fibrefill
- Stitch marker (Optional)
- Yarn needle
- 9 mm safety eyes
- Mini Square Brads
- Any embellishments you want!
Instructions:
SIZE: Approximately 14 ½ “tall.
Do not join rounds unless otherwise stated. Do not turn unless otherwise stated. Use a stitch marker to mark your place.
Head and Body
-
With tan and G hook, ch 2.
-
Rnd 1: 6 sc in 2nd ch from hook. (6 sc)
-
Rnd 2: 2 sc around. (12 sc)
-
Rnd 3: (2 sc in nx st, sc in nx st) around. (18 sc)
-
Rnd 4: (2 sc in nx st, sc in nx 2 sts) around. (24 sc)
-
Rnd 5: (2 sc in nx st, sc in nx 3 sts) around. (30 sc)
-
Rnd 6: (2 sc in nx st, sc in nx 4 sts) around. (36 sc)
-
Rnd 7: (2 sc in nx st, sc in nx 5 sts) around. (42 sc)
-
Rnd 8 – 13: Sc around. (42 sc)
-
Rnd 14: (Sc in nx 5 sts, dec) around. (36 sc)
-
Rnd 15: (Sc in nx 4 sts, dec) around. (30 sc)
-
Rnd 16: (Sc in nx 3 sts, dec) around. (24 sc)
-
Rnd 17: (Sc in nx 2 sts, dec) around. (18 sc)
-
Stuff head firmly.
-
Rnd 18: (Sc in nx st, dec) around. (12 sc)
-
Rnd 19 – 20: Sc around. (12 sc)
-
Rnd 21: (2 sc in nx st, sc in nx st) around. (18 sc)
-
Rnd 22: (2 sc in nx st, sc in nx 2 sts) around, change to white in last st. (24 sc)
-
Fasten off tan
-
Rnd 23: (2 sc in nx st, sc in nx 2 sts, 2 sc in nx st, sc in nx 8 sts) twice. (28 sc) Rnd 24 – 34: Sc around, change to black at end of Rnd 34. (28 sc)
-
FO white.
-
Rnd 35 – 39: Sc around. (28 sc)
-
Rnd 40: (Dec, sc in nx 5 sts) around. (24 sc)
-
Stuff firmly.
-
Rnd 41: (Dec, sc in nx 4 sts) around. (20 sc)
-
Rnd 42: (Dec, sc in nx 3 sts) around. (16 sc)
-
Rnd 43: (Dec, sc in nx 2 sts) around. (12 sc)
-
Rnd 44: (Dec, sc in nx st) around. (8 sc)
-
Rnd 45: Dec around. (4 sc)
- FO, leaving a long end. Weave your end in and out of the remaining sts. Pull tight to close the hole and secure end.
Nose
-
With tan, ch 6
-
Row 1: 2 sc in 2nd ch from hook. Sc in nx ch, hdc in nx ch, dc in nx ch. 7 tr in last ch. Working on opposite side of the foundation row, dc in nx ch, hdc in nx ch, sc in nx ch. Sc in same st as beginning 2 sc. (16 sts)
-
Row 2: Ch 1, sc in nx 4 sts, hdc in nx st, dc in nx 7 sts, hdc in nx st, sc in nx 3 sts. (16 sts)
- FO, leaving a long end. Stuff and sew to centre of facing, making a pointy-like tip.
Arms (Make 2)
-
With tan and G hook, make an adjustable loop.
-
Rnd 1: 5 sc in loop and pull tight to close. (5 sc)
-
Rnd 2: 2 sc around. (10 sc)
-
Rnd 3 – 4: Sc around. (10 sc)
-
Rnd 5: 3 sc in first st, sc in rem sts around. (12 sc)
-
Rnd 6: 2 sc in each of first 3 sts. Sc in rem sts around. (15 sc)
-
Rnd 7: Dec 3 times. Sc in rem sts around. (12 sc)
-
Rnd 8: Sc 3 tog. Sc in rem sts around. (10 sc)
-
Rnd 9: Sc around, change to white. (10 sc)
-
FO tan.
-
Rnd 10 – 19: Sc around. (10 sc)
- FO, leaving a long end. Stuff arms firmly, pinch the tops of your arms closed and sew to body at shoulder position.
Legs (Make 2)
-
Starting at feet, with black, ch 5.
-
Rnd 1: 2 sc in 2nd ch from hook. Sc in nx 2 ch, 3 sc in last ch. Working on opposite side of foundation row, sc in nx 2 ch, sc in same st as beginning 2 sc. Join. (10 sc)
-
Rnd 2: Ch 1, *2 sc in each of nx 2 sts. Sc in nx 2 sts*, 2 sc in each of nx 3 sts. Rep from * - * once. Join. (18 sc)
-
Rnd 3: Ch 1, (Sc in nx st, 2 sc in nx st) twice. Sc in nx 3 sts. (2 sc in nx st, sc in nx st) 3 times. Sc in nx 2 sts, 2 sc in nx st. Join. (22 sc)
-
Rnd 4: Ch 1, in BLO, sc around. Join. (22 sc)
-
Rnd 5: Ch 1, in both loops, sc in nx 9 sts, (dec, sc in nx st) 3 times. Sc in nx 4 sts. Join. (19 sc)
-
Rnd 6: Ch 1, sc in nx 7 sts, (dec, sc in nx st) 3 times. Sc in nx 3 sts. Join (16 sc)
-
Rnd 7: Ch 1, sc in nx 6 sts, (dec, sc in nx st) 3 times. Sc in nx st. Join. (13 sc)
-
DO NOT JOIN ROUNDS FROM HERE ON.
-
Rnd 8: Ch 1, sc around. (13 sc)
-
Rnd 9 – 20: Sc around. (13 sc)
- FO, leaving a long end. Stuff legs and sew to bottom of body.
Hair
-
With white fun fur, ch 2.
-
Rnd 1: 6 sc in 2nd ch from hook. (6 sc)
-
Rnd 2: 2 sc around. (12 sc)
-
Rnd 3: (Sc in nx st, 2 sc in nx st) around. (18 sc)
-
Rnd 4: (2 sc in first sc, sc in next 2 sc) around. (24 sc)
-
Rnd 5: (2 sc in first sc, sc in next 3 sc) around. (30 sc)
-
Rnd 6: (2 sc in first sc, sc in next 4 sc) around. (36 sc)
-
Rnd 7: (2 sc in first sc, sc in next 5 sc) around. (42 sc)
-
Rnd 8: (2 sc in nx st, sc in nx 6 sts) around. (48 sc)
-
Rnd 9: Sc in nx 28 sts. Leave remaining unworked. (28 sc)
-
Rnd 10 – 18: Ch 1, turn, sc across. (28 sc)
-
FO, leaving a long end. Sew to hairline.
- NOTE: It is kind of difficult to sew with fun fur, so you can use thread or matching yarn.
Eyebrows (Make 2)
-
With grey fun fur, ch 8.
-
Row 1: Sc in 2nd ch from hook and across. (7 sc)
-
FO. Sew to face in an angry look with brows furrowed.
-
NOTE: Here I used crazy glue to attach the eyebrows. It was just easier.
- Trim your eyebrows with scissors so you can see Scrooge’s eyes and they don’t blend in with his hair.
Hat
-
With black, make a magic ring.
-
Rnd 1: Work 5 sc into ring. Pull tight to close. (5 sc)
-
Rnd 2: 2 sc around. (10 sc)
-
Rnd 3: (2 sc in nx st, sc in nx st) around. (15 sc)
-
Rnd 4: (2 sc in nx st, sc in nx 2 sts) around. (20 sc)
-
Rnd 5: (2 sc in nx st, sc in nx 3 sts) around. (25 sc)
-
Rnd 6: (2 sc in nx st, sc in nx 4 sts) around. Join. (30 sc)
-
Rnd 7: Working in BLO, ch1, sc around. (30 sc)
-
Rnd 8 – 15: Sc around, change to red at end of Rnd 15. (30 sc)
-
FO black.
-
Rnd 16 – 17: Sc around. (30 sc)
-
FO.
-
Rnd 18: Join black in FLO of any st. (2 sc in nx st, sc in nx 5 sts) around. (35 sc)
-
Rnd 19: (2 sc in nx st, sc in nx 6 sts) around. (40 sc)
-
Rnd 20: (2 sc in nx st, sc in nx 7 sts) around. Join. (45 sc)
-
FO. Weave end to centre of hat. Tack hat to top of head slightly askew.
- NOTE: I added a cardboard circle to fit inside the top of the hat for stability.
Scarf
-
With red, ch 61.
-
Row 1: Working in back ridge of ch, sc in 2nd ch from hook and across. (60 sc)
-
Row 2: Ch 1, turn, sc across. (60 sc)
-
FO. Weave in end.
- Tie scarf around neck.
Coat
-
Starting at neckline, with black, ch 16
-
Row 1: Sc in 2nd ch from hook and across. (15 sc)
-
Row 2 (first armhole): Ch 1, turn. 2 sc in nx st. Leave remaining sts unworked. (2 sc)
-
Row 3 – 4: Ch 1, turn. Sc across. (2 sc)
-
FO
-
Row 2 (back): Sk nx 4 sts. Join black in nx st with sc. Sc in nx 4 sts. Leave remaining sts unworked. (5 sc)
-
Row 3: Ch 1, turn. Sc across. (5 sc)
-
Row 4: Ch 1, turn. 2 sc in nx st, sc in nx 3 sts, 2 sc in nx st. (7 sc)
-
FO
-
Row 2 (second armhole): Sk nx 4 sts. Join black in nx st with sc. Sc in same st. (2 sc)
-
Row 3 – 4: Ch 1, turn. Sc across. (2 sc)
-
Row 5: Ch 1, turn. 2 sc in nx st, sc in nx st. Ch 4. Sc in nx 7 sts. Ch 4. Sc in nx st, 2 sc in nx st. (13 sc)
-
Row 6: Ch 1, turn. 2 sc in nx 2 sts. Sc in nx st. Sc in each ch. Sc in nx 3 sts, 2 sc in nx st, sc in nx 3 sts. Sc in each ch. Sc in nx st, 2 sc in nx 2 sts. (26 sc)
-
Row 7: Ch 1, turn. (2 sc in nx st, sc in nx st) twice. Sc in nx 8 sts. 2 sc in nx st, sc in nx 10 sts. 2 sc in nx st, sc in nx st, 2 sc in nx st. (31 sc)
-
Row 8 – 17: Ch 1, turn. Sc across. (31 sc)
- FO
Coat Tails
-
Row 1: Sk first 9 sts of Row 17. Join black with sc in nx st. Sc in nx 5 sts. (6 sc)
-
Row 2 – 4: Ch 1, turn. Sc across. (6 sc)
-
Row 5: Ch 1, turn. Dec, sc in nx 2 sts, dec. (4 sc)
-
Row 6 – 8: Ch 1, turn. Sc across. (4 sc)
-
Row 9: Ch 1, turn. Dec twice. (2 sc)
-
Row 10 – 11: Ch 1, turn. Sc across. (2 sc)
-
FO.
-
Row 1: Sk nx st of Row 17, join black with sc in nx st. Sc in nx 5 sts. (6 sc)
-
Row 2 – 11: Same as above.
-
EDGING: Row 1: Join black with sc in middle st on back of neck. Sc evenly around entire piece, working 3 sc in corners. Join.
-
Row 2: Ch 2 (counts as first hdc), hdc in nx 7 sts, 3 hdc in nx st, hdc in nx st, dc in nx st, tr in nx 2 sts. Dc in nx st, hdc in nx st, sc in nx st, sl st in nx st.
-
FO. Weave in end.
-
Count back 16 sts from beginning of Row 2. Join black with sl st in this st. Sc in nx st, hdc in nx st, dc in nx st, tr in nx 2 sts, dc in nx st, hdc in nx st, 3 hdc in nx st, hdc in nx 7 sts. Join to beginning ch 2 from Row 2.
- FO. Weave in end.
Sleeves
-
Rnd 1: Join black with sc in 1st bottom st of armhole. Work 15 more sc evenly around. (16 sc)
-
Rnd 2 – 13: Sc around. Join at end of Rnd 13. (16 sc)
- Repeat for second sleeve.
Finishing
- I used 1 mini square brad on each arm for cufflinks and 2 mini square brads as buttons on front of coat.
Read NextAmigurumi Christmas Tree Pattern

Thanks for your comment. Don't forget to share!
Aphganmaker
Sep 09, 2011
I would SOOO make this. I think it adorable and can be adapted to make the whole cast of characters!
Carolyn T
Sep 08, 2011
I like the things I seen on this newsletter, but when it comes to crochet, I have tried it and can't seem to get it. However, I am a knitter and I wish you would put more free knitting patterns on here also. I also like to ask you when putting an pattern on the front page please tell us if it is crocheted or Knited, Thank you, Sorry, I just get so mad when everything is crochet this or that. Even when they have patterns listed for crochet and for knit it is always more for the crochet than the knit at least even out the patterns please. Thank you very much for reading this. God Bless you,
Melissa Ryan
Nov 08, 2012
Hi @Carolyn T Great comment. I'm not sure if you're aware, but we do have a site entirely devoted to knitting. You can find it at www.allfreeknitting.com.
Rosewood11
Sep 08, 2011
He's very cute, but I think he looks more like Barry Manilow than Scrooge. He should be standing by Schroeder's kiddy piano!!! (I know it sounds like I'm being catty, but I love Barry Manilow, and I think it would make a cute display).
Material Moose
Sep 08, 2011
Oh, My Gosh! He is too adorable!! I too would love to see the whole cast. Don't forget the giant turkey for Christmas day at the end!
agilholm 6872824
Sep 08, 2011
I think this is a cute ami, he reminds me of my husband (Tee-hee)! This is a doll you could use to teach children about turning bad traits into good by following the Scrooge story. Or give to someone as a joke (but, not a mean joke). I will be making this one, thanks, Birdie
Melissa Ryan
Nov 08, 2012
hahahaha great ideas, @agilholm! I think it would be a great practical joke gift!
anniebee479 204290 5
Sep 08, 2011
I think this is the tackiest doll I have ever seen . I would not make him
Gilda Elise
Sep 08, 2011
I'd love to make this, especially if all the other characters were available!
cherblues2
Sep 08, 2011
I love this and as asimmons stated I would love to make all the characters especially Tiny Tim! :)
emeraldwitch01 330 2941
Sep 07, 2011
This is too cute. Would make this any time for the grandkids.
Report Inappropriate Comment
Are you sure you would like to report this comment? It will be flagged for our moderators to take action.
Thank you for taking the time to improve the content on our site.