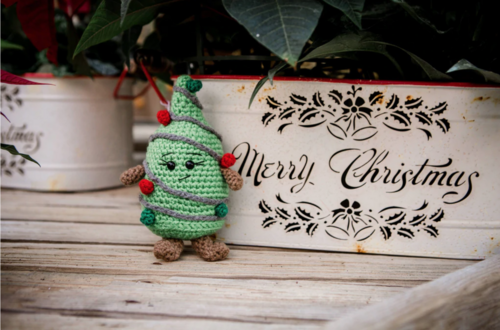
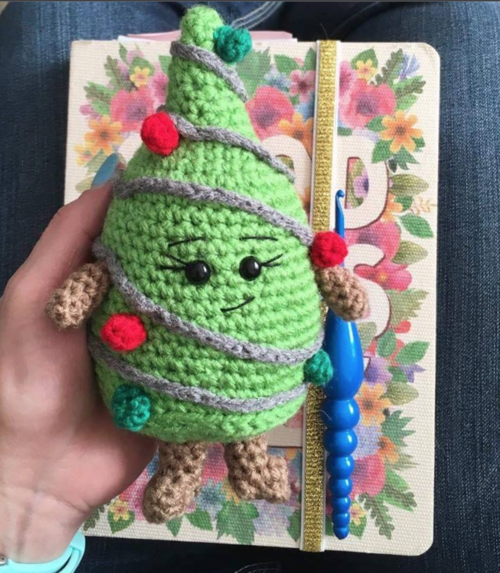
Amigurumi Christmas Tree Pattern

This Amigurumi Christmas Tree Pattern makes the cutest little tree you've ever seen! Doubling as the perfect holiday decor and a sweet seasonal stuffed toy, this amigurumi deserves a place under your Christmas tree this winter season. The tree's kawaii smile is contagious. After you've given this adorable gift to your children or grandchildren, you will be sure to see a smile light up across their faces. Or simply use this step by step guide to make a bundle of cuteness for yourself! Anyone who sees those round, shiny eyes is almost guaranteed to fall in love.
Crochet HookE/4 or 3.5 mm hook
Materials List
- 3.5 Furls Crochet Candyshop Hook
- Red Heart Super Saver Yarn (green, tan, red, dark green, grey)
- 7.5mm safety eyes
- Scissors, needle, stuffing
Instructions
Holiday Tree
-
Rnd1: With Green Yarn starting at the top of your Holiday Tree sc x 6 in a magic ring, or ch x 2 and do 6sc in the second chain from your hook (6)
-
Rnd2-4: Sc x 6 (6)
-
Rnd5: [Sc, inc] x 3 (9)
-
Rnd6-7: Sc x 9 (9)
-
Rnd8: [Sc x 2, inc] x 3 (12)
-
Rnd9: Sc x 12 (12)
-
Rnd10: [Sc, inc] x 6 (18)
-
Rnd11: Sc x 18 (18)
-
Rnd12: [Sc x 2, inc] x 6 (24)
-
Rnd13: Sc x 24 (24)
-
Rnd14: [Sc, inc] x 12 (36)
-
Rnd15-19: Sc x 36 (36)
-
Rnd20: [Sc x 5, inc] x 6 (42)
-
Rnd21-28: Sc x 42 (42)
-
Rnd29: Sc, [sc x 8, dec] x 4, sc, fasten off (38)
Bottom of Tree
-
Rnd1: With Green Yarn starting in the middle of the bottom of your tree sc x 6 in a magic ring, or ch x 2 and do 6sc in the second chain from your hook (6)
-
Rnd2: Inc x 6 (12)
-
Rnd3: Sc x 12 (12)
-
Rnd4: [Sc, inc] x 6 (18)
-
Rnd5: [Sc, inc] x 9 (27)
-
Rnd6: Sc x 27 (27)
-
Rnd7: [Sc x 2, inc] x 9 (36)
-
Rnd8: Sc x 3, [sc x 14, inc] x 2, sc x 3, fasten off (38)
Garland
-
Row1: With Tan Yarn ch x 200, fasten of (200)
Ornaments
-
Rnd1: With Red or Green Yarn sc x 5 in a magic ring, or ch x 2 and do 5sc in the second chain from your hook (5)
-
Rnd2: Sc x 5 (5)
-
Rnd3: Dec x 2, sl st, fasten off.
Arm (make 2)
-
Rnd1: With Tan Yarn (or the color of your choosing) sc x 6 in a magic ring, or ch x 2 and do 6sc in the second chain from your hook (6)
-
Rnd2-3: Sc x 6 (6)
-
Rnd4: Dec, sc x 4 (5)
-
Rnd5: Sc x 5, leave a long tail (you will use this tail to sew your arm to Christmas Tree), fasten off (5)
Leg (make 2)
-
Row1: With Tan Yarn starting at the top of your leg ch x 7, join (7)
-
Rnd2-4: Sc x 7 (7)
-
Rnd5: Dec, sc x 5 (6)
-
Row6-7: You will now be creating the foot, turn, ch, sc x 2 (2)
-
Rnd8: Do not turn, sc around the entire piece, fasten off
Sole of Foot (make 2)
-
Row1: With Tan Yarn ch x 3 (3)
-
Row2: Turn, sc x 2 (2)
-
Row3-5: Turn, ch, sc x 2, fasten off at the end of Row5 (5)
Assembly
Sew the bottom of your Holiday Tree onto the bottom of the top portion of your tree, making sure that you stuff it firmly as you sew it shut. Sew on the garland and ornaments. Sew on the arms and legs, and sew the soles onto the bottom of your Holiday tree’s feet. Sew on a mouth and eyebrows with black thread. Now you have your own little kawaii Holiday tree!
Abbreviations
- ch
- chain
- sc
- single crochet
- inc
- increase
- dec
- decrease
What is the cutest crochet Amigurumi you've ever seen?