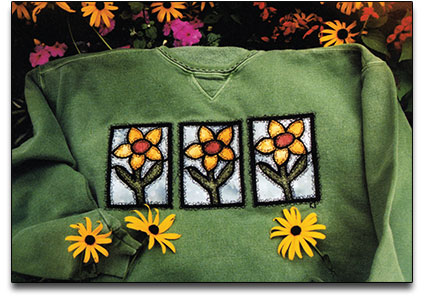
Flower Applique Sweatshirt
Add cheerful flower applique to a plain sweatshirt with decorative stitching from Sulky of America. Batik, mottled or marbled fabrics are used to give the flowers the appearance of stained glass. You can also use this technique for lovely kitchen tea towels.
Materials:
- Sewing Machine
- Sulky Tear-Easy Stabilizer
- (or use Sulky Soft 'n Sheer if using T-shirts or lightweight fabrics)
- Sulky KK 2000 Temporary Spray Adhesive
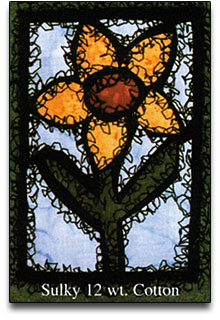
- Sulky 12 wt. Cotton Thread #1005 Black for stitching down the neckline and shirt bottom by hand
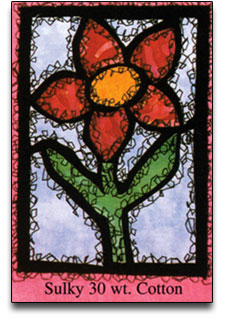
- Sulky 30 wt. Cotton Thread #1005 Black for the Herky-Jerky stitching
- Zip-Lock Bags
- Fine-line, Permanent-ink Marker
- General Sewing Supplies
- Sulky Black Polyester Bobbin Thread
- 1/4 yd. Heat 'n Bond Light Fusible Web
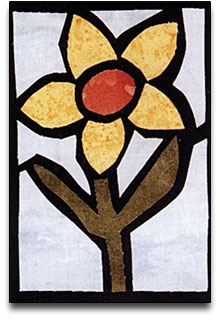
- Fabrics: Selecting Fabrics: The black fabric is solid, not mottled. All other fabrics are either mottled, marbled or batik to give a "sun shining through a window" effect for the pieces. Certainly this flower can also be made up using floral fabrics.
1/4 yd. black fabric for 3 background blocks
9" square pieces for each sky blue, green stem, and golden-yellow petals
Scrap of rust/brown for flower centers - Pattern
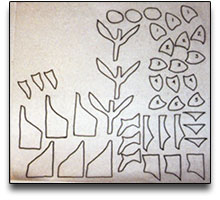
Trace The Designs & Prepare The Appliqué
Base: Fusing and stitching "stained glass" pieces to a solid background rectangle creates each block. To create the base black rectangle that your pieces will be fused to, cut three rectangles, 4" x 5-3/4". Set aside.
Trace: From the design pattern, use a fine-line, permanent-ink marker to trace all of the shapes three times onto the paper side of Heat 'n Bond Light (the designs are printed in reverse of what your block will be). You do not need to trace the outline rectangle. Number each petal which will help when placing them onto your black rectangle fabric. Kathleen likes to trace all of the shapes for one flower block as they appear and then cut the fusible web apart into the individual pieces. Remember, we are only separating the shapes, not cutting on the actual tracing lines yet.
Cut: Working one flower block at a time, iron the fusible web pieces onto your appropriate fabrics. (Stem fused to green fabric; petals fused to yellow, etc.) Have plastic bags ready to keep each block's pieces together, then cut the pieces, cutting on the actual tracing line.
Fuse: Working one block at a time, remove the fusible web paper backing from one block's pieces and reassemble, realigning the pieces of the flower block onto one of your black rectangles. To help position the little pieces, use the design pattern, your numbering on each piece, and the photograph. Remember this design pattern is now a reverse image of what you are laying down (petal #3 should be in the 9:00 o'clock position now). NOTE: Allow approximately 1/4" as a framing border around your pieces. Take your time arranging the pieces. Your pieces won't always be in the exact same spot on each flower block, and that's okay. Actual stained glass isn't exact either. Iron the pieces in place once you have them positioned.
Hint: Kathleen found that ironing the lower sky and stem pieces first and then making a second pass at positioning all of the petal pieces made life easier than trying to control all of the little pieces at one time. Repeat the process for the remaining two flower blocks.
Position The Blocks On The Shirt Or Sweatshirt
Work with one block at a time to position them onto your sweatshirt. Beginning with the center block, spray the back of it with Sulky KK 2000 and place them to the left and right of the center block.
Stabilize The Back Of The Shirt Or Sweatshirt
Kathleen suggests that you use Sulky Soft 'n Sheer under a T-shirt or other lightweight fabric like quilt squares. She recommends using two layers that are at least 2" larger all around than the stitching area. Adhere the layers together and keep them in place by spraying KK 2000 on the stabilizer, not the shirt.
Set Up Your Machine For Free-Motion Stitching
- Lower or cover the feed dogs (check your machine instruction book for setting up for darning).
- Replace the regular presser foot with a darning foot.
- Thread a new 14/90 needle with Sulky 30 wt. Cotton #1005 Black or try Sulky 12 wt. Cotton which is thicker. Bobbin should also contain the same 30 wt. Cotton or Sulky Black Bobbin Thread.
- Select the straight stitch setting.
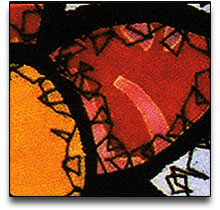
You really should practice this stitch prior to stitching your first flower block. Practice makes closer to perfect! You may find that securing the stitching area in a German hardwood embroidery hoop will give you the best control, and less stress on your arms and neck; the stitching, however, can be easily accomplished without a hoop by simply holding the shirt with both hands and keeping it flat against the throat plate of the machine while stitching. The "star-like" stitching to the right is an example of what your Herky-Jerky stitching can look like! We are wiggling our machine stitching over and around our fused appliqué pieces. this is a most foolish (but beautifully effective) machine stitching appliqué stitch. It's the easiest appliqué stitch yet!
Apply the Herky-Jerky Stitching
Place your first block under the preser foot and manually lower your needle through the fabric and back up along an edge of one of the fused pieces. Stop. Using your upper thread, pull the bobbin thread up through the fabric so that you have both threads in your left hand. Hold them to secure your first stitches, then clip these threads away. (Holding onto them longer will be distracting and can affect the quality of your stitching.) take off in a Herky-Jerky, PETITE circular, triangular motion while running your machine with a realtively steady stitching rhythm as you move the block around to stitch along the piece edges. Stitch on the fused pieces and off of them into the background fabric. Follow around all of the fused pieces on your flower block. Maneuver around all of the pieces and "hop" across the background fabric to each of the pieces without stopping to cut threads and restart. Finish up your stitching by Herky-Jerky stitching the black rectangle outer edges to the sweatshirt, stitching on the black rectangle and off onto the sweatshirt. Repeat for the other blocks.
Finishing Your Sweatshirt
To complete your sweatshirt, cut off the bottom ribbing from the sweatshirt and fold up and pin a 1/2" hem to the outside of the shirt so the wrong side of the sweatshirt shows. Using Sulky 12 wt. Cotton #1005 Black, handstitch the hem in place with a 1/2" running stitch, or machine stitch with a long straight stitch or triple straight stitch. Turn down your neckline ribbing in half also to the outside and stitch as you did the hem.
Read NextDIY Upcycled Crochet Jean Shorts