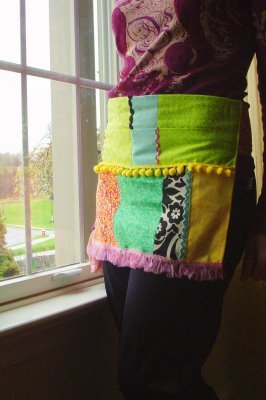
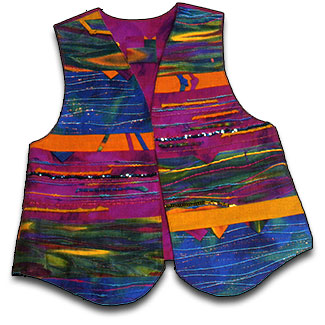
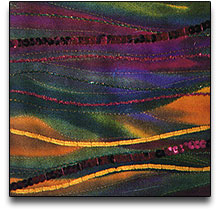
Embellishing with Thread
Use decorating stitching and variegated metallic thread to embellish a plain vest, jacket or other garment. The artist explains how to use different threads, fibers and even beads to give exciting new looks to plain clothing with this project from Sulky of America.
Materials:
- Zig-Zag Sewing Machine
- Presser Feet: Darning, Embroidery, Braiding, Multi-Cord, Pearl & Piping, Sequin & Ribbon and All-Purpose
- Embroidery or Top-Stitch Machine Needle Size 12/80
- Your favorite Vest Pattern
- Machine Needle - 14/90 Topstitch
- 1/2 yd. each of 3 complementary fabrics
- 1/8 yd. each of 2 contrasting fabrics
- Lining and fabric for vest back as suggested by pattern - Kathy used her own vest pattern and a variety of John Kaldor Fabrics
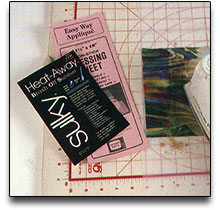
- 2 packages of Heat-Away™ Stabilizer
- 1 package of Tear-Easy™ Stabilizer
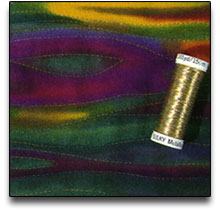
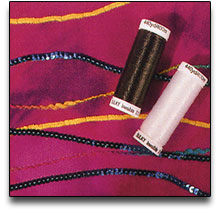
- Sulky Variegated Metallic Thread
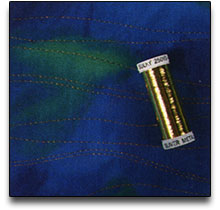
- Sulky Sliver Metallic Thread
- Sulky 30 wt. Rayon Thread
- Sulky Fine Polyester Invisible Thread .004
- Sulky Bobbin Thread
- 3-5 yds. of 4 or 5 different decorative yarns
- 3 yds. Sequins (iron-on type preferred)
- 3 yds. Crosslocked Beads or Molded Beads
- Rotary Cutter, Mat and Ruler
- Spray Starch, Iron, Ironing Surface
- General Sewing Supplies
- Optional: Fasturn Tool
Cutting
Measure your vest front length. Cut eight complementary fabric sections, each measuring one quarter the length of the vest front by the width of each pattern front, plus 1". Cut 4 contrasting strips 2" wide by width of each pattern front, plus 1". Spray starch all fabric and iron dry.
Metalizing With Sulky Variegated Metallic Thread
Thread the top with Sulky Variegated Metallic Thread and the bobbin with Sulky Bobbin Thread. Drop the feed dogs and attach the darning foot. Loosen top tension until bobbin thread does not appear on right side of fabric.
Pin the Sulky Heat-Away onto the fabric that you want to metalize.
Gently place your hands on the fabric to guide it while you straight stitch at a consistent, moderate speed, following the designs of the fabric along the edge of the color patch. Keep the length of the stitches as uniform as possible. To reposition your hands, stop with the needle down in the fabric.
Whenever possible, start and stop stitching off the edges of the fabric. Tie on and off. If you do not feel comfortable with Free-Motion Metalizing, raise your feed dogs, use an embroidery presser foot and straight stitch at a 3mm length. Remove Heat-Away Stabilizer following package instructions.
Metalizing With Sulky Sliver Metallic Thread
Metalize with Sulky Sliver Metallic Thread following the instructions above with the exception of using a 3.5mm stitch length. When stitching with Sulky Sliver Metallic Thread always use it on a vertical spool pin with a felt pad under it.
Couch Pearl Cotton or Smooth Decorative Yarns
Thread the top with Sulky Fine Invisible Thread or Sulky Sliver Metallic, and the bobbin with Sulky Bobbin Thread. Slightly loosen top tension. Pin Heat-Away onto the wrong side of the fabric. With 2.5 mm length and 2.5 mm width, zig-zag over decorative yam.
Tip: Use a needle threader to thread decorative yarn through the center hole on a multi-cord presser foot.
After all couching is completed, remove Heat-Away.
Couch Nubby Decorative Yarns
Pin Heat-Away onto the wrong side of the fabric. Thread top with Sulky Fine Invisible Thread, and the bobbin with Sulky Bobbin Thread. Keep a slightly loose top tension. Attach either an adjustable braiding foot, knit edge toot or presser foot with a large hole for guiding cords. Select a blanket stitch, length 2.5mm and width 2.5mm. Be sure the nubby yarn will flow freely through the presser foot without any hangups as you are couching it. The blanket stitch will not flatten nubby areas on the yam. Remove Heat-Awav after all couching is completed.
Make and Couch Weft Fibers
Thread the top with Sulky 30 wt. Rayon Thread, and the bobbin with Sulky Bobbin Thread. Set the length of the Blanket Stitch at 1.2mm and width at 6mm. Keep a slightly loose top tension. Use the Pearl and Piping Foot which has a wide, deep groove underneath to prevent the flattening of your Weft Fibers. Position Sulky Tear-Easy Stabilizer on the wrong side of the fabric foundation piece.
Make the Weft Fibers: Cut fabric strips 12" long by 3/4" wide. Clip one end at a 45 degree angle. Make 1/16" lengthwise folds in the fabric to the wrong side. Roll the fabric in your fingers until it is about 1/8" in diameter; pin. Position the pinned end under the presser foot and tie on. Blanket stitch a few stitches at a time, stopping with the needle down in the fabric. Roll the fabric as needed to continue stitching. Tie off at the end. Cut Weft Fibers at an angle.
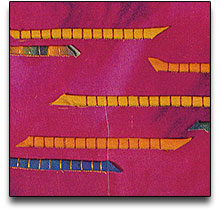
Couch Sequins
Thread the top with Sulky Fine Invisible Thread, and the bobbin with Sulky Bobbin Thread. Keep slightly loose top tension. Position the Tear-Easy Stabilizer on wrong side of fabric. Select one of the following stitches: zigzag, blanket stitch (wide enough to cross over sequins), or straight stitch. To figure the length of your stitch, straight stitch next to a sequin, adjusting the length until it clears the sequin. This determines your stitch length. It's okay to miss the sequin holes when you couch sequins with a straight stitch. The Sequin and Ribbon foot is a wonderful guide for couching flat trims. Slip sequins into the slot on the front of the presser foot (sequins have been inserted correctly when you stroke sequins toward you and they feel smooth). Simply guide with both hands resting gently on the fabric and let the presser foot and machine do all the work. Always stop with your needle down.
Couching Crosslocked Beads or Molded Beads
Thread the top with Sulky Fine Invisible Thread and the bobbin with Sulky Bobbin Thread. Keep slightly loose top tension. Position Tear-Easy Stabilizer on the wrong side of the fabric. Use the Pearl and Piping Foot to attach beads or pearls. Select the zig-zag stitch. Set the length at 2.5 mm and the width slightly wider than the beads. Slowly lower the needle by hand over the beads for a few stitches to make sure the needle doesn't hit and break the beads and/or the needle.
Tip: When embellishing a fabric surface with several different trims. threads, cords, sequins, beads, etc., apply the flat trims first, then finish surface design with couched beads.
Prairie Points
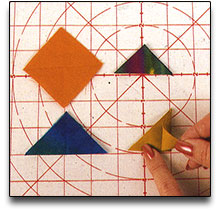
Cut several 2 1/2" squares of all fabrics. Fold each square diagonally in half and then in half again. Press.
Knotted Straps
Make as many Knotted Straps as you want by cutting strips on the bias 1-1/4" wide by 18" long from fabric scraps left over from cutting out vest pattern. Thread top and bobbin with regular all-purpose sewing thread. Place right sides of the 18" length together and straight stitch them together with a 1/4" seam allowance. Trim seam allowance to 1/8". Follow the instructions for the Fasturn tool (or use a safety pin) to turn the fabric tubes right side out. Tie an overhand knot where needed.
When you have completed the surface design work by machine, you are ready for construction. Lay out your embellished fabric sections as you would have them appear on your vest fronts. Place two or more 2" contrasting fabric strips between embellished fabric. Position and pin Prairie Points and Knotted Straps onto any seam line. Using a 1/4" seam allowance, stitch fabric strips together with embellished fabric while sandwiching in the Prairie Points and Knotted Straps.
Press seams with Prairie Points toward the 2" contrasting strips. Press seams with Knotted Straps toward the embellished fabrics. Lay out, pin, and cut out vest front pattern pieces from your new texturized fabric.
Tip: If any beads are trapped within seam allowances, carefully crush them with pliers. Do not cut the threads that locked beads together or they will unravel.
Finish construction following your vest pattern instructions.
Add your own patchwork label to the lining before the vest is assembled.
Tip: Try making your next foundation pieced block by tracing the design onto paper with a Sulky Iron-on Transfer Pen, then transferring the image to Sulky Tear-Easy Stabilizer.
Use the Tear-Easy as a foundation for the Foundation Piecing Method. It's more exact than copy machine reproductions.
Read NextEasy Breezy Skirt