Holiday Village Decoupage Noel
Learn how to decoupage with this pretty, vintage Christmas craft. A Holiday Village Decoupage Noel would look lovely in the foyer or on the mantel. Show your love for the Christmas season and create a craft that puts everyone in the holiday spirit. This Christmas craft idea is so simple, but it will make you feel like you've taken a trip back in time. Create a Holiday Village Decoupage Noel and watch as your guests' faces light up with holiday glee. Classic holiday decor is all you need to bring the festivities into your home.
Primary TechniqueGeneral Crafts

SeasonWinter
Materials:
- FolkArt ® Metallics - Sahara Gold, 2 oz.
- FolkArt ® Metallics - Pearl White, 2 oz.
- Mod Podge ® Glitter - Hologram Gold, 8 oz.
- Mod Podge ® Glitter - Hologram Silver, 8 oz.
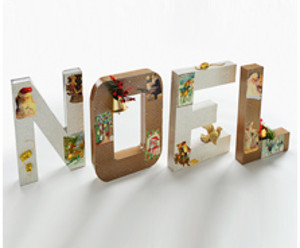
- 9” x 12” Paper Mache Letters NOEL
- Paper Pad by Martha Stewart Create™
- Copies of antique Christmas cards
- Various Christmas embellishments
- Craft knife
- Craft glue
- Pencil
- Medium flat paint brush
Instructions:
- Paint the N and the E Metallic Pearl White. Let dry and apply one coat of Silver Glitter Mod Podge.
- Paint the O and the L Sahara Gold. Let dry and apply one coat of Gold Glitter Mod Podge.
- Turn letters right side down and trace N and E on light colored paper. Trace O and L on dark colored paper. Cut out with a craft knife.
- Apply papers to letters with coordinating Mod Podge formula. Add one more coat of Mod Podge to each letter when dry.
- Apply Christmas embellishments with craft glue. Refer to photo for placement.
Read NextFolded Book Christmas Tree