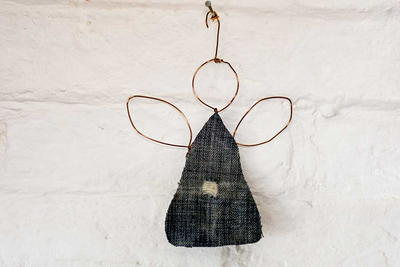
Patina Topiary Angel
This elegant messenger is softened with ribbons and roses. The beautiful faux-finish is a lovely patina that makes this handmade angel decoration really stand out. It makes an excellent decoration for your home during the holidays or can be used to decorate for showers or as a housewarming gift.

Materials:
- STYROFOAM™ Brand Foam:
- Blocks, one each: 12" x 12" x 1/2"; 6" x 4" x 2"
- Faux finishes: copper; green patina
- Wooden dowel, 1/4", 12" length
- Satin fabric, 45" wide, 1/3 yd.
- Lace, 1-1/2" x 2/3 yd.
- Pearl trim, 2/3 yd.
- Floral picks with pearl sprays, 6" long: bridal; pearlized roses
- Ribbon roses, 1/4", six
- Double-sided satin ribbon, 1/8" x 1/4 yd.
- Birthday candle
- Serrated knife
- Paraffin or candle stub
- Fine-line black permanent marker
- Disposable palette
- Ruler
- Stiff-bristled paintbrush
- Pencil
- Water basin
- Paper towels
- Straight pins
- Sewing needle and matching thread
- Scissors
- Utility knife with new blade
- Iron and pressing cloth
- Low temperature glue gun and glue sticks
- White, thick craft glue
Pattern
Steps:
- Wax serrated knife with candle stub or paraffin. Tape angel pattern pieces together along dashed line. Carefully cut angel from 1/2"-thick foam with sharp utility knife or serrated knife. Note: When cutting around tight curves, first make several cuts from pattern line out to edge of foam; continue cutting along curve, removing small foam pieces one at a time. Sand rough edges with scrap piece of foam.
- Follow manufacturer's instructions to apply two to three generous coats of copper faux finish to 2" foam block, angel and dowel. While last coat is still wet, apply patina finish; let dry.
- Cut one 12" x 13" rectangle (gown) and one 5" square (sleeve) from satin fabric. Turn under top right-hand corner of sleeve and glue underside just beneath angel's hand. Wrap remaining fabric over edges of arm and spot glue to secure. Wrap excess to back and glue to secure.
- Holding gown fabric with long edge at top, turn top right-hand corner over 1 1/2" and gather to fit across front neck area; fabric will not wrap to back at neck. Fold over and press fabric edges that will cross wing and sleeve areas.
- Glue underside of gathered fabric across neck. Drape top turned edge across wing area to create pleasant folds; pin to secure. Arrange other folded edge across sleeve and pin. Wrap fabric around to back along top and bottom edges of angel. Glue fabric to left edge of angel so it conforms to foam curves.
- Carefully glue pearl trim to gown, sleeve and neckline edges. Gather lace to fit neckline and glue to angel. Glue lace along bottom of gown and sleeve edge. Form and glue pearl trim halo to head. Glue ribbon roses to halo to hide visible glue.
- Glue bridal pick onto wing, tucking wire ends under gown. Glue pearlized roses pick to angel, tucking wire ends under gown.
- Glue and push dowel into center of 2" foam block. Glue top end of dowel to back of angel. Glue birthday candle to hand and ribbon roses to cover glue. Tie ribbon into bow and glue to hand.
- If desired, trace second angel pattern onto fabric; glue to back of foam angel.
®™ Trademark of The Dow Chemical Company ("Dow") or an affiliated company of Dow.
For more project ideas, please see styrofoamstyle.com.
If you like this angel craft, you are sure to find something you love in our free angel crafts eBook. Click here to download the free angel crafts ebook now.
Read NextHow To Build A French Creche