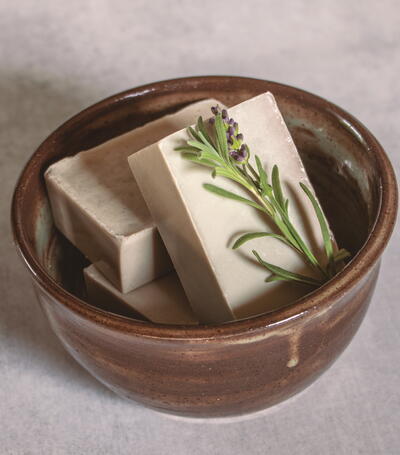
Dead Sea Soap

First things, first: Not all soap bases are created equal. Some melt-and-pour bases boast a simple ingredient list of saponified oils and glycerin; others include detergents, such as sodium laureth sulfate (SLES) or sodium lauryl sulfate (SLS). The benefits of bases with detergents are better lather and sometimes performance; the downside is that some skin types are more sensitive to these ingredients and may find them drying.
If you try out a soap base and find it drying or less than ideal for your skin type, don’t give up on melt-and- pour crafting! Instead, try a different manufacturer, or seek out premium bases, which are designed for both great lather and good skin feel.
Three of the more popular brands include SFIC, Stephenson and Crafters Choice, available from a variety of online vendors. For less mainstream options, some online suppliers, such as Essentials by Catalina, Mooseberry and Aussie Soap Supplies offer specialty in-house bases created with high-quality ingredients, plus a few shops on Etsy carry melt-and-pour bases lovingly made from scratch by artisan soapmakers.
Melting Points
Melting points vary depending on soap base type and who made it and can range from 120 to 142°F (49 to 61°C). You can normally find the melting point of a soap base by contacting the vendor you purchased it from, or by checking the manufacturer’s website.
Basic Equipment & Supplies
Besides soap base, you’ll also need to assemble some other equipment and supplies to get started making your own melt-and-pour soap. You probably already have many of these materials around your house, but if not, your local craft or kitchen supply store is likely to carry what you need.
- Alcohol (Isopropyl, or rubbing alcohol)
- Coffee Grinder
- Heatproof 4-cup (1-L) Glass Measuring Cup or Container
- Glass Canning Jars
- Shot-Sized Glass Measuring Cups
- Infrared Thermometer
- Molds
- Rocking Pizza Cutter (or Soap Cutter)
- Scale
- Set of Teaspoons
- Sieve
- Spray Bottle
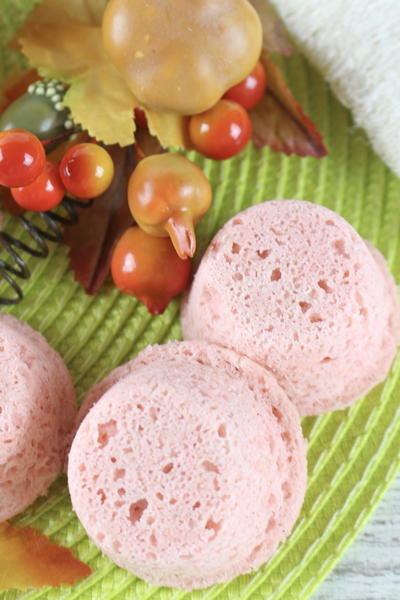
These unique bars will float in your bathtub, instead of sinking to the bottom as most soaps do. They feature Dead Sea mud clay powder, which is loaded with minerals and trace elements. Dead Sea products are renowned for treating a multitude of skin ailments, making them a spa treatment staple! If you’d like to use wet Dead Sea mud instead of the dry clay powder, simply omit the alcohol and blend the mud with the glycerin before making the recipe, then be sure to strain out any stray clumps of mud before whipping. Jojoba or olive oil is added to keep the soap from being too drying, while aloe vera gel soothes skin and adds a small boost to the lather. Glycerin helps whipped melt-and-pour soap hold its form better and leads to a higher success rate, but if you don’t have any, you could try leaving it out for a slightly different soap texture.
Yield: four 4-ounce (113-g) bars
Materials List
- 16 oz (454 g) goat’s milk or other white soap base
- 1⁄2 tsp jojoba or olive oil
- 1⁄2 tsp aloe vera gel
- 2 tsp (10 ml) glycerin
- 1 tbsp (12 g) Dead Sea mud clay powder + 2 to 3 tbsp (30 to 45 ml) rubbing alcohol
- 3.6 g (~1 tsp) lavender or peppermint essential oil
- 1 g (~1⁄4 tsp) tea tree essential oil
- Silicone molds
- Rubbing alcohol, for spritzing
DIRECTIONS:
-
Gather all the ingredients needed to make the recipe. Prepare your workspace with all of the needed equipment, including a cutting board and cutting utensil to cut the soap base, a Mason jar or heatproof container for melting it, a jar lid/heatproof saucer or plastic wrap to cover the jar/container, a fork or spatula for stirring, small glass containers for essential oils plus a small spray bottle filled with rubbing alcohol. Have the mold that you’re using clean and ready to fill. If using individual molds, consider placing them on a tray or cookie sheet to make it easy to move them.
-
Cut the soap base into uniform cubes to help it melt evenly. Weigh out the amount needed for the recipe.
-
In a heatproof 4-cup (1-L) glass measuring container, melt the cubes of soap base, using the double-boiler method, heating over medium-low heat for 20 to 30 minutes, or the microwave method, heating for 20 to 30 seconds at a time, until it’s melted. (Methods below)
-
Stir in the jojoba oil, aloe vera gel, glycerin, diluted Dead Sea mud clay powder and essential oils. Mix thoroughly.
Double-Boiler Method
Place the heatproof container in a larger pot filled with a few inches (at least 5 cm) of water, forming a makeshift double boiler. Cover it loosely with a canning jar lid or heatproof saucer to keep the soap from losing too much moisture as it heats. Set the pan over medium-low heat and stir it occasionally, until the base is melted. This can take anywhere from 15 to 35 minutes, depending on the amount of soap base and the temperature used. If you’re infusing herbs in the soap base, lower the heat to low after the soap is almost melted, and add an extra 10 to 30 minutes of time to allow the plant’s beneficial components and color to infuse more deeply into the base. Be careful to monitor the soap, especially as it gets close to being fully melted. Don’t overheat the soap or let it boil, or it will become lumpy and rubbery.
Microwave Method
-
Cover the top of the container with a layer of plastic wrap to keep the soap from drying out as it heats. Heat the soap in 20- to 30-second bursts in a microwave, checking and stirring after each time. Small amounts of soap will take a shorter amount of time to melt; larger amounts will need longer. Don’t over heat the soap or let it boil, or it will become rubbery and difficult to work with. If you consistently have trouble with easily overheated soap, try reducing the microwave’s power level to 50 percent or low. Once the soap base is mostly melted with just a few small remaining lumps, remove the container from the microwave and stir gently to help the last bits dissolve.
-
While the soap cools, plug in a handheld mixer so it’s ready to use. Lay the mold nearby for easy pouring. You’ll need to work quickly, so having these things prepared in advance will be helpful.
-
Monitor the temperature of the soap base for several minutes, stirring occasionally. When the temperature is 125 to 130°F (52 to 54°C), it’s time to mix.
-
Set a timer for 25 seconds and use the handheld mixer to whip the soap on low to medium-low speed. If you have an infrared thermometer, monitor the temperature while you mix, as it will drop.
-
Stop mixing after 25 to 30 seconds, or before the temperature drops to 115°F (46°C). Immediately pour the whipped soap into the molds, then lightly spray the tops with rubbing alcohol.
-
Clean the containers and stirring utensils by soaking them in warm water and rinsing well. Don’t put anything still coated in soap directly into a dishwasher as the extra bubbles could make the dishwasher overflow. Before soaking the containers, first check whether the soap can be peeled out of the container. Depending on the container type and how thick the layer of soap is, it can sometimes be loosened at one edge with a spoon, and then peeled off in sheets for extra-easy cleanup.
-
Keep the soap in the mold for at least 8 to 12 hours. Removing them too soon may cause the sides to stick. Unmold them and wrap tightly in shrink-wrap, plastic wrap or cellophane bags and store them in a cool, dry place, out of direct sunlight. You can also store them in airtight plastic storage containers. Melt-and-pour soap is best used within a year of making, though the soap won’t spoil or go bad after that time. The colors and scent will fade and the soap will eventually dry out, but it will still be usable.
Tips for success: Don’t overbeat the soap base. Mixing for too long or on high speed will cause the soap to become overly airy, making it stick in the mold, similar to a sticky marshmallow. If the whipped soap cools and hardens before it can be poured into the molds, remelt the soap and try again.
Read NextDiy Magnesium Lotion Recipe