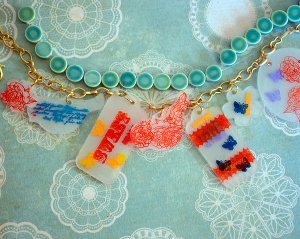
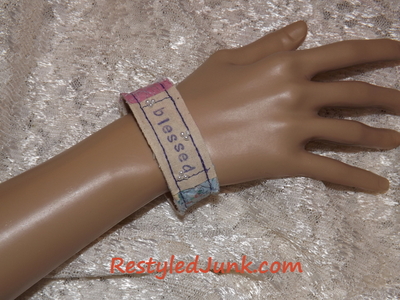
Shrinky Plastic Charm Bracelet
Kids and adults will love making this Shrinky Plastic Charm Bracelet. You can decorate your plastic pieces however you'd like, and kids are sure to get a kick out of watching their charms shrink in the oven! This is a fun project that will remind seasoned crafters of their childhood, and may inspire new crafters to try some vintage crafting techniques.

Materials:
- Fuse Creativity System® Starter Set
- Medium Design Set 100780 - Circle
- Mini Design Set 102400 - Flower
- 1/4" Circle Hand Punch
- Shrink plastic sheets
- Ink pads
- Chain bracelet
- Jump rings
- Jewelry pliers
Instructions:
- The Fuse Creativity System® cuts cleanly through shrink plastic, making it so easy to create this charming and personalized charm bracelet. To make it your own, start by sorting through your stamps and find the images and words that represent you best.
- Pre-heat your oven to 300 – 350 degrees (or whatever temperature is suggested in the instructions on your shrink plastic package).
- Select a few of your favorite Fuse steel-rule dies to cut shapes for your charms. Some of the less detailed photo-etched Fuse dies will work too, but most will just emboss the shrink plastic and not cut all way through, so it’s best to stick with your steel-rule dies for this project.

- Sandwich a piece of shrink plastic between each die and cutting plate, and run it through the Fuse to punch out the shapes. Insert something soft, like a Q-Tip or the eraser end of a pencil into the hole on the backside of the die to pop the plastic out of the die.
- When baking your shrink plastic, there are always a few that don’t turn out perfectly, so cut out a few more pieces than you think you might use.
- Punch a hole with a ¼ inch hand punch near the edge of the top of each shape.
- Use your Simple Stick stamps with quick drying inks designed for stamping on smooth surfaces to stamp layers of images, text, and patterns on your cut shapes. Stamp the lighter colors first and dark colors last. Press stamps gently – too much pressure can cause the stamps to slide and smear.

- Line a cookie sheet with parchment paper and place your shapes ink-side up on the paper. Carefully read the baking instructions on the shrink plastic packaging, and bake your stamped plastic according to these instructions.
- Once they’re done baking, let them cool before handling. Use a small oat the ink-side of the charm with a thin coat of Mod Podge. Clear finger nail polish will work too.

- Use a pair of pliers to split open a jump ring, slip the open ring through the hole of the charm, add the charm to a chain bracelet and close the jump ring.


- Add the remaining charms to your chain.


Love shrink plastic crafts? Find more gorgeous ideas for what to make with shrink plastic in DIY Shrinky Dinks: A Shrink Plastic Craft Guide.
Read NextSimple Crochet Bracelets