Paper Bag Autumn Apples
Fall is the time for apple picking and the perfect season for a little paper crafting. These Paper Bag Autumn Apples combine the season's favorite fruit with cool fall craft ideas. You will be excited to hang these cute decorations as soon as the leaves begin to change. Your eyes won't even be able to look away from these Paper Bag Autumn Apples. These brown paper bag crafts can even be created for a teacher's classroom. Personalize your delicious paper apples however you choose.
Primary TechniquePaper Crafts

SeasonFall
Materials:
- Brown grocery bag
- Acrylic paint in brown, barnyard red, and buttermilk
- Toothbrush
- Paintbrush
- Fine tip black marker
- Pinking shears (or other decorative scissors)
- Gingham material scrap
- Decorative buttons with classroom motif (ruler, pencil sharpener, pencil, etc.)
- Barnyard red medium button
- Cotton batting (Fiberfil)
- White craft glue
- Craft wire
- Pencil
- Raffia
- Pattern
Instructions:
- Lay brown paper bag on flat work surface. Cut out two large sections from the front and back of the bag. Stack those sections, one on top of the other, then cut out and trace around the pattern onto the bags. Cut it out with the pinking shears.
- Beginning at the bottom of the apple, use tacky glue to connect the two layers at the seams, stuffing the apple as you go with cotton batting (Fiberfil). Work your way around the edges, carefully stuffing (but not too much!) until apple is completely closed.
- When the glue is dry, paint the decorative edges and the stem with brown and the apple with barnyard red. When dry, dip the bristle tips of a toothbrush into the buttermilk paint. Test your splattering ability on a piece of scrap paper before doing this on your apple. Hold toothbrush horizontally and drag your thumb across the bristles, causing the paint to splatter spots wherever you aim it. When you are comfortable with this method, go ahead and splatter some buttermilk paint on your apple.
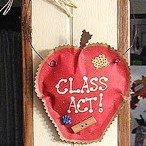
- When the buttermilk paint is dry, use the fine tip craft pen or marker to write the words “CLASS ACT!” in the center of the apple. Using white craft glue, adhere a square of gingham fabric to the upper right hand corner of the apple. Glue a couple of decorative school themed buttons to the lower left and lower center of the apple.
- Cut a piece of craft wire long enough to wrap completely around your apple. This should be enough for your hanger. Find the middle of craft wire, wrap the middle section of the wire around a pencil about 6 or 7 times. Pull the pencil out to create the curl at the top of your hanger. Curve the wire into a hanger shape and poke each end carefully through the sides of the apple as shown in the photo. Use the skinny end of a small paintbrush to curl the ends of the wire that you poked through.
- Tie a piece of raffia into a bow out onto the craft wire just before where the top curls begin. Hot glue the barnyard red button to the center of the raffia bow.
- Note: It is not necessary to paint the back of the apple, though you may if you like.
- Primary colors: If you prefer to use primary colors for your apple, use red for the apple, leave the decorative edges plain, use yellow decorative fabric, and primary colored decorative buttons. Use a white craft pen to write “CLASS ACT!” on your apple.
Read NextCrochet Scarecrow Finger Puppet