Autumn Storage Box
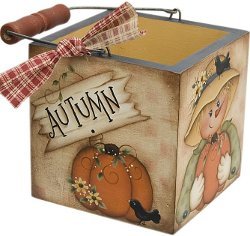
The fall season can be inside your home with this neatly decorated storage box. You can have signs and symbols of fall all over the box. Great for keeping small items or memories in, also used just for decoration.
Materials:
- DecoArt Products Required
- Americana Acrylics
- DAO7 - Moon Yellow
- DAO40 - Williamsburg Blue
- DAO60 - Mocha
- DAO63 - Burnt Sienna
- DAO65 - Dark Chocolate
- DAO67 - Lamp (Ebony) Black
- DA113 - Plantation Pine
- DA164 - Light Buttermilk
- DA166 - Deep Midnight Blue
- DA187 - Reindeer Moss Green
- DA191 - Camel
- DA219 - Heritage Brick
- DA238 - Canyon Orange
- Americana Staining/Antiquing Medium
- DS51 - Staining/Antiquing Medium
- Americana Spray Sealers
- DAS13 - Americana Matte Spray
- Checkerboard stencils (1/4" and 3/8" checks)
- Sanding block or sand paper, medium grit
- 1" wash brush
- #1 and #3 round brushes
- 1/4" and 3/8" angular brushes
- 3/8" mop brush
- #2 and #8 flat brushes
- 18/0 liner brush
- 3/8" stencil brush
- 3M Wood Putty, optional (for filling in nail holes)
- Water container
- Palette or plastic plate
- Paper towels
- Tracing paper and pencil
- Graphite
- Stylus
- 5" square box with handle, #100013 from www.cabincrafters.com
Pattern
Instructions:
Preparation:
- Sand surface; remove dust. Trace pattern onto tracing paper.
- Basecoat box Light Buttermilk.
- Basecoat inside of box Camel.
- Paint trim on top edge of box Williamsburg Blue.
- Paint wooden handle Heritage Brick.
- Lightly sand handle, edges, and sides of box.
- Mix equal parts of Antiquing/Staining Medium and Dark Chocolate. Brush this onto box (one side at a time), then wipe off before stain dries. Wipe off center area first so it is a bit lighter than edges. (Don't forget bottom of box.) Repeat staining on wooden handle and on top edge of box; wipe off excess.
- Position larger checkerboard stencil onto box sides and lightly drybrush checks with Heritage Brick. (To drybrush, load stencil brush with paint, scrub bristles onto clean, dry paper towel to remove excess paint. Then use light scrubbing motion to apply checks onto surface.)
- Transfer design outlines onto box, then transfer details later, as needed. Avoid transferring small details such as eyelashes or cheeks. (I painted scarecrow design on front and then added pumpkin design on other three sides. It might be easier to paint one side at a time.)
Scarecrow Pattern:
- Basecoat as follows: Scarecrow's hat, Camel; bird, Lamp Black; scarecrow's face and neck, Mocha; shirt, Reindeer Moss Green; pumpkin: Canyon Orange; and gloves, Light Buttermilk.
- Using Williamsburg Blue, lightly drybrush small checks on shirt; paint hat band and buttons on sleeves.
- Drybrush scarecrow's cheeks with Heritage Brick.
- Paint scarecrow's nose with Canyon Orange.
- Using Burnt Sienna, shade scarecrow's face, neck, and nose; middle section of pumpkin.
- Shade hat band and buttons with Deep Midnight Blue.
- Shade shirt with Plantation Pine.
- Paint small leaves on hat with Plantation Pine. (You can either basecoat them now and highlight later, or wait and doubleload them along with pumpkin leaves later.)
- Paint flower petals using round brush loaded with Moon Yellow and tipped in Marigold.
- Highlight top of bird, float wing, and paint bird's beak with Moon Yellow.
- Float Moon Yellow across edge of hat brim.
- Using Dark Chocolate: Shade all corners of box sides; around outside of design area; and hat. Dab in flower centers. Shade bird's beak; bottom edge of nose; around outside of pumpkin (on shirt); and "behind" middle section of pumpkin, then shade outer edges of pumpkin.
- Thin drop of Dark Chocolate and, with liner brush, pull tip of nose and add lines on nose.
- Use same thinned Dark Chocolate to pull twigs on the and curly twigs on pumpkin.
- Basecoat pumpkin stem Dark Chocolate; shade gloves with Dark Chocolate.
- Dot bird's eye with Light Buttermilk.
- Add scarecrow's eyes with Lamp Black. Thin some Lamp Black to add bird's legs and scarecrow's lashes and mouth.
- With Lamp Black, shade bottom edges of flower centers and pumpkin stem; add small dot inside bird's eye; and add linework and dot on buttons.
- Float Light Buttermilk highlights in bottoms of scarecrow's eyes.
- Float Light Buttermilk along the tips of flower petals.
- Double-load #2 flat brush with Plantation Pine and Reindeer Moss Green to paint leaves.
- (Highlight leaves on hat with Reindeer Moss Green if you basecoated them earlier with Plantation Pine.)
- Thin following colors with water and add strands of hair: Dark Chocolate; Burnt Sienna; Marigold; then Moon Yellow.
- Thin drop of Reindeer Moss Green to add threads on buttons.
- Float Dark Chocolate underneath hat brim (on top of hair) to create shadow so that hair appears to be underneath hat.
- Dot scarecrow's eyes with Light Buttermilk.
- Add Light Buttermilk and Moon Yellow dots on flowers and on pumpkin.
Pumpkin Pattern for Sides of Box:
- Basecoat sign and post Light Buttermilk.
- Basecoat pumpkin with Canyon Orange.
- Shade center section of pumpkin with Burnt Sienna.
- Using Dark Chocolate: Shade around outside of design (and corners of box if you haven't done so already); shade sign and post. Shade "behind" center section of pumpkin and around pumpkin edges; paint pumpkin stem; and thin some paint to add curly vines and twigs.
- Double-load #2 flat brush with Plantation Pine and Reindeer Moss Green to add leaves.
- Paint flower petals using round brush loaded with Moon Yellow and tipped into Marigold.
- Dab in flower centers with Dark Chocolate.
- Using Lamp Black: Paint bird; thin paint to add legs; and shade pumpkin stem and bottom edges of flower centers.
- Write "Autumn" with slightly thinned Lamp Black using #1 round brush.
- Add nail (dot) on sign with Lamp Black.
- Add bird's beak with Moon Yellow.
- Highlight bird with Moon Yellow and float wing.
- Shade bird's beak with Dark Chocolate.
- Highlight edges of flower petals with Light Buttermilk.
- Dot bird's eye with Light Buttermilk.
- Add dots on pumpkin with Light Buttermilk and Moon Yellow.
- Add tiny Lamp Black dot in bird's eye.
Finishing
- Lightly spray Americana Matte Spray Sealer on entire box and wooden handle.
- Let dry.
Helpful Hint
- Use mop brush to soften floated lines as you shade and highlight.
Read NextDIY Autumn Wood Banner

