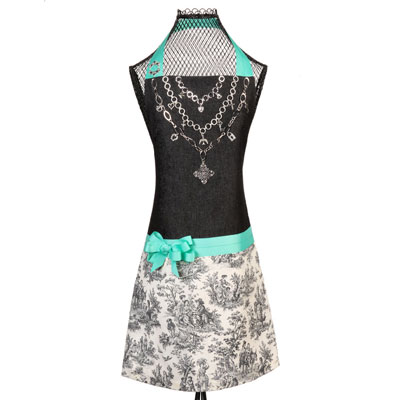
Little Black Dress Apron
Your mom loves to cook in her kitchen, but she also likes to go out and have a good time. Now she can have a good time in her kitchen with this little black dress apron. Give her the style she loves to wear around the house.
Materials:
- Aleene’s Fabric Fusion Permanent Fabric Adhesive
- Aleene’s Fabric Fusion Permanent Fabric Adhesive Pen
- Ribbon – grosgrain – 7/8” wide
- Charms – several sizes
- Jump rings
- Toile or print fabric – ½ yard – back and white
- Apron with bib – Black
- Wire cutters
- Scissors
- Iron
- Plastic bag or paper
- Chains – three sizes and designs
- Pliers – needle nose or jewelry tools
- Masking tape
- Measuring tape
Instructions:
-
Purchase or sew a bib apron.
-
Protect work surface with a plastic bag or paper.
-
Draw a chalk or pencil line 17" from the top of the apron across the lower part of the apron. This will be the guideline for attaching the printed fabric.
-
Cut a piece of the fabric about 16" high and 4" wider than the width of the lower area of the apron. Fold 1" under on one side and press. Lay the pressed edge along the line on the apron and make sure it fits across and beyond each side about 2". Using Fabric Fusion, apply glue to the apron along the pencil line and 1" below. A brush may be used to spread the glue so there are no thick areas. NOTE: Use masking tape to hold down glued areas until they are dry.
-
Carefully turn the apron over and on each side fold under 1” and once more to make it the same width of the apron. Sparingly use the glue to hold in place. NOTE: If the lower edge or sides of the apron are too long or wide for the printed fabric, trim them as desired before gluing the sides down.
-
Press and hem the bottom of the printed fabric to desired length using glue as before. Let dry.
-
At the top of the bib area, cut off the neck strap. Determine length of ribbon needed to become new neck strap. Lay the apron out flat. Glue two strips of ribbon next to each other from one side to the other on the back side. Hold in place with masking tape. NOTE: Thick grosgrain ribbon is best.
-
Just above the printed fabric, sparingly apply glue and place two rows of ribbon. Glue ends of ribbon to the back side of the apron. Make a bow and glue to the ribbon.
- Lay all the chains and charms out on the bib area before cutting any chain lengths. When a pleasing design is achieved, attach the charms to the chain with jump rings. Lay all of the chains on the bib again when finished and then cut the excess chain off with wire cutters. Starting at the top outside chain, and using the Fabric Fusion pen, apply a tiny bead of glue along the chain links and press onto the fabric. Use masking tape to hold in place. It is not necessary to glue each link down. Glue down the charms that are larger and the ones with the flat backs. Now glue the charm or jewelry piece to the ribbons on one side of the bib. Lay flat until dry.
Notes:
-
The chains should have a flat area for gluing to the fabric. Charms that are flat on the back are best also. Different finishes, antiqued, shiny or dull, make an interesting combination. The charms can be all one design, hearts, crosses, keys, etc, or any combination desired. The center charm on each chain and the metal piece on the ribbon should be larger than the others. All measurements should be adjusted for the size of the person the apron is made for.
Read Next17 Men’s Prayer Shawl Patterns
Your Recently Viewed Projects

Thanks for your comment. Don't forget to share!
Readerwoman
Dec 09, 2010
Adorable. Would be easy to add pockets - discretely - on the side seams... every apron should have pockets!
Report Inappropriate Comment
Are you sure you would like to report this comment? It will be flagged for our moderators to take action.
Thank you for taking the time to improve the content on our site.