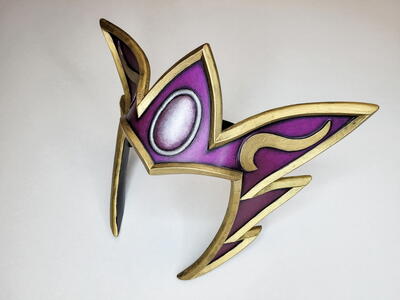
Royal Headpiece
With Shining Gemstone

This elegant headpiece with pointy edges looks magnificent on a magical character such as a Sorceress or other spellcaster. The band that's attached on the back of this headpiece will keep it firmly on your head in a convenient way without adding much weight to this already super light-weight piece. The headpiece can be worn over your normal hair or over a wig and doesn’t require hair clips or fasteners. It’s really comfy! A beautiful gem is the shining center of this headpiece. It’s not a real gem, but sculpted with foam clay instead. The painting and finishing make this gem look so realistic. The edges of the headpiece are decorated with triangular-shaped prefab EVA foam bevels to help speed up the crafting process.
Materials List
-
Main Materials
- Royal Headpiece templates (pattern sheet I)
- 1 (14 x 14–inch [35 x35–cm]) sheet of 6mm EVA foam
- 1 (4 x 4–inch [10 x 10–cm]) piece of 2mm EVA foam
- 79 inches (2 m) of EVA foam prefab triangular bevel (I used 10mm wide, low profile)
- Contact cement
- Foam clay
- 6 inches (15 cm) of EVA foam prefab half-round dowel (I used 5mm wide)
- Painter’s tape or duct tape
- Flexible primer (black)
- Acrylic paint (dark brown, metallic purple, pearl, gold and silver)
- Black oil paint (optional)
- Satin and glossy (spray) varnish (optional)
-
Tools
- Measuring tape
- Paint marker
- Craft knife
- Cutting mat
- Heat gun
- Safety tools, including a respirator, dust mask and safety glasses
- Rotary tool with sanding drum (120-grit), or regular sandpaper
- Wooden clay modeling tool (optional)
- Brushes, for painting
Instructions:
Printing the pattern: If you want to print a pattern, be sure to set your printer to ‘not scaling’. It should print at 100%. Also make sure you pick the right paper size to print. So in the USA, you would need ‘letter’ and in Europe you would need ‘A4’. If in doubt, check what paper is in your printer It’s also important that you open the file in Acrobat reader and print from there instead from opening it in your browser and printing from there. In rare occasions, printing from a browser can warp the pattern pieces. So use Acrobat reader just to be sure! It’s a free to download program.
Preparation
Before cutting the foam, hold the cut-out paper template of the headpiece base to your head where you want to wear it. Using a tape measure, measure around the back of your head, between the markings on the template and add 2 inches (5 cm) to this measurement. This measurement will determine what length the EVA foam strap needs to be for making the headpiece wearable.
Once you know the measurement for your strap, cut a ¾-inch (2-cm)-wide piece of 6mm EVA foam to that length. For reference, mine was 14 inches (35 cm) long.
Using the paper pattern, trace and cut the headpiece base out of the 6mm EVA foam. Cut out the swirly details twice (once mirrored) using the 2mm EVA foam.
-
Shaping the Headpiece Base
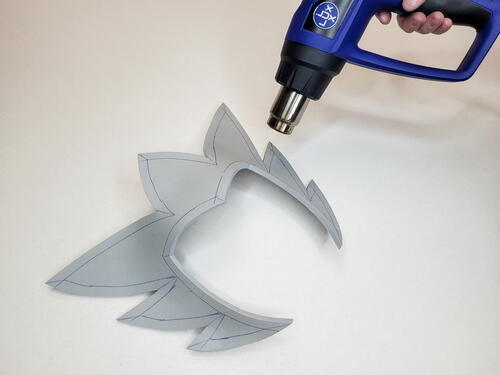
Heat the foam headpiece base with the heat gun. When the foam is hot, you can shape it to be rounded so that it will fit well on your forehead. Curve the foam piece and hold it for a few minutes in the desired shape until it’s cooled down. Bend the pointy edges in the other direction to make them stand out to the sides more if you like how that looks. When the foam has cooled down again, you can try it on your head to see if you like the shape.
The sides of the headpiece should sit snug against your cheeks. If the shape isn’t right just yet, heat the foam again and shape it further. If you want to keep it simple and don’t want to add edging and details, move on to step 5 next and then skip the faux gemstone too. -
Adding Details
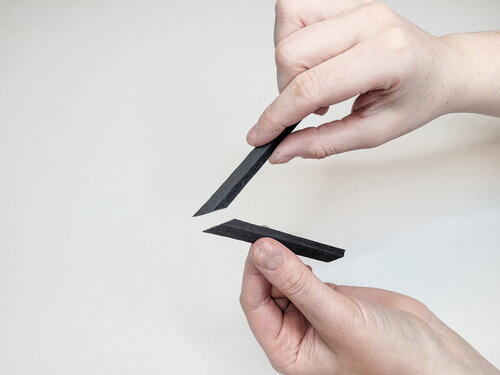
Lay the triangular-shaped bevel along the edges of the headpiece to measure how long they should be, and cut to the right lengths. In order to achieve nice pointy corners, make sure to cut the ends diagonally. You should end up with 18 pieces.
Note: Each piece will vary in length, so to avoid mixing them up, write numbers or letters on them and on the corresponding part of the armor pieces where they need to go. -
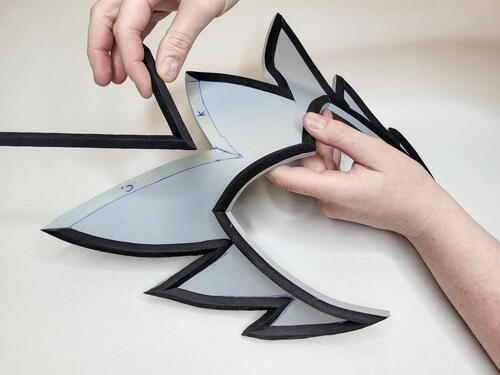
Glue the bevels all around the edge on the headpiece base using the contact cement. Where two pieces of bevel meet, glue these sides together so it forms one continuous bevel.
-
Take the two swirly detail pieces and glue those on both of the “ears” of the headpiece.
-
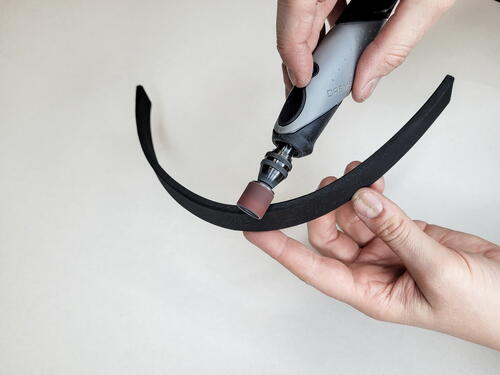
Cleaning Up the Edges
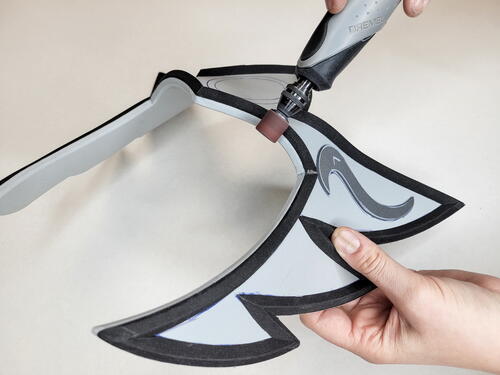
Using the rotary tool with 120-grit sanding drum, sand the edges of the headpiece smooth. The transition between the glued-on bevels and the headpiece will get super smooth in this step. Also sand the edges smooth of the strip of foam that will be used for the headband to make it softer. The result of the sanding will look nicest when using a rotary tool, but you can also use regular sandpaper for this job. After the sanding is done, clean the foam piece by removing all of the dust. -
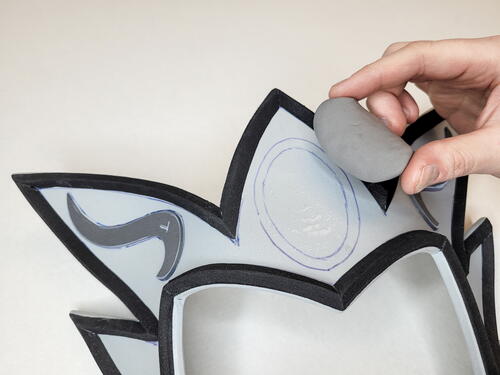
Creating a Faux Gemstone
Form a flat oval shape with a bit of foam clay. If the foam clay is too dry, mix some water into it. Using your fingers, apply a little bit of water on the armor where you want to place the gem. This will make the foam clay stick better to the foam.
Press the foam clay oval shape softly onto the base and push the clay’s sides down until it is a cabochon shape. Use your fingers to do the sculpting and, optionally, some (wooden) clay modeling tools. Now set the project aside for 24 to 48 hours so the foam clay can air-dry. It doesn't matter if your gem isn’t perfectly shaped right now, since it will get a bit puffier once the foam clay has air-dried. -
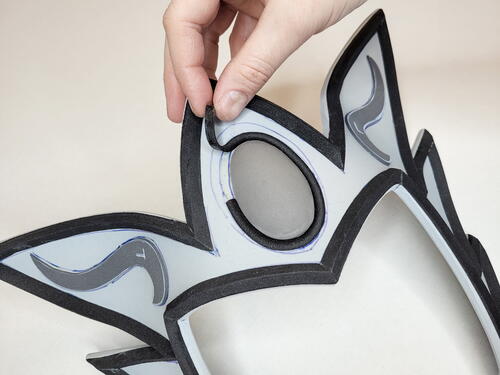
Lay the half-round foam dowel around the cured foam clay gem, and cut it to the right length. Glue the dowel to the armor around the faux gem to create a gemstone setting. Also glue the sides where the two ends of the bevel meet to create one continuous bevel.
-
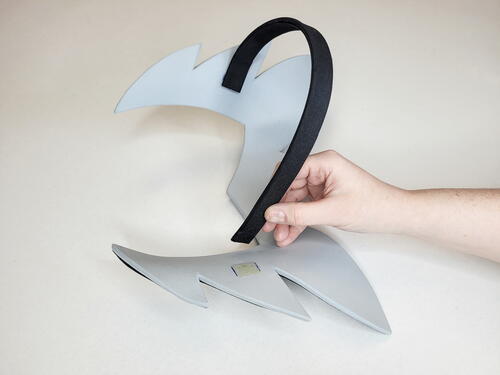
Make It Wearable
Heat the thin EVA foam strap with the heat gun. When the foam strip is hot, you can shape it to be rounded and fit well on the back of your head. This piece will be the strap that keeps the headpiece snug on your head.
To decide where to glue the ends of this strap to the headpiece, try taping the strap to different spots on the backside and adjusting the length as needed until it sits perfectly on your head. Now take it off and mark where the strap needs to be attached. Glue both ends of the strap to the backside of the headpiece. Now the headpiece is wearable! -
Priming and Painting
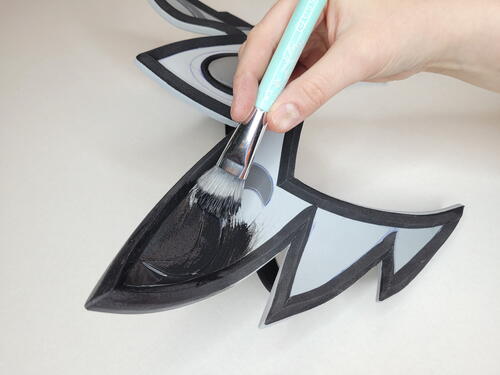
Prepare the headpiece for priming and painting by heat-sealing it with the heat gun. Try to avoid heating the foam clay as much as possible, since it can get damaged. When the foam is cool, apply the black flexible primer to the headpiece. Cover the complete front of the piece and most of the back too. You can leave the parts that will be sitting against your skin (forehead) unprimed for comfort reasons. Also prime the outside of the strap on the back. Use as many coats of primer as needed until you like how the surface looks. I used two layers of HexFlex black. Leave the primer to dry for 2 to 4 hours. -
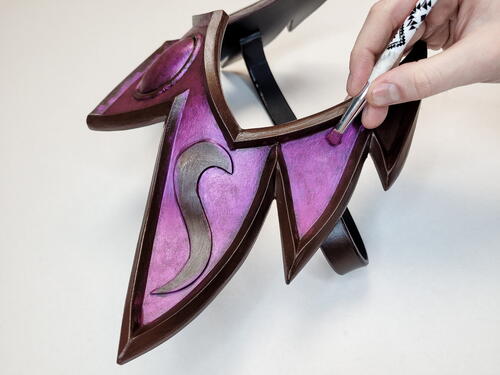
Apply a layer of brown acrylic paint to the armor pieces and head strap. This will serve as the shadow color for the purple and gold paint. To create some initial depth, add more paint on the raised parts and less on the edges where shadows naturally occur. If your primer isn’t black, then you can also add some black paint on the shadow parts. Leave the brown paint to dry for 2 to 4 hours.
-
For the main color, I used a metallic purple acrylic paint (Sangria Purple from Cospaint). Dab it on with a brush to get a nice layer of paint. Leave the edging and details unpainted for now, and stay away from the corners so the shadow color still shows through. Acrylic metallic paint usually dries quickly, so leave it to dry for 1 hour.
-
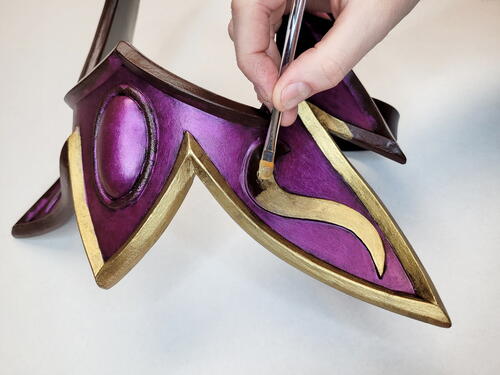
Apply gold metallic acrylic paint on the beveled edge sand on the swirly details. (I used 14kg Gold from Cospaint.) Only paint the raised surfaces, and not the shadows, to give it even more depth.
-
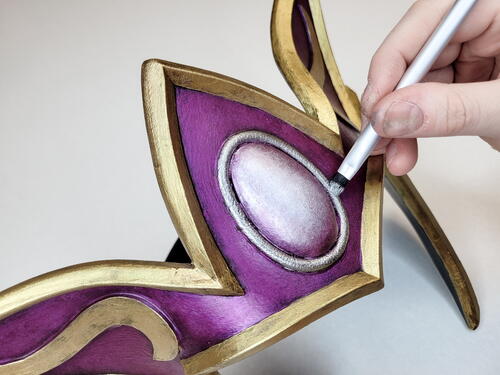
To make the gem stand out, dab some pearlescent paint on it. (I used Pearl White from Cospaint.) Just use a little bit of paint on the brush, and add more layers to make it pop even more. Leave this paint to dry for 1 hour.
-
Apply silver acrylic paint on the gemstone setting. (I used Dark Silver from HexFlex.) Use a thin brush so you can be as precise as possible. Leave this to dry for 1 hour.
-
Optional: Take your paint job to the next level by creating even more shadows with black oil paint. Then, if you want, finish off by protecting your project with a layer of varnish. For this project, I recommend coating the whole piece with satin acrylic varnish and applying gloss acrylic varnish on the gem.


Get Creative! Ideas for Variations
If you don’t like the spiked shape, make it round.What about a metallic blue headpiece for a Sorceress who controls the power of water? Or perhaps green, to make it more elvish looking.
This piece looks brand new, but you can add battle damage like scratches and dents to add more character to the piece.
Changing the shape of the gem or adding more gems can have an interesting effect. You could also use store-bought acrylic cabochons to make the gems. They come in various colors, shapes and sizes and are translucent.
I left the strap on the back brown, because that matches my hair color. But you can paint the strap gold or the color of your own hair or wig.
Credit:
Reprinted with permission from The Beginner’s Guide to Cosplay Armor & Props by Joyce Van Den Goor. Page Street Publishing Co. 2023. Photo credit: Pascal Deguelle + Joyce Van Den Goor.
Read NextGreek Goddess Crochet Shawl Pattern