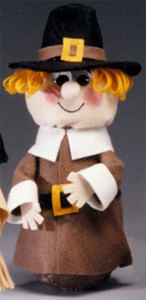
Wobbly Pilgrim
Your Thanksgiving is sure to rock when you have a wobbly pilgrim on your table! He rocks and wobbles, and you can make him in only one day.

Materials:
- STYROFOAM™ Brand Foam:
- 12" x 4" cone, one
- 4" ball, one
- Wobbly Pilgrim pattern
- Clear glass marbles
- Pencil
- Fine-line black permanent marker
- Ruler
- Scissors
- Serrated knife
- Wire cutters
- Needlenose pliers
- Awl or ice pick
- Low-temp glue gun and glue sticks
- Thick, white craft glue
- 2 9" x 12" sheets brown felt
- 1 9" x 12" sheet cream felt
- 1 9" x 12" sheet gold felt
- 1 9" x 12" sheet white felt
- 1 9" x 12" sheet black felt
- Polyester fiberfill
- White chenille stem
- Paper towels
- 1/2"-3/4" wiggle eyes, two
- Fine-gauge spool wire
- Medium flat paintbrush
- Black dimensional fabric paint (optional)
- Pink acrylic paint (optional)
- Brown acrylic paint (optional)
- Compass
- Metal tablespoon
- Extra-long straight pins
- Large-eye sewing needle
- Candle stub or paraffin
- Disposable palette
Steps:
- Press opposite sides of foam ball on a hard surface to flatten slightly. Wax serrated knife with candle stub or paraffin and cut ball in half.
- Refer to diagram to cut top 4" from foam cone. Mark a line around cone 5" from base. Indent cone on line by pressing foam onto square edge of a counter or table. Note: This will become pilgrim's neck.
- Refer to diagram to hollow out lower 5" of cone and one half ball by scooping out foam with a tablespoon. Leave approx. 1/4"-1/2" outer shell intact, working carefully to avoid cracking foam. If desired, paint bottom 1" of cone and half ball brown to match robe.
- Cut chenille stem in half. Using pattern, cut two hands from cream felt. Glue hands to matching felt, sandwiching a chenille stem between layers. Let dry. Cut hands from doubled felt, cutting around original shapes.
- Cut out remaining pilgrim patterns as indicated. Also cut one 12" x 4" strip from cream felt for head and one 12" x 4" strip from gold felt for hair.
- Gather felt nose close to edge, stuffing firmly with excess cream felt before closing. To gather felt throughout, use a large-eye needle with fine-gauge wire and hand sew gathering stitches where indicated. Gather felt on wire and then twist wires together to secure. Trim excess wire.
- Glue nose to center of 12" x 4" cream felt head. Paint pink round cheeks on either side of nose. Draw a curved smile with black dimensional paint between cheeks. Allow to dry. Overlap sides of head 1/4" as indicated on pattern with facial features to inside and glue to form a tube. Turn.
- Fold 12" x 4" gold hair strip in half lengthwise and glue long raw edges together. Let dry. Fringe strip for hair by cutting slits in folded edge approximately 1/4" apart.
- Overlap one side of felt robes 1/4" and glue to form one long piece. Slide a buckle onto center of belt and then glue belt to robe. Glue white trim to bottom of sleeves. Following patterns, overlap corresponding edges of robe, hat crown, and sleeves 1/4" with any embellishments to inside and glue to form tubes. Turn.
- Insert a chenille stem arm into each sleeve with wide end overlapping hand slightly. Gather each sleeve around arm 1/4" from top.
- Place head on cone with bottom of felt 1/4" below indented neck. Gather head around neck. Place robe on cone with top edge overlapping bottom of head and belt buckled centered below face. Gather robe around neck.
- Use an awl or ice pick to form tiny holes in robe and foam body at shoulders to attach arms. Glue arms into holes with sleeve seams concealed at bottom. Glue collar around neck, centering front opening above belt buckle (see photo).
- Stuff head with fiberfill between foam and felt to give it a round appearance. Gather head 1/4" from top around cone.
- Gather hat crown tube 1/4" from top edge. Turn and shape as desired. Glue fringed gold hair around top of head. Place hat brim over top of head, enlarging center circle if necessary. Place hat crown on top, gluing bottom edges to brim. Slide a gold buckle onto center of hatband. Glue hatband to base of crown, centering buckle above pilgrim's nose.
- Turn cone body on end and weight hollow area with glass marbles. Align hollow half ball on bottom of cone with flat sides together and pin in place temporarily. Test pilgrim's rocking motion, adding or subtracting marbles as necessary. When satisfied, remove pins and glue ball to cone permanently.
®™ Trademark of The Dow Chemical Company ("Dow") or an affiliated company of Dow. For more project ideas, please see styrofoamstyle.com.