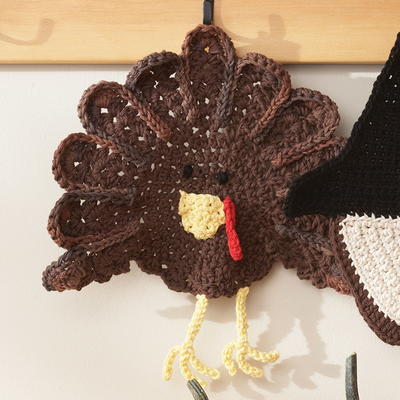
Let’s Talk Turkey Crochet Silverware Holder
Celebrate Thanksgiving by working up this crochet turkey pattern.

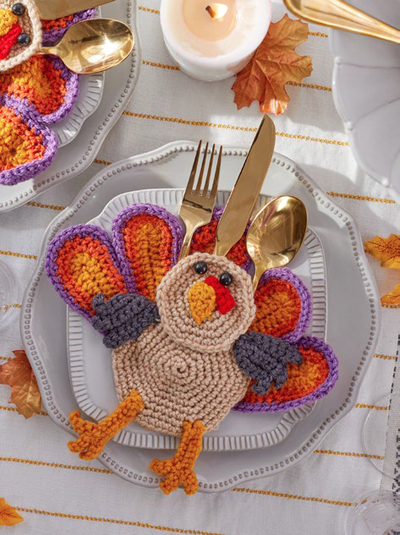
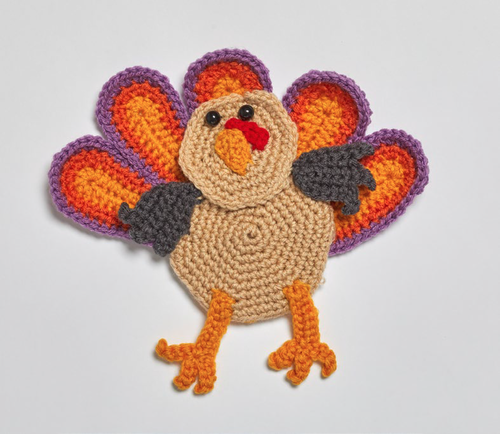
Learn how to crochet a turkey that has a dual purpose! Dress up your place settings this Thanksgiving with the Lets Talk Turkey Crochet Silverware Holder. This adorable project is a wonderful way to greet guests ready to sit down to the best meal of the year. This pattern is composed of several basic shapes like a hexagon motif and vividly colorful ovals to make the feathers. If you decide you don't want to make them for every place setting, crochet a few to decorate the table, or you can even turn them into wall decorations! Get in the mood for Thanksgiving with a turkey crochet pattern like this one.
More Crafty Ideas For You
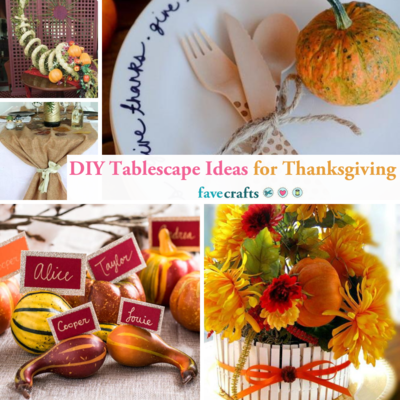
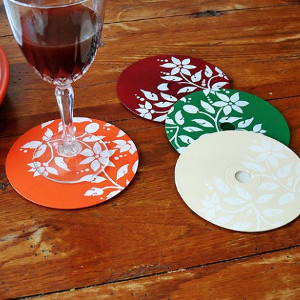
One fun and festive craft project to consider for fans of the Let's Talk Turkey Crochet Silverware Holder is creating a set of matching Thanksgiving-themed coasters. These coasters can be made using similar crochet techniques and Thanksgiving-inspired colors such as warm oranges, deep reds, and earthy browns. They would make a charming addition to your Thanksgiving table decor and are sure to impress your guests.
Another craft project idea that complements the Let's Talk Turkey Crochet Silverware Holder is making a set of matching napkin rings. These napkin rings can be crocheted using the same turkey motif or coordinating colors to tie your table setting together. They are a simple yet impactful way to elevate your Thanksgiving table decor and add a personalized touch to your holiday hosting.
For those looking for a more challenging craft project, consider creating a matching table runner featuring the turkey motif used in the Let's Talk Turkey Crochet Silverware Holder. This project will showcase your crochet skills and create a cohesive look for your Thanksgiving table. You can customize the size, colors, and design to fit your table perfectly and make a statement piece that will impress your guests.
No matter which project you choose to pursue, these craft ideas are a wonderful way to continue the Thanksgiving theme throughout your table decor and showcase your creativity and talent as a crafter. Happy crafting!
NotesNotes:
1. Head and body are worked in continuous (spiral) rounds. Do not join at end of round unless stated otherwise. Place marker for beginning of round and move marker up as each round is completed.
2. To change color, work last stitch of old color to last yarn over. Yarn over with new color and draw through all loops on hook to complete stitch. Proceed with new color. Cut old color.

Crochet HookG/6 or 4 mm hook
Yarn Weight(4) Medium Weight/Worsted Weight and Aran (16-20 stitches to 4 inches)
Crochet Gauge6 sc = 1½" (4 cm); 6 rounds = 1½" (4 cm). CHECK YOUR GAUGE. Use any size hook to obtain the gauge.
Finished SizeSilverware holder measures 7¾" (19.5 cm) from top of center feather to bottom of body.
Materials List
- RED HEART® Super Saver®: 1 skein each 334 Buff A, 321 Gold B, 319 Cherry Red C, 3950 Charcoal D, 256 Carrot E, and 528 Medium Purple F
- Susan Bates® Crochet Hook: 4mm [US G-7].
- Yarn needle
- Stitch marker,
- Two ⅜" (9.5mm) round buttons
TURKEY
Here’s a unique crochet idea for setting a special Thanksgiving table for your guests. Pop your silverware into these colorful turkeys and set the stage for a memorable meal!
Head
With A, ch 2.
-
Round 1: Work 6 sc in 2nd ch from hook—6 sc. Place marker on first st.
-
Round 2: Work 2 sc in each sc around—12 sc.
-
Round 3: *Sc in next sc, 2 sc in next sc; repeat from * around—18 sc.
-
Round 4: *Sc in next 2 sc, 2 sc in next sc; repeat from * around—24 sc.
-
Round 5: *Sc in next 3 sc, 2 sc in next sc; repeat from * around—30 sc.
-
Round 6: *Sc in next 4 sc, 2 sc in next sc; repeat from * around; join with slip st in first sc—36 sc. Fasten off, leaving a long tail for sewing.
Body (make 2)
-
Rounds 1–6: Work same as Rounds 1–6 of head. Do not join or fasten off at end of last round.
-
Round 7: *Sc in next 5 sc, 2 sc in next sc; repeat from * around—42 sc.
-
Round 8: *Sc in next 6 sc, 2 sc in next sc; repeat from * around—48 sc.
-
Round 9: *Sc in next 7 sc, 2 sc in next sc; repeat from * around; join with slip st in first sc—54 sc. Fasten off, leaving a long tail for sewing.
Beak
With B, ch 5, slip st in 2nd ch from hook, sc in next ch, hdc in next ch, 5 hdc in last ch; working in opposite side of foundation ch, hdc in next ch, sc in next ch, slip st in last ch. Fasten off, leaving a long tail for sewing.
Wattle
With C, ch 6, sc in 3rd ch from hook, slip st in each remaining ch. Fasten off, leaving a long tail for sewing.
Wing (make 2)
With D, ch 9.
-
Row 1: Sc in 2nd ch from hook and in each ch across, turn—8 sc.
-
Row 2: Ch 1, sc in first 6 sc; leave remaining sc unworked, turn—6 sc.
-
Row 3: Ch 3, sc in 2nd ch from hook and in next ch, sc in each sc across, turn—8 sc.
-
Rows 4–7: Repeat Rows 2 and 3 twice. Fasten off, leaving a long tail. Weave tail through ends of rows and pull tightly to gather.
Leg (make 2)
With B, ch 9.
-
Row 1: Sc in 2nd ch from hook and each remaining ch across, turn—8 sc.
-
Row 2: *Ch 5, sc in 2nd ch from hook and in next 3 ch, slip st in end of Row 1; repeat from * twice; working in opposite side of foundation ch, slip st in each ch. Fasten off, leaving a long tail for sewing.
Tail Feather (make 5)
With B, ch 12.
-
Row 1 (right side): Sc in 2nd ch from hook and in next 3 ch, hdc in next 5 ch, dc in next ch, 6 dc in last ch; working in opposite side of foundation ch, dc in next ch, hdc in next 5 ch, sc in last 4 ch; change to E, turn—26 sts.
-
Row 2: Ch 1, sc in first 6 sts, hdc in next 5 sts, 2 dc in next 4 sts, hdc in next 5 sts, sc in last 6 sts; change to F, turn—30 sts.
-
Row 3: Ch 1, sc in first 12 sts, 2 dc in next 6 sts, sc in last 12 sts—36 sts. Fasten off.
FINISHING
Refer to photograph for placement of all pieces.
-
Arrange beak slightly above center of face and sew in place. Sew wattle on top of beak. Sew buttons for eyes above beak and wattle.
-
Overlap head on first 4 rounds of 1 body piece and sew in place.
-
Sew wings to head and body.
-
Position feathers to form a fan, slightly overlapping first 6 rows, and sew together with strand of E. With right side facing, pin feathers to back side of body.
-
With wrong sides together, sew body pieces together, leaving opening between 3 center feathers unsewn.
-
Sew legs in place.
-
Weave in ends.
Abbreviations
- A, B, C
- Color A, Color B, Color C, etc.
- ch
- chain(s)
- dc
- double crochet
- hdc
- half double crochet
- sc
- single crochet
- st(s)
- stitch(es)
- *
- repeat whatever follows the * as indicated
Contest Rules:
- There is a maximum of one extra entry per person. The extra entry will be based upon a comment left on this post. Duplicate comments are not tallied.
- The winner will be selected at random from the comments on this page and the entries on the contest page.
- The winner will be contacted on the morning of November 19th, 2018.
- Email Address provided in their account (please do NOT leave your email address in the comments--you already provided it when you created your account)
- You have until November 18th, 2018 at 11:59pm EST to leave your comment on this post. Comments posted after that will not be counted.
- Contest open to anyone 18+ in US and/or Canada. Excludes Quebec and Puerto Rico.
Have you ever crafted for Thanksgiving before? What did you make?
Read NextAwesome DIY Crochet Pumpkins
Your Recently Viewed Projects
Thanks for your comment. Don't forget to share!
kimlennie 9336847
Nov 09, 2019
I have never crafted for thanksgiving as it is only my husband and I. But these are so cute to make for craft fairs.
Crafty Suz
Nov 17, 2018
I think this is so cute. My three year old granddaughter as well as my 86 year old mother would like it. I think I will save this for a project to have ready for next Thanksgiving. That's one of the great things about this site, I can save projects for the future. I like to pin them too. These would be really cute to make and sell at a craft fair too, Do you agree?
beckyesser
Nov 10, 2018
It was an easy pattern to follow Very cute. I would reccmend this pattern.
crafter772 2880119
Nov 07, 2018
I have crocheted Turkey placemats and Turkey dish cloths. This Turkey Silverware Holder will fit right in with these.
ridiculosity 67303 43
Nov 05, 2018
Never that I remember, don't expect to in the future, either. But I love the imagination shown in this project. And the chance to win goodies!
kimlennie 9336847
Nov 05, 2018
I have never crafted for thanksgiving but these turkeys are a good start.
aketch
Nov 05, 2018
I like to make decorations for wine bottles that I gift. These include bright leaves, dried hydrangeas, cedar boughs and small twigs. My friends all love these small natural arrangements.
Report Inappropriate Comment
Are you sure you would like to report this comment? It will be flagged for our moderators to take action.
Thank you for taking the time to improve the content on our site.