Dancing Leaves Coasters
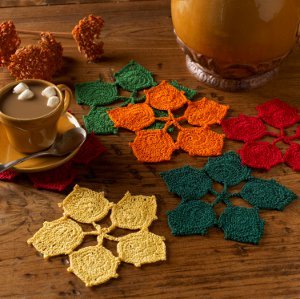
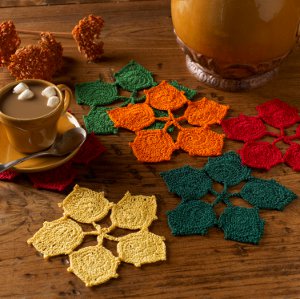
 Decorate your Thanksgiving table with these colorful and fun Dancing Leaves Coasters. Mix and match colors to create the look of falling leaves on your table. You can also place these colorful crochet coasters under pillar candles, small serving dishes, or just spread them out on your table for a fun decoration that's sure to last you for years to come.
You can find this project, as well as many more, in our new free eBook, Welcome to Our Home: Knit and Crochet Ideas from Red Heart. Download your own free copy today!
Materials:
- 1 skein Aunt Lydia's® Classic Crochet Thread, Size 10 in Cardinal Red
- 1 skein Aunt Lydia's® Classic Crochet Thread, Size 10 in Golden Yellow
- 1 skein Aunt Lydia's® Classic Crochet Thread, Size 10 in Pumpkin
- 1 skein Aunt Lydia's® Classic Crochet Thread, Size 10 in Victory Red
- 1 skein Aunt Lydia's® Classic Crochet Thread, Size 10 in Forest Green
- 1 skein Aunt Lydia's® Classic Crochet Thread, Size 10 in Myrtle Green
- 2.75mm [US C-2] Susan Bates® Crochet Hook
- Stitch marker
- Yarn needle
- Assembly diagram
Notes and Special Stitches:
- Motifs are working in a continuous spiral. Do not join or turn unless otherwise indicated. Place a stitch marker in the first stitch and move up as work progresses.
- Motifs are joined while working Rounds 4 and 5, using a join-as-you-go technique, following Assembly Diagram for placement.
- adjustable ring = Holding the yarn a few inches from the end, wrap around your finger. Do not remove wrap from finger, insert hook into the wrap and draw up a loop of working yarn. Chain one to secure the loop, and remove ring from finger. Work stitches of first round in the ring. Pull gently, but firmly, on tail to tighten ring.
- picot = Ch 3, slip stitch in first ch, slip stitch in indicated stitch.
- joining picot = Ch 3, insert hook in first ch and in corresponding picot of previous Motif (see Assembly Diagram), yarn over and draw through all loops on hook, slip stitch in top of indicated stitch on current Motif.
Instructions:
Coaster measures 5.5" (14 cm) in diameter.
Motif measures 3" (8 cm) long (including stem) x 2" (5 cm) wide.
First Motif
- Round 1 (Right Side): Starting with adjustable ring, work (4 sc, 4 dc, 4 sc) in ring; insert st marker – 12 sts.
- Round 2: Work 2 sc in next 2 sts, 2 hdc in next 2 sts, 2 dc in next 4 sts, 2 hdc in next 2 sts, 2 sc in next 2 sts – 24 sts.
- Round 3: [2 sc in next st, sc in next st] 2 times, [2 hdc in next st, hdc in next st] 2 times, 2 dc in next st, dc in next st, [2 tr in next st, tr in next st] 2 times, 2 dc in next st, dc in next st, [2 hdc in next st, hdc in next st] 2 times, [2 sc in next st, sc in next st] 2 times – 36 sts.
- Round 4: [2 sc in next st, sc in next 2 sts] 2 times, 2 hdc in next st, picot in next st, hdc in next st, 2 hdc in next st, hdc in next 2 sts, (dc, picot, dc) in next st, dc in next 2 sts, 2 dc in next st, tr in next st, (tr, picot, tr) in next st, tr in next st, 2 dc in next st, dc in next 2 sts, (dc, picot, dc) in next st, hdc in next 2 sts, 2 hdc in next st, hdc in next st, picot in next st, 2 hdc in next st, [sc in next 2 sts, 2 sc in next st] 2 times – 48 sts.
- Round 5 (Stem): Ch 5, work 3 sc in second ch from hook, slip st in next 3 chs, slip st in next sc.
- Fasten off.
Remaining Motifs
- Work 4 additional Motifs, joining on side adjacent to previous Motif and joining last Motif on two sides, following Assembly Diagram as a guide for placement.
- Rounds 1-3: Work same as for First Motif.
1-Sided Joining
- Round 4 (Joining Round): [2 sc in next st, sc in next 2 sts] 2 times, 2 hdc in next st, picot, hdc in next st, 2 hdc in next st, hdc in next 2 sts, (dc, picot, dc) in next st, dc in next 2 sts, 2 dc in next st, tr in next st, (tr, picot, tr) in next st, tr in next st, 2 dc in next st, dc in next 2 sts, (dc, picot, dc) in next st, hdc in next 2 sts, 2 hdc in next st, hdc in next st, joining picot, 2 hdc in next st, [sc in next 2 sts, 2 sc in next st] 2 times – 48 sts.
2-Sided Joining
- Round 4 (Joining Round): [2 sc in next st, sc in next 2 sts] 2 times, 2 hdc in next st, joining picot, hdc in next st, 2 hdc in next st, hdc in next 2 sts, (dc, picot, dc) in next st, dc in next 2 sts, 2 dc in next st, tr in next st, (tr, picot, tr) in next st, tr in next st, 2 dc in next st, dc in next 2 sts, (dc, picot, dc) in next st, hdc in next 2 sts, 2 hdc in next st, hdc in next st, joining picot, 2 hdc in next st, [sc in next 2 sts, 2 sc in next st] 2 times – 48 sts.
- Round 5 (Stem Joining Round): Ch 4, insert hook through 3 sc group of stems of all adjoining Motifs and work slip st, 3 sc in next ch, slip st in next 3 chs; join with slip st in next sc on Motif.
- Fasten off.
Finishing
- Weave in ends. Block.
Read NextGratitude Journal
Your Recently Viewed Projects
Marilyn B
Nov 15, 2017
These are so pretty! I could see using this pattern with a metalic white and silvery yarn and turn them into wintery snowflakes! These could be connected together in groups of three and then attached in a longer row as a table runner or even as placemats or trivets if doubled in thickness. Or these could be grouped in a round formation for a tablecloth too! So pretty and such a versatile desogn... Thanks for sharing!
Hannah
May 09, 2017
This is SO fascinating!! I am so in love with the colors! These earth colors really blended together. It's a pretty idea to make it something like this as a coaster but it's artistry is too much for just a coaster. I am thinking of putting this is up on a wall, creating a tree effect. Very very alluring!! I love this dancing leaves project!
zgpsimp 9587440
Oct 30, 2013
the coasters are darling. I hope I can find the pattern. You are SO Clever
Report Inappropriate Comment
Are you sure you would like to report this comment? It will be flagged for our moderators to take action.
Thank you for taking the time to improve the content on our site.

