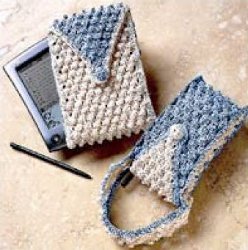
What's in Your Pockets Wall Board
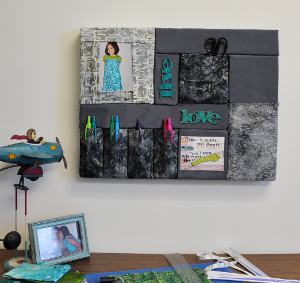
Keep your life organized with this What's in Your Pockets Wall Board. Made up of a variety of fabric pockets, this memo board is great for teens and busy families. You can use any type of fabric to create this project, so it's great for cleaning up your scrap fabric stash and putting those fabric pieces to use! You can make this board as small or as large as you'd like, simply add more of the provided diagrams to alter the look and/or size of your memo board. With lots of pockets for pens, keys, mail, notes, and more, this board will help you stay organized during the busy back-to-school season!
Primary TechniqueFabric Crafts

Materials:
- One 18” x 24” On-the-Grid Foamology Tile
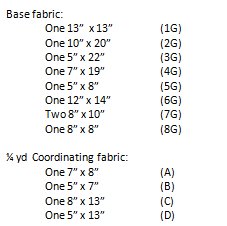
- 2 yds base color fabric- (pieces 1G-7G) (we chose Gray)
- ¼ yd coordinating fabric (pieces A-D)
- 8” x 10” coordinating fabric (piece E)
- 12” x 20” coordinating fabric (piece F)
- 12” x 16” coordinating fabric (piece G) (we chose Batiks)
- Cutting tool – you can use Scissors, Pinking Shears or a Rotary cutter and mat.
- Quilting ruler
- Glue Gun
- Tacky Glue or Fabric Glue (optional)
- Butter knife
- Iron and Ironing Board
- Embellishments (optional)
- Diagram 1
- Diagram 2
Cutting Instructions:
Use pinking shears to cut the fabric with clean, fray free edges.
- You are working on a 3” scored grid. Not every groove will be used to create this project. In diagrams, grooves are indicated as dashed lines; Tucking is indicated by heavy black lines or heavy dashed lines.
Instructions:
Base
- Refer to diagram 1 and cover entire panel with base fabric to form base blocks, the lining for the pockets and picture frame.
- Working from the center out, position fabric piece on soft foam and tuck into grooves with a butter knife. Secure with a line of glue to make it permanent.
- When wrapping fabric around the foam to the back, fold the fabric as you like around the side, then secure on the stickybase™
- It’s best to peel back stickybase liner from edges as you work – DO NOT remove entirely until you are ready to mount to the wall.
- Use a glue gun on the back corners to secure fabric in place.
Picture Frame (A-D) – (refer to diagram 2)
- Fabric A (7x8) - Fold the 8 inch edge down two inches and press to make a clean edge. Place the folded edge two inches from the side edge and centered left to right. Tuck and wrap around to adhere to back.
- Fabric B (5x7)- Fold the 5 inch edge down two inches and press. Place the folded edge two inches from the groove and center left to right. Tuck bottom edges in the grooves.
- Fabric C (8x13) - Fold the 8 inch edge down two inches and press. Place the folded edge two inches from the left side leaving one inch to tuck on the bottom. Tuck and wrap around to adhere to back.
- Fabric D (5x13)- Fold the 5 inch edge fabric down two inches and press. Place folded edge two inches from the right side groove. Tuck and wrap around to adhere to back.
Pocket (E-G) – (refer to diagram 2)
- Fabric E (8x10) – Fold the 10 inch edge down two inches to form the top of pocket and press. Refer to diagram 2 and lay over the base fabric making sure the top lines up. Tuck three sides to form a pocket and secure with glue in the grooves.
- Fabric F (12x20) – Fold the 12 inch edge down two inches to form the top of pocket and press. Refer to diagram 2 and lay over the base fabric making sure the top lines up. Starting from right, tuck fabric into each groove. Wrap remaining around to adhere to back and secure with glue in the grooves.
- Fabric G (12x16) – Fold the 16 inch edge down two inches to form the top of pocket and press. Lay the fabric on top of the base square making sure you line up the top and have one inch of fabric to tuck in on the left and about three inches extra on right and the bottom. Tuck fabric in groove and wrap fabric around to adhere to back. Secure with glue in the grooves.
- Attach to wall where desired.
Read NextModern Labels for Spice Tins