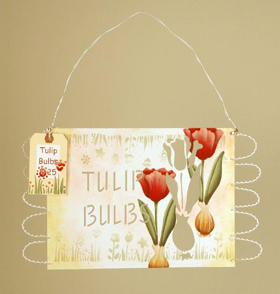
Spring Tulips Sign
With pretty stencils and light colors, this painted wooden sign from Delta Creative will brighten up your home for spring. This is an intermediate project with a free painting pattern.

Materials:
-
Delta Creative Ceramcoat® Acrylic Paint
- Moroccan Red 2552
- Oyster White 2492
- Coral 2044
- Adobe Red 2046
- Wedgewood Green 2070
- Moss Green 2570
- Roman Stucco 2581
- Gamal Green 2120
- Brown Velvet 2109
- Satin Exterior/Interior Varnish 7003
- Faux Glaze Medium 5401
- Delta Creative® Sobo Glue
- Delta Creative Stencil Mania™ -Row of Flowers 97 956 0308
- Delta Creative Stencil Magic® 1/4” Stencil Brush 983000008
- Spray Adhesive
- Tin Tulip Bulb sign #02-2018 (Available www.dcccrafts.com)
- One shipping tag craft stores or office stores
- One sheet of white cardstock
-
Loew-Cornell La-Corneille Golden Taklon Brushes
- Series 7300 Shader #8 and 12
- Series 7050 Script Liner #1
- Series 7350 1” Wash Brush
- Series 7500 Filbert #4
- Stylus
- Transfer paper
- Tracing paper
- Palette paper
- Water container
- Scissors
- Paper towel
- Free Painting Pattern
Instructions:
When stenciling it is always a good idea to have one brush for each color. When you wash the brush it becomes full of water and does not stencil as nicely.
Background:
- Using a soft cloth pick up a small amount of Faux Glaze Medium Clear and then a small amount of Roman Stucco lightly rub at each end of the piece. Allow to dry and then repeat process randomly rubbing here and there with Coral.
Stenciling:
-
Apply spray adhesive to Row of Flowers stencil allow to dry, pat off excess spray with paper towel. Press firmly in place 1/2” up from the bottom edge. Using 1/4” stencil brush, pick up small amount of Moss Green pat on palette to remove excess color. Using straight up and down motion pat over open areas of stencil. Repeat as many times as needed to go along both upper and lower edges.
-
Tip: Applying two thin coats is preferable; applying to heavily will cause color to bleed under edge of stencil. Cover open areas of stencil not in use with low-tack painter’s tape so unwanted color does not appear.
Transferring Pattern:
-
Lay tracing paper over pattern and trace all lines except those used to denote shadows. The shadow lines are generally short straight lines and several of them. Main lines are where there are color changes. Detail lines are facial features, patterns on fabric, and etc. Lay tracing on surface and tape at top and on one side. Slide graphite paper between tracing and surface with the dark side down; draw over the main lines only. Do not add the detail lines these will be applied after the basecoating is done.
- Apply pattern.
Leaves:
-
Basecoat the tulip leaves using the #8 shader and the stem using the #1 liner all in Wedgewood Green. Float the shadows along the bottom edge and through the center of the leaf in Gamal Green using the same brush.
-
Float the highlights along the upper edge and through the center of the leaf with Moss Green using the #8 shader.
- Tip: to float load brush first in floating medium or water, pat off excess on paper towel. Dip one corner of brush in color, blend color through bristles using short back and forth motion on palette. Color should graduate from heavy color on one corner to no color on opposite corner. If when you begin to paint, you have color showing from both sides of brush, it is improperly loaded. Rinse and start again.
Bulbs:
-
Basecoat the bulbs in Roman Stucco using the #12 shader.
-
To float the shadows using the same brush, start at the bottom of the bulb and pull up in Brown Velvet allowing it to streak.
- Using the same brush float the highlights starting at the top of the bulb and pulling down in Oyster White plus a touch of Roman Stucco allowing it to streak.
Tulips:
-
Basecoat the tulips in Adobe Red using the #12 shader.
-
Referring to the color picture float the shadows that create the divisions in the petals in Moroccan Red using the #12 shader.
-
To reinforce the shadows add a small touch of Gamal Green to the Moroccan Red and float at the base of the tulip.
-
Float the highlights in Coral starting at the top of the petal and pulling down using the #8 shader.
- Add a touch of Oyster White to the Coral to reinforce the highlights.
Tag:
-
Print the “tulip bulbs $.25” on white cardstock. Trim and glue in place on the shipping tag.
-
Using the Row of Flowers stencil repeat stenciling process in the following colors:For the leaves pick up Moss Green on one half of the brush and Wedgewood Green on the other half, pat on palette to slightly blend the two colors and then pat on stencil going over just the leaves. For the flowers pick up Coral on one half of the brush and Moroccan Red on the other half, pat on palette to slightly blend the two colors and then pat on stencil going over just the flowers.
- Using stylus create accent dots in Coral or Moroccan Red.
To Finish:
- Apply as many coats of Satin Exterior/Interior Varnish to the tin only do not varnish the tag.
Read NextDecoupaged Clay Pot