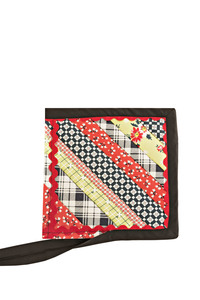
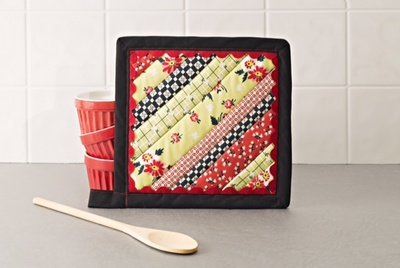
Aunt Betty's Strip Pieced Potholder
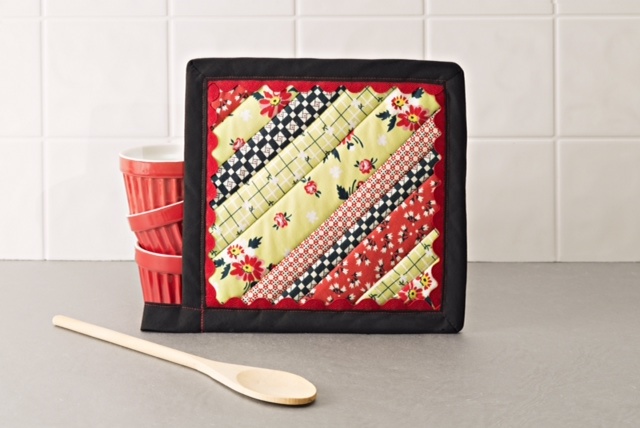
Free easy sewing patterns have never been this colorful or fun to work with. Create your own version of Aunt Betty's Strip Pieced Potholders using fabric and rick rack. This piece will look great in a kitchen or hung on a hook. The warm colors and colorful look is both eye-catching and serene, just like an afternoon in the country. If you don't have an Aunt Betty to make you a potholder, you can make your own DIY sewing projects and say it was her handiwork. People won't believe you made this fabulous piece all by yourself.
Primary TechniqueSewing

Sewn byBoth Hand and Machine
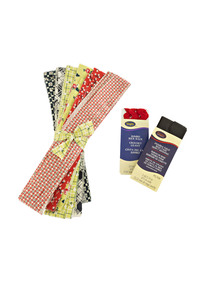
Materials:
- 10” strips of fabric in varying widths (1” to 2”) – approximately twelve strips
- Backing fabric – one 9” X 9” square
- Insulated Fleece – two 9” X 9” squares
- Wrights Jumbo Rick-Rack – one package
- Wrights Double Fold Bias Tape 7/8” wide – one package
- General sewing supplies
- Rotary cutter and mat
- 9-1/2” Square Acrylic Ruler
Instructions:
- Layer the 9” backing square right side down with the two 9” insulated fleece squares on top. Pin-baste the three squares together.
- Place one strip of fabric right side up on top of the fleece, diagonally across the middle.
- Place a second strip of fabric on top of the first strip right sides together aligning one long edge. Stitch the long common edge of the strips with a 1/4” seam. Flip the second strip over and finger press along the seam.
- Continue aligning, stitching, and flipping strips until the entire square is covered with strips.
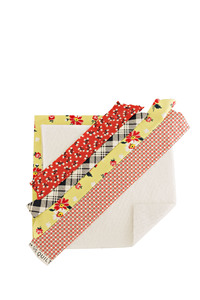
- Trim the strip-pieced square to 8-1/2” x 8-1/2”.
- Cut four 8 ½” long pieces of jumbo rick-rack. Place the rick-rack ¼” from the edge along each of the four sides of the strip-pieced square and baste. Note: Make sure the rick-rack is placed so that it will peek out from under the bias tape.
- Place the bias tape over the edge of the square, encasing the raw edge. At the corners, fold the bias tape so that it creates a mitered corner. Stitch the bias tape on all four sides of the square. Hand stitch the mitered corner seams.
- Optional: Create a hanging loop with the bias tape. Begin applying the bias tape at one corner. After stitching the bias tape on the last side, leave a 5” length at the corner to create the hanging loop. Stitch the long edges of the bias tape together and fold it in half, stitching it down on the back side of the potholder.
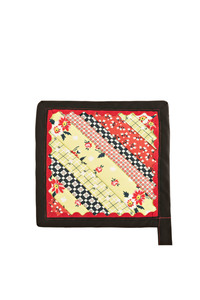
Finished Size: 8-1/2” Square
Your Recently Viewed Projects
Thanks for your comment. Don't forget to share!
flowergirl
Jul 23, 2018
When you have different sized strips of fabric lying around and you don't know what to do with them them try making this. It's very colourful and depending on what colour fabric you have, the results are going to be different. Love that the sewing instructions are very simple and won't take up so much time. If you want to hide a boring terra cotta pot then this is how you do it.
Marilyn B
Jan 14, 2017
This is a different approach to sewing pieced work, and I love it! I would have sewn the strips together until they were one piece, put right sides together, sewn with a turn out space, as the traditional way. This is so much easier and faster too! Thanks for sharing, can't wait to try it! Love the color combinations too, and a good way to use pretty fabric scraps, where you only have slivers left!
lpalmer59 7490208
Jun 23, 2016
This would be a great project to do with my granddaughters on a rainy afternoon. I would get some quality time with them and they would get to learn something I have wanted to teach them form some time now. Moreover, in the end, they would have a great present to give to their mom.
Ask93 7929298
May 11, 2016
I am always on the lookout or searching for projects that will help me use up my scraps of fabrics, and this does fit the bill. I like the colors too. My challenge comes when it is time to sew on the seam binding and the ric rac. Do you have any tips to make that part easier.
READERWOMAN 218688 9
Apr 09, 2015
Lovely pattern, can't wait to try it - but I sure wish you would offer printable patterns!
Report Inappropriate Comment
Are you sure you would like to report this comment? It will be flagged for our moderators to take action.
Thank you for taking the time to improve the content on our site.