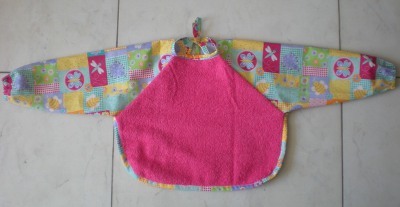
Terry Cloth Baby Bib with Sleeves
This adorable baby bib from Cecilia Jorcin addresses dining messes. The terry cloth body is lined with waterproof fabric the sleeves protect clothes from stains. With all the cute cotton fabrics to choose from, this is a baby bib that everyone will love.

Materials:
- Cotton fabric
- Terry cloth fabric or towel
- Waterproof fabric (material that doesn't allow the liquid go through to the other side)
- Two 5" pieces of 1/4"- to 3/8"-wide elastic
- Thread
- Sewing machine
- Safety pins
Instructions:
- Download patterns and cut the pieces according to the patterns.
2 cotton sleeves
1 terry cloth fabric front piece
1 waterproof fabric front piece for the inside
1 strip of cotton fabric of 45" x 1 1/2" (binding for the edges)
1 strip of cotton fabric of 24" x 1 1/2" (binding for the neck and ties to tie)
- Place the terry cloth piece and a sleeve on a table, right sides together, and then place the waterproof fabric piece on top, with the wrong side of the sleeve facing the right side of the waterproof piece.

Do the same with the other sleeve.

- Sew along both edges with straight stitch and reinforce with a zig-zag. Turn it right side out so that the seam is sandwiched between the two body pieces.

- Align each sleeve and sew with straight stitch from wrist to armpit.

- Take the strips of fabric and make the two bindings. You won't need to finish the ends of the longer binding, but you will need to finish the ends of the shorter binding since it will be used for the tie at the neck.
To finish the ends, cut the ends in a V shape.

Fold and iron both tips, wrong sides together.

To make the binding, fold 3/8" over on one side, wrong sides together, and iron.

Fold 3/8" over on the other side and iron. The long edges should meet in the middle.

Fold on the middle and iron.

- Place the longest binding all around the edges of the bib except in the neck. With right sides together and aligning the edges, sew the binding and body together with a straight stitch. Make short clips in the seam allowance around the curves.

- Then fold the binding inwards...


... and sew along the edge.

- Mark the center point of the short binding. Mark the center point of the neck opening on the front pieces. Aligning the center marks and having right sides together, sew with a straight stitch.

Then fold the binding inward and sew along the edge.
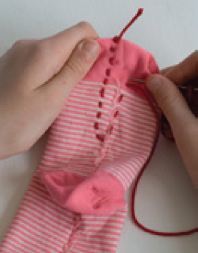
- Turn the sleeves wrong side out. To form a casing, turn under 1/4" and then 1/2" again along the wrist.

- Sew along the folded casing edge with straight stitch, leaving a 3/4" opening.

- Attach a safety pin on one end of a 5" piece of elastic and pass it through the casing until you reach the opening again. When you work with short pieces of elastic, you may want to pin the other end to the fabric.

- Pull both ends of the elastic, Overlap the ends and sew with a zig-zag stitch.

- Close the opening with a straight stitch.
- Done!!
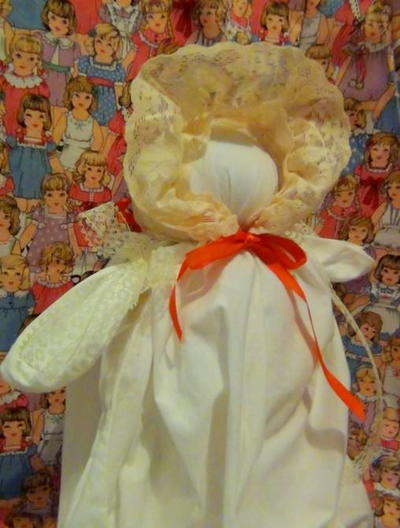
Read NextVintage Handmade Handkerchief Doll
Your Recently Viewed Projects

Thanks for your comment. Don't forget to share!
len10pin
Apr 19, 2017
This is such a great idea. I've never seen a bib with sleeves. I've got to make some of these for baby shower gifts!
mulberrygalprinces s
Dec 15, 2016
This is so neat and although I don't sew my daughter in law does so I will pass this on to her. She has twin baby boys and this will come in handy for sure. Thank you so much for offering it and for free.
JennyBee1
Aug 22, 2011
@bcockbain 7826336, Our projects are all user-submitted; we suggest contacting the original designer for specific questions regarding the sizing. Here is a link to her blog, where hopefully you can find her contact information. http://soteitei.blogspot.com/ --Editor of FaveCrafts
65sheshe
Sep 29, 2010
Did anyone notice that the waterproof cloth was on backwards or was it me. I used a flannel backed outdoor tablecloth and when i followed the directoins the plastic was outside the bib. i would think the plastic should go on the inside and the flannel on the outside so the baby wouldnt stick to the bib. thanks,victoria
Crafter 0798243
Aug 02, 2010
I printed the pattern out and didn't have any problems. I did scale it down to 100% as it was at 130%. Hope this helps you.
Cecile82
Jun 21, 2010
Hi! I have uploaded a new pdf file with the pattern on http://www.scribd.com/doc/30899642/Bib-Pattern, I have made smaller pieces to make it fit better this time, I didn't try the to print it though. I hope it helps!
SpinninJenny
Jun 20, 2010
I had a problem printing out the sleeve patterns. The wrist portion of the pattern was out of the print field and all I got printed was a diagonal line. Could someone measure the long sleeve line and the wrist line on both sleeves and post them here or email me, so I can make this? I could guesstimate and hope it is OK.
M4rt0n
Jun 17, 2010
What a great idea: No more stains on the sleeves, no more washing two sets of baby clothes each day! This will help a lot of people. Thanks Cecilia!
Report Inappropriate Comment
Are you sure you would like to report this comment? It will be flagged for our moderators to take action.
Thank you for taking the time to improve the content on our site.